Group messaging

Group messaging facilitates communication in group work scenarios. If managers have activated group messaging for the respective groups, group members can use it to exchange messages.
The messages in a group chat are visible to all participants of the group and each participant has the possibility to write his/her own messages in the group chat.
1. ".'="" }"="">Activate group messaging
2. ".'="" }"="">Participants of group messaging
3. ".'="" }"="">Display and write group messages
4. ".'="" }"="">Managing options for group messaging
Note
In order to be able to use group messaging, it must be activated for the respective groups. Managers must activate the option "Group messages" when creating a group ("Create group") via the participant administration. Group messages can also be activated later for existing groups.
- Call up the participant administration on the left in the navigation bar via "Participants".
- Click on "Groups".
- Select a group and click on "Edit group".
- Activate "Group messaging".

- Save the settings with "Save changes". After activating, the group appears in the messaging window in the category "Group".

2. Participants of group messaging
The assignment of participants to a group chat is based solely on Moodle groups. All people assigned to a Moodle group can exchange messages with each other once group messaging has been set up. If a person is to be added to or removed from the group messaging, managers must add or remove them from the Moodle group.
Note
A person can be part of several group chats, e.g. if a person is assigned to several groups and the group messages have been activated for each of these groups.
It is not possible to group messaging for groups across different course rooms. Since the composition of the participants in a group chat is based on the Moodle groups to be created in advance, all persons who are to form a group chat must be enrolled in the same course room.
3. Display and write group messages
By clicking on the desired group chat, you can access the chat history and write and send messages. Accepting a contact request as a prerequisite for being allowed to send messages to each other is not necessary for group messages.

4. Managing options for group messaging
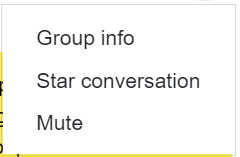
- If you want to know the names of the other group members or mark the group chat as a favorite, click the three dots
 to the right of the group name above the chat history.
- A context menu will open, offering you several selection options.

- Group info - all other group members will be displayed.
- Mark communication as favorite - If you select this option, the group chat will be marked as favorite by a star icon
 and moved from the previous "Group" category to the "Starred"
  category. This can simplify access to particularly frequently used group chats.
 - Mute - By default, the speech bubble icon displays every incoming message. If you do not want new incoming messages of certain chat history to be displayed by the bubble icon
 , select this option. You can recognize a muted chat by the icon
  . The mute can be undone at any time in the same way as it was activated ("Remove mute").

