


Solution overview (Grading Table)

RWTHmoodle provides graders for each assignment a tabular overview of all students and their submissions for each assignment. The table shows, among other things, the status of the submissions, the submission and feedback files, and enables the start of the grading.
For this activity, you can use Tagging (Tags).
- Call up submission overview
- Submission status
- Filtering submissions
- Sending a reminder for missing submissions
- Download all submissions
- Allocate submissions to particular markers for grading
- Lock submissions
- Allow submission changes for editing
- Revert the submission to draft (submission button)
- Overriding assignment deadlines (Due date)
1. Call up submission overview
RWTHmoodle provides graders for each assignment a tabular overview of all students and their submissions for each assignment. You can access the overview this way:
- Click on the name of the assignment on the course page.
- Click on "Submissions".
2. Submission status
In principle, the assignment overview contains all students in the course room, regardless of whether they have submitted a solution for the assignment or not. However, the column "Status" shows in which status the submission is. Customized submission deadlines for individuals or groups are also displayed here.
For example, if you have configured the assignment so that students must press the submit button to submit a submission for grading, then you will see for individual students whether they have already created a submission, whether the submission is still in draft status, or whether it has already been submitted for grading.

3. Filtering submissions
Graders can filter the submission overview. To do so, click on "Status" above the table. Here you can filter the table by the following criteria:
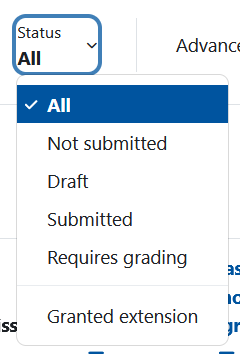
- All
- Not submitted
- Draft
- Submitted
- Requires grading
- Granted extension
If you have activated the marking workflow when configuring the assignment, you can additionally filter the submissions according to the status of the marking workflow using the workflow filter under "Advanced" above the table on the right. There, you will find all options in the "Marking state" menu.
If you have activated the group mode "Separate groups" or "Visible groups" in the task settings under "Common module settings", a drop-down menu will also appear above the submission list that lists all groups available in the course room. If you have selected an additional grouping when activating the group mode, the drop-down menu will only show the groups of this grouping. You can use the menu to filter the delivery list by group.
4. Sending a reminder for missing submissions
You can send a message to several students at the same time, for example to remind them of a missing submission. Select the students in the list you want to contact and in the drop-down menu "With selected", above the submission list, click on "Send a message".
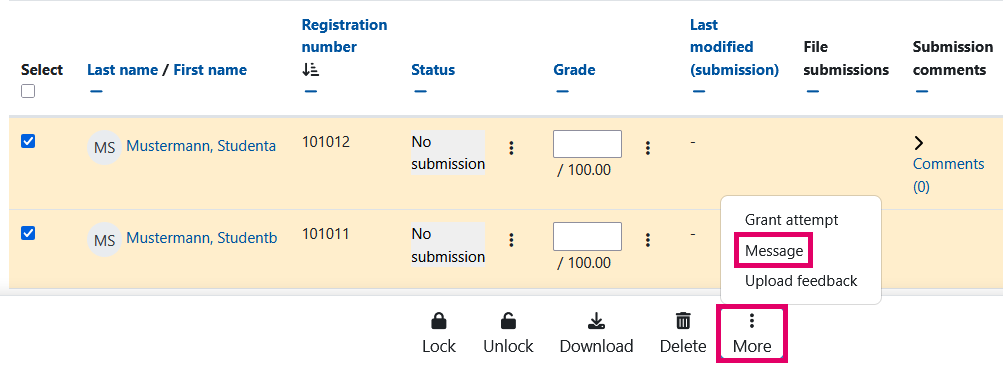
A window opens in which you can enter the message.
5. Download all submissions
If "File submissions" is selected as the submission type in the assignment settings, graders can use the "Download All Submissions" option in the "Actions" menu at the top right of the page to download the submitted files as a ZIP archive and grade them offline. This won't work when using advanced grading methods or if files were submitted via access-controlled links in Sciebo.
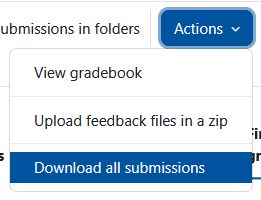
Alternatively, you can also download the submissions using an API function. For more info please read the manual for Grading Assignments, section 4.2. Download submissions via API.
6. Allocate submissions to particular markers for grading
If you want to allocate the grading of the submissions among several graders, use group submissions and assign specific groups to individual graders. The graders can then filter the submission overview according to the groups assigned to them. To do this, the "Groups" option must be set to "Visible groups" or "Separate groups" when configuring the assignment under "Common module settings". In addition, the appropriate grouping must be selected. See the instructions for Group Assignments.

Note
Alternatively, you can use the marking workflow (see Adding an Assignment). In this mode, you can assign each submission to a grader. This approach is particularly suitable if the expertise of different people is required for the grading.
7. Lock submissions
Before you start grading after the submission cut-off date, switch to "Prevent submission changes" for all students in the "Edit" column.
- Select several/all students in the "Selection" column.
- Then, below the table, in the menu bar at the foot of the page, select "Lock".

This step is only necessary if you have defined the submission deadline using the "Due date" setting when configuring the assignment. Only then can students continue to work on their submission after the deadline has passed. On the other hand, this step is not necessary if you have defined the deadline as the date of the last possible submission. In this case, the submissions are automatically blocked for further processing.
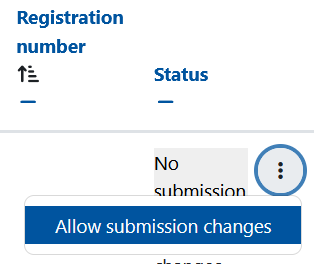
8. Allow submission changes for editing
Likewise, you can release the submission for editing again by selecting the "Allow submission changes" option.
To release an individual submission, proceed as follows:
- Search for the correct submission in the table and click on the three-dots in the status column to open the menu.
- Select the option "Allow submission changes".
To release multiple submissions at once, proceed as follows:
- In the "Select" column, select all students whose submissions you want to reset to draft status.
- Then, below the list of submissions, at the foot of the page, click on "Unlock" and confirm the action.

9. Revert the submission to draft (submission button)
If you have set the assignment configuration to require students to press the submit button, you can reset solutions submitted for grading back to draft mode so that these students can revise their submissions.
To reset an individual submission to draft status, do the following:
- Find the correct submission in the table and click on the three-dot menu in the “Status” column.
- Then, select "Revert the submission to draft".
To reset multiple deliveries to draft status at once, do the following:
- In the "Select" column, select all students whose submissions you want to reset to draft status.
- Then, below the list of submissions, in the menu bar, click on "More". A menu opens.
- Select "Revert to draft" and confirm the action.
If in the configuration of the assignment in the section "Submission settings" the setting "Attempts reopened "is set to "Automatically until pass" and a grading below the pass limit is entered, then the submission will automatically be reset to draft mode as soon as the grading is saved. The same applies if the setting "Attempts reopened" is set to "Manually" and the grader sets the setting "Allow another attempt" to "Yes" in the grading table.
10. Overriding assignment deadlines (Due date)
If a submission deadline (due date) has been set in the assignment configuration, then managers can extend it for individual students or groups.
- In the Selection column, select all students whose submissions you want to reset to draft status.
- Then, below the submission list, click the drop-down menu next to "With selected..."
- From there, select "Grant extensions" and click the "Go" button.
- Select the new submission dates and click "Save Changes".
