Provide individual Zoom links for video-monitored online remote exams

Examiners can use the course rooms for pre- and post-examination preparation, among other things, to provide individual zoom links for video monitoring and cheating control during an online remote examination. To do this, use the option in the Grades section to upload a CSV file with the links and assign them to students individually. You can also use the procedure for other information such as random codes to be appended to the display name when entering the Zoom meeting to help identify participants. For face-to-face exams, for example, you can use the procedure to provide students individually with information about the lecture hall in which they are writing their exam.
1. Create CSV spreadsheet with Zoom links
2. Upload CSV list to grades section
2.1. Create grading category
2.2. Add grade item
2.3. Upload zoom links
2.4. Check the display
2.5. Display grade
1. Create CSV spreadsheet with Zoom links
Create a CSV file with the links of the Zoom meetings to which the students will be assigned for video monitoring. In addition to the links, the file must contain the students' registration numbers to enable identification of the students and the correct assignment of the links when uploading the list to the course room.
Therefore, use the gradebook setup of the course room as a basis. You can export this list as an Excel file.
- Open the course room.
- Open the "Grades" on the left in the navigation bar. You will now see the "Grader report" with all the results of all participants on graded activities in the course room.
- Click the "Grader report" drop-down menu at the top of the page.
- Scroll down the drop-down menu to the "Export" section. Here, select the "Excel spreadsheet" option.

- In the "Grade items to be included" section, deselect all grade items.
- Then click on "Download". The download of the grading list in Excel format will then start automatically.
- Open the list in Excel. The exported list contains, among other things, the first and last names of the participants as well as their registration numbers.
- Add a column with the zoom links to the list.
- Save the customized list on your computer. Be sure to save the list as a CSV file, because the following import is only possible in this format.
2. Upload CSV file to "Grade" section
Similar to the announcement of exam results, for example, you can upload the list of zoom links in the Grades section of the course room. Students will only see the link assigned to them individually there.2.1. Create grade category
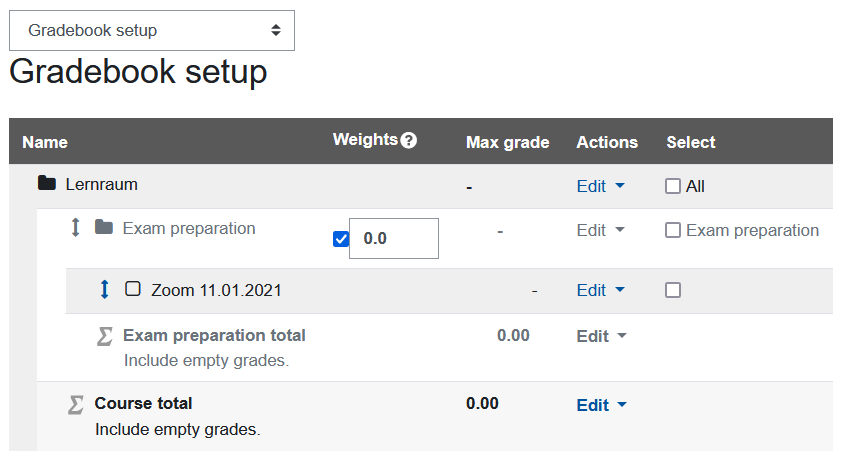
Video monitoring zoom links are provided through the grades section. To separate them more clearly there from real grades such as preliminary exam results, you can create a new grade category before uploading if required. The graded item into which the zoom links will be imported will then be placed in this category. If you do not need this clearer separation, for example, if you do not provide the preliminary exam results via the course room, go directly to the next section 2.2. Create grade item.
- In the course room, access the "Grades" section in the navigation bar on the left. You will now see the "Grader report" with all the results of all the participants on graded activities in the exam room.
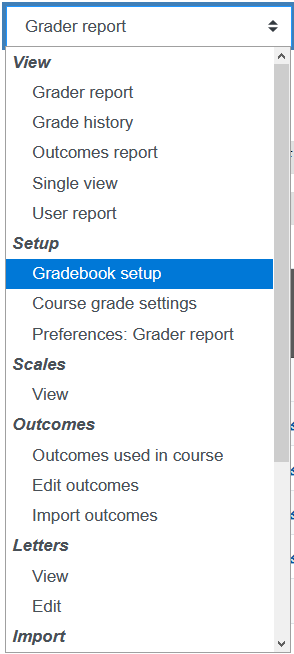
- Click in the "Grader report" drop-down menu and select the "Gradebook setup" option in the "Setup" section there.
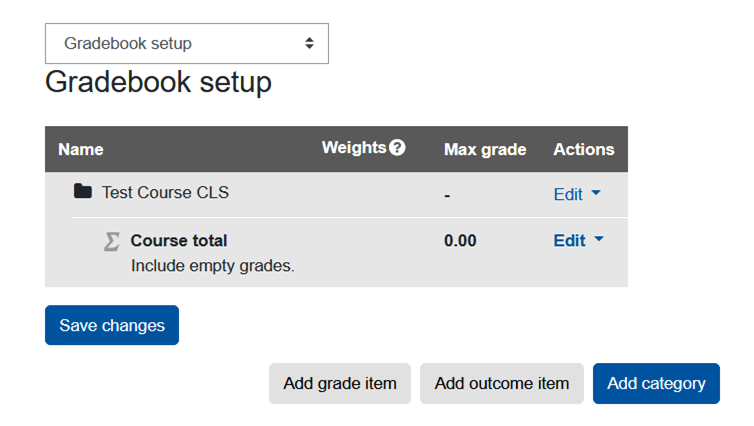
- In Setup, click the "Add Category" button below the displayed list.
- Give the category an appropriate name, for example, "Exam Preparation".
- In the "Category total" section, select the "Hidden" option.
- In the "Parent category" section, select the "Weight adjusted" option and set it to the value 0.
- Leave all other settings and click "Save changes".

- You will now return to "Gradebook setup" and see the newly created grade category in the overview.

2.2. Add grade item
Once the grade category is created, you can create a grade item and assign it to this category. You can also repeat the steps for additional information, such as random codes to be appended to the display name when entering the Zoom meeting to help identify attendees.
- Starting from "Gradbook setup", click "Add grade item" below the overview.

- Give the grade item an appropriate name, for example, "Zoom Link <Date>".
- Select "Text" as the grade type.
- If you want to hide the grade item initially, activate the corresponding option. You will then need to manually make the grade item visible to students later.
- Alternatively, you can also use the "Hidden until" option under "Show more" in combination with a date to make the grade item visible automatically with the random codes.

- In the "Parent category" section, select the grade category you created in section 2.1. If you did not create a separate category, go to the next step.

- Save the new rating aspect with "Save changes".
- You will be taken back to the "Gradebook setup" where you will see the newly created grade item.

2.3. Upload Zoom links
Now the CSV file with the zoom links can be imported.
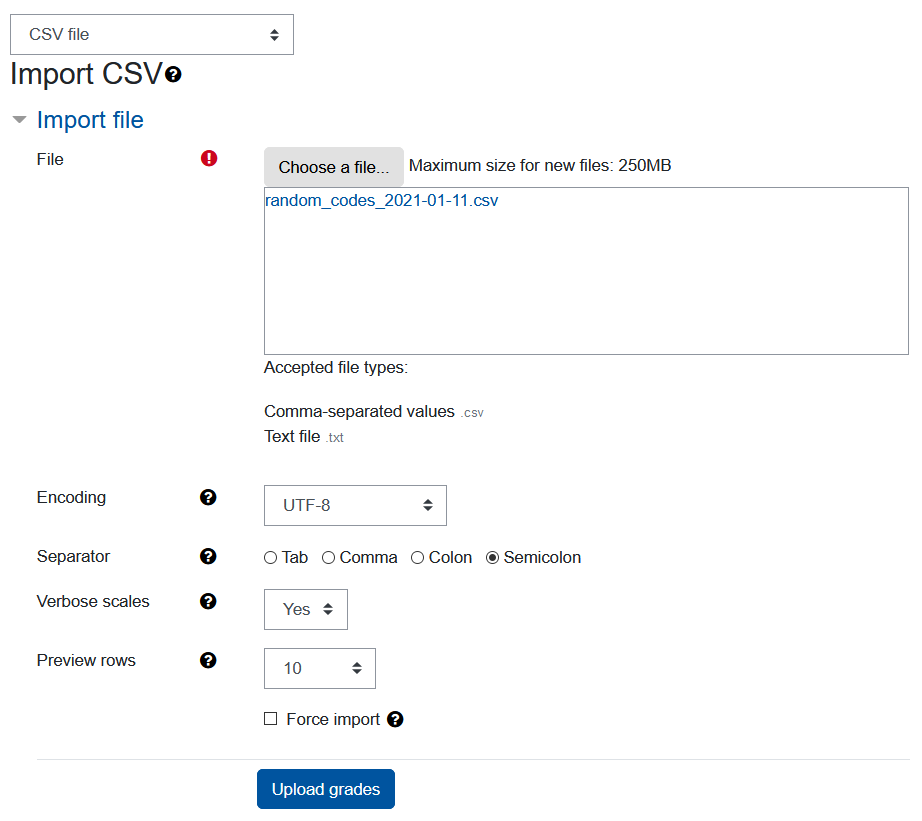
- Click in the "Gradbook setup" drop-down menu and select the "CSV file" option there in the “Import” section.

- Drag and drop the prepared file into the "File" upload field.
- Leave the encoding at UTF-8.
- Select the appropriate delimiter that was used in the file. In German Excel, this is a semicolon. In English Excel, it is a comma.
- Keep the other settings and click "Upload grades".
- You will then see an import preview. Select the column with the student number from your CSV file for "Map from".
- For "Map to", select the option "Registration number".

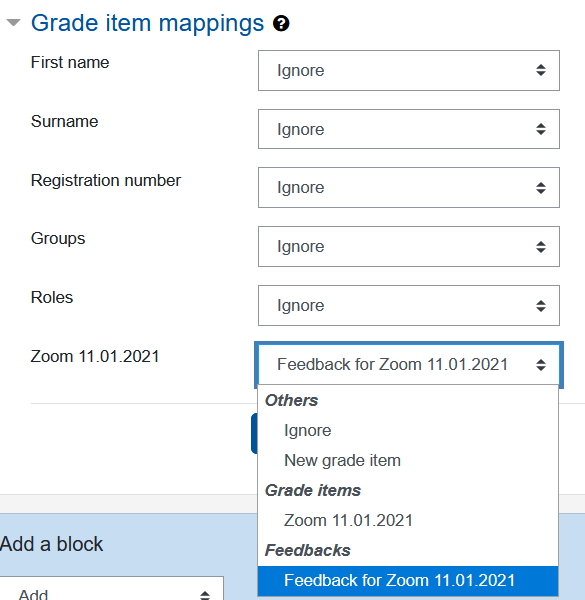
- Then, in "Grade item mappings", leave all settings at "Ignore" except for the column with the random codes.
- For this column, click the Ignore drop-down menu. In it, scroll down to the "Feedbacks" section and select the appropriate "Feedback for <Grade item name>" entry. ATTENTION: Be sure to select "Feedback for <...>", otherwise the mapping will be incorrect and errors may occur.
- Then click on "Upload grades".
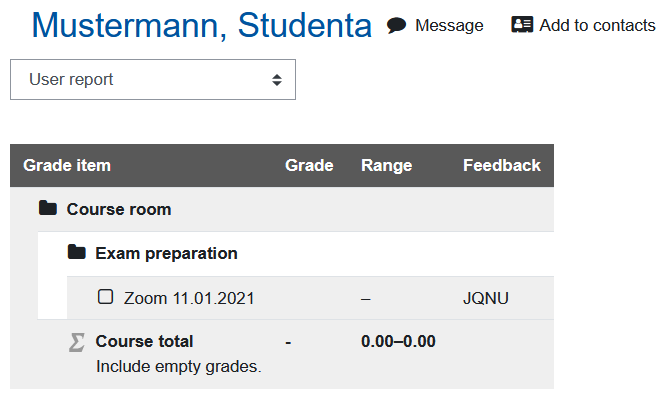
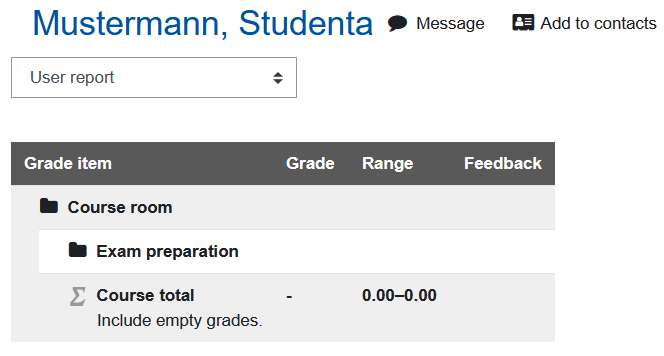
- The grades can now be viewed in the "User report" of the grades in the "Feedback" column. Please note that the "Feedback" column is only displayed in the user report or the single view of the grade item, but not in the grader report.
2.4. Check the display
In the user report, you can view the grades from the student's point of view and from the manager's point of view.
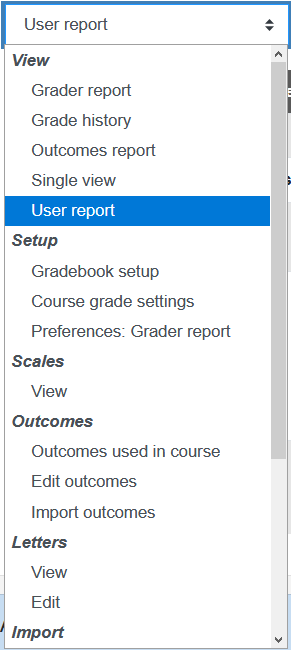
- To review the imported data, in the Grades section, click the drop-down menu at the top left and select the "User report" in the "View" section.
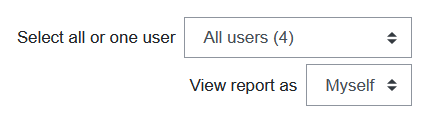
- Then, to the right of the table, select "View report as" to get the manager's view. This also contains hidden ratings.
- Then, to the right of the table, for "Select all or one user", select either "All users" or a single person who has been assigned a zoom link.
- The table shows the data of all users or the selected person according to the selection. If the grade item has been hidden, the corresponding row is grayed out.
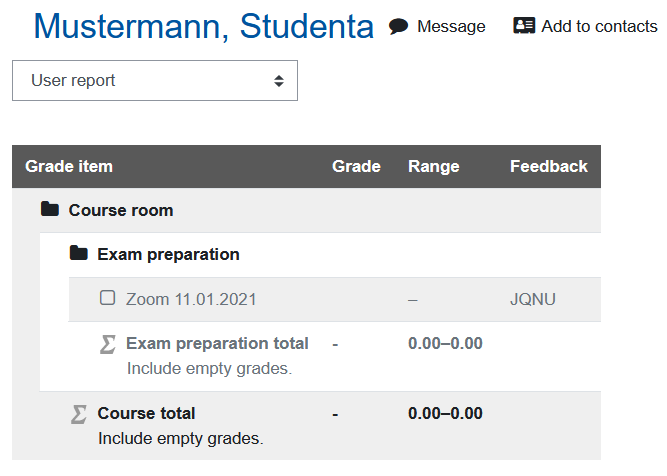
- At "View report as", change to "User". Now you will see the same report from the student's perspective. Grades hidden by date are listed in the grayed-out form. However, in the "Feedback" column, the imported zoom link is not displayed. If you have not hidden the grade item by date, but manually, the whole grade item will not be displayed.
2.5. Display grade
If you have set the grade item with the zoom links to be automatically made visible by date and time, students will see the item and its content from the defined time. If you have only selected the setting "hidden" when creating the grade item, you have to make it visible manually.
- Click in the "Grader report" drop-down menu and select the "Gradebook setup" option there in the "Setup" section.
- Click "Edit settings" in the "Actions" column for the desired grade item.
- Then select "Show".

- The previously grayed out (= hidden for students) grade item is now displayed in black font color and is thus visible to students.
- In the "User report" with the setting "User", the grade item is now displayed.