


Grading assignments

When students submit assignments, managers or tutors can grade them, i.e. they are graders. When they click on the assignment in the course room, the overview page with information about the assignments appears. Here you can see how many students are in the course, how many have submitted something and how many submissions need to be graded.
When they click "View all submissions," raters are taken to a table with all students and their submissions. The table contains columns with information about the student, status of the submission, grade achieved, link to the grading page, link to the submission, feedback comments, and feedback files (if enabled). From here, the "Grade" button can be used to start the grading process.
When they click on the "Grade" button, the first person's submission from the overview list will be displayed to the grader and can be graded. By clicking on the button "Save and show next" further persons can be graded.
- Quick grading
- Advanced grading page
- Annotations in PDF submissions and online text submissions
- Offline marking
- Informing students about their grading
1. Quick grading
Quick grading allows graders to enter grades directly into the table of all submissions. However, please note the following:
- If you want to provide additional feedback (as a comment or feedback file), you must use the advanced grading page.
- Quick grading does not work together with advanced grading methods, such as rubrics.
- Quick grading is unsuitable if a submission is to be graded by more than one person.
- Entries in the "Submission Comments" column are private communication between students and graders. They are visible immediately after saving. For detailed feedback, graders should use the advanced rating page instead.
You can activate the Quick grading as follows:
- Click the assignment on the course page.
- Click on the link "View all submissions". The submission overview (grading table) will appear.
- Below the table, you will find an Options section. Here, select the "Quick grading" checkbox. In addition, you can also specify here how many assignments per page are displayed and filter for students who have submitted something or for whom grading is required
- If the quick grading is activated, you can enter the respective gradings and submit comments directly in the table. Don't forget to click the "Save all quick grading changes" button below the table at the end. A message will appear that the changes have been saved.
2. Advanced grading page
The advanced grading page is a page where you can view and grade a single person's submission. In blind marking mode, graders see only an assignment-related participant ID here instead of a name. The elements that the page contains depend on the submission and feedback settings you chose when configuring the assignment.

On the advanced grading page, you can:
- View submissions and submission comments
- Annotate and comment on the submission
- Enter feedback and set the status of the marking workflow
- Provide feedback as a comment or feedback file
- Switch to the submission of the next/previous students or specifically selected students
- Go to submission overview (grading table), go to assignment, edit assignment settings (gear icon
 ) or go to the course page.
Don't forget to save all annotations, gradings, and comments via "Save changes"!
You can access the advanced grading page as follows:
- On the course page, click the assignment.
- On the next page, click the "Grade" button. Then the individual grading page of the person who comes first in alphabetical order of the participant list will appear.
- Alternatively, you can also select "View all submissions" and then click on "Grade" in the grading table for the desired person.
3. Annotations in PDF submissions and online text submissions
If students have uploaded a PDF file or if the submission type is "Online text" and the feedback type is "Comment inline", graders will see the submissions in a window where you can add annotations. These annotations can be entered as comments, highlights, and more. Once saved, all entries are visible as feedback to the students who submitted the solution.

Note
If files have been submitted as access-controlled links in Sciebo, the annotation of these files in RWTHmoodle will not work. These files must be downloaded individually, corrected offline, and the annotated files uploaded again as feedback files.
To ensure that students actually see all annotations, they must download and open the PDF. The preview view may not show everything.
3.1. Annotation tools
The annotation page menu bar contains a number of tools for creating annotations and comments.

These are from left to right:
 Next page/previous page: Go forward or back one page in the document
 Search comments: Search for comments in the document. When you click on search hits, you will be directed to the place where the comment is located (see below)
 Expand/Collapse all comments: Collapsed comments are represented by speech bubbles as placeholders. Expanded comments are displayed with the full text
 Rotate 90 degrees to the left or right: These two tools allow you to rotate the document if it was submitted in landscape format, for example.
 Comments and comment color: Click this button to create a comment. With the mouse pointer displayed as a cross, drag an area in the document and write your comment in the newly created field. Choose an appropriate color before creating a comment.
 Drag: Select the hand icon to change the position of the document
 Select: The arrow corresponds to the normal mouse pointer
 Pen: With this tool, you can write or draw freely in the document
 Line: Use this tool to draw a line in the document
 Rectangle: Frame an area in the document with a rectangular shape
 Oval: Frame an area in the document with an oval shape
 Highlight: Highlight text in the document with a highlighter
 Annotation color: Set the color for pen, line, rectangle, oval, and highlight
 Stamp: set a predefined shape as a stamp in the document using the left button. Before that, use the right button to select the shape of the stamp.
3.2. Reuse or delete comments
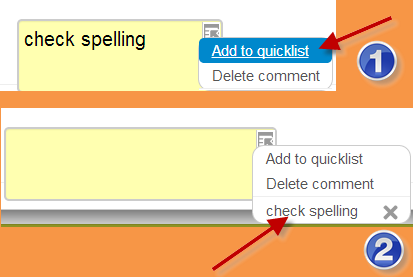
Comments can be stored and saved to be reused in another place (quick list, see No. 1).
3.3. Search for comments
- Click the search icon next to the page display in the toolbar to search for a saved comment (Accessing comments, see No. 2):
- In the search field, enter the comment phrase you are looking for.
- If you then click on the found comment, you will be directed to the place in the uploaded file where this comment has been used before.
3.4. Show/hide columns
The document column and the grading column can be shown or hidden by clicking on the corresponding icons at the bottom right of the page.
4. Offline marking
You can also grade submissions outside of RWTHmoodle in case you are using points or scales for grading. You cannot upload grades and feedback to Moodle if you have enabled Rubrics or Marking Guides.
To grade submissions offline, make sure that the checkboxes "Feedback as the comment", "Offline grading worksheet" and "Feedback files" are selected on the configuration page of the assignment in the section "Feedback types". Then proceed as follows:
- Download the submissions.
- Download the spreadsheet (grading worksheet) as a CSV file.
- Grade and annotate (if applicable) the submitted work.
- Enter the grades and additional feedback comments into the CSV file.
- Upload the completed CSV file.
- Upload the corrected submissions with your annotations (if necessary).
The above procedure is now described in detail.
4.1. Downloading student submissions
- Click on the assignment on the course page and then click "Show all submissions". The submission overview (grading table) will be displayed.
- Above the table, select "Download all submissions" from the "Grading action" drop-down menu and save the ZIP file containing all submissions.
- Unzip the ZIP file on your computer in a new directory (so that you can archive everything compactly in one ZIP-file again at the end).
Note
- If you have a large number of files or very big files, the ZIP file with the files may take too long to create and may crash. In this case, reduce the number of submissions you want to download and download them gradually.
- The option "Download all submissions" in the submission overview (grading table) no longer works if files were submitted via access-controlled links in Sciebo. The ZIP file with the submissions can then no longer be opened. These submissions have to be downloaded one by one.
4.2. Download submissions via API
Alternatively, you can download the submissions via an API function. You can reach the necessary information this way:
- Click on your name in the upper right corner and select the "Settings" option.
- Then click on "Security keys".
- In the security key table, you will also find the key for the "Moodle mobile web service".
- After clicking on "Documentation" behind the web service you will get to the list of API functions.
- To download the submissions you need the function "mod_assign_get_submissions". By clicking on the corresponding entry you will get the necessary code.
The tool MoodleBulkDownload developed at the Faculty for Architecture might help you with the bulk download via the API.
4.3. Download the grading worksheet
- Above the grading table, select Download grading worksheet from the Grading action drop-down menu.
- Save the CSV file to your computer. The grading worksheet contains all gradings, submission comments, and feedback comments that are already entered in the table.
4.4. Grading, annotating and adding feedback to submissions
- Open the downloaded submissions on your computer and grade them.
- Enter annotations into the submissions as needed.
- Save the files in the same location where they were previously unzipped, that is, in each student's directory. ATTENTION: When saving the annotated submissions and the feedback files, do not change the names of the locations of the directories under any circumstances. RWTHmoodle needs this data to upload the files correctly.
- If you want to give feedback as a feedback file, then create these feedback files and save them in the respective students' directories as well.
- Open the CSV file with the offline grading worksheet and enter the gradings and, if required, feedback comments for the students. Be sure to make the entries in the grading worksheet in the correct column/row. Leave all other content unchanged.
- Save the CSV file.
- Finally, put everything back into a ZIP file.
4.5. Upload the completed grading worksheet
- Click on the assignment on the course page.
- Click on the link "View all submissions". The submission overview (grading table) will appear.
- Above the table, select "Upload grading worksheet" from the "Grading action" drop-down menu.
- Upload the CSV file by dragging and dropping it into the upload field.
- Adjust the character encoding according to the encoding your spreadsheet program used when saving the CSV file.
- Choose a suitable separator, usually, this is a semicolon or a comma for English-language programs.
- With "Upload grading worksheet" you upload the file to the system.
- Finally, check that all gradings and feedback comments are displayed in the grading worksheet.
4.6. Upload feedback files/annotations
- Click on the assignment on the course page.
- Click on the link "View all submissions". The submission overview (grading table) will appear.
- Above the table, select "Upload multiple feedback files in a zip" from the "Grading action" drop-down menu.
- Upload the ZIP file you have created (see above under 4.4.).
- Finally, check that all feedback files are displayed in the grading table.
If you have an assignment where students do not submit files, then you will not have a zip file to download, and accordingly, you will not have a suitable directory structure in which to store your feedback files.
5. Informing students about their grading
5.1. Immediately after the grading
If you want to notify students individually immediately after the grading, then check the "Notify students" checkbox at the bottom of the individual grading page. RWTHmoodle will then send a notification as soon as the grading is saved. How students receive the notification depends on their personal settings for notifications.
5.2. Keeping grades hidden until a release date
If you want to keep grades hidden until a certain date (for example until all grades are available), then there are two options: the grader report of the course room and the marking workflow.
5.2.1. Grader report of the course room
This option is suitable if there is only one person marking and no special circumstances during the grading process.
- Click on "Grades" in the navigation menu on the left.
- In the drop-down menu at the top, select the "Grader report" option. An overview with all students and all grade items will appear.
- Click the "Turn editing on" button at the top right.
- In the column of the assignment whose grades you want to hide, click the gear to edit.
- On the next page, check the "Hidden" checkbox.
- If you want to make the assessments visible to all students later, return to this page and uncheck the checkbox again.
- Alternatively, click the "Show more" link and, in the "Hidden until" setting, specify a date until which the grading should be hidden from students.
- Finally, click the "Save changes" button.
You can notify students via announcements once the grades are unlocked. Note that hidden grades will not be included in the overall course grade.
5.2.2. Marking workflow
This method is particularly useful when multiple graders are involved in the grading process, or when special circumstances require grades to be temporarily hidden.
- In the configuration of the assignment, set the "Use marking workflow" setting to "Yes" in the "Grade" section.
- When the grading process is complete, click the assignment on the course page.
- Then go to the submission overview (grading table) via "View all submissions".
- At the top left of the table, check the "Select" box to select all students. (If you still want to hide the grading for individual students, then uncheck the respective checkboxes again).
- Below the table, in the "With selected..." drop-down menu, select "Set marking workflow state" and click the "Go" button. Click "OK" to confirm.
- On the Status page, select "Released" from the "Marking workflow state".
- If you want to notify students about their grading, set the "Notify students" setting to "Yes".
- Finally, click on the "Save changes" button.
5.3. Grading in "Anonymous submissions" mode
In the "Anonymous submissions" mode (also known as blind marking) the graders do not see the names of students who have submitted something. Instead, anonymous names "Student X" are displayed in the submission overview. This is also the case when submission comments are enabled.
However, anonymity is only guaranteed until the evaluation of the submissions is completed. This is because students cannot see their grades in the grader report of the course room until the names are revealed. If you use advanced grading methods such as rubrics, then the rubric will also be hidden in the student's view of the grades until the names are revealed. Feedback comments, on the other hand, are always displayed, regardless of whether the names are hidden or revealed.
To reveal the names after the grading is complete, do the following:
- Open the assignment.
- Click the gear icon in the upper right corner inside the white box. This will open the "Assignment Administration."
- Here, select the "Reveal student identities" option.
