Configuration of self-enrolment (managers)

Self-enrolment is an enrolment method in which students can enroll and unenroll from a course room independently and directly in RWTHmoodle. It can be used with or without an enrolment key, i.e. a password that has to be entered once when enrolling.
The enrolment method offers various other setting options with which, among other things, the time window for self-enrolment, the duration of participation, and automatic unenrollment in case of longer inactivity can be regulated.
Self-enrolment supports managers in managing participants, especially in course rooms independent of RWTHonline. However, it can also be used in parallel to the standard manual enrolment by managers and the automatic participant synchronization from RWTHonline.
The self-enrolment method can be activated by the RWTHmoodle administration on request. For this purpose, please contact the IT-ServiceDesk by email and state the name of the course room.
- Basic information on self-enrolment
- Set a key for self-enrolment
- Further configuration options for self-enrolment
- Check if self-enrollment is enabled in the course room

Note
The option for self-enrollment for a course room is set up by the RWTHmoodle administration on request. Managers can, however, specify the desired configuration for the self-enrollment when making the request. The configuration options are explained below.
Direct your request to RWTHmoodle support at the IT-ServiceDesk. Inform the support about the desired settings including the required data.
1. Basic information on self-enrolment
The self-enrolment method can be used in particular for course rooms that are independent of RWTHonline. Since the automatic synchronization of students from the RWTHonline registration procedures is not available in these course rooms, the participants must be administered manually by the managers. Self-registration can support the managers in this task. However, they remain responsible for data protection-compliant participant administration.
This means, especially in the case of permanently available course rooms, that participants may not remain in the course room indefinitely, but only until the purpose of processing their personal data has been fulfilled. Self-enrolment supports managers with the setting options "Enrolment duration" and "Unenroll inactive after" to (automatically) remove persons who should no longer belong to the course room but have not deregistered themselves from it within the set time limits.
In general, all persons with RWTH single sign-on accounts can use self-enrolment to RWTHmoodle course rooms.
However, by using an enrolment key (password), which must be entered for self-enrolment, it is possible to restrict who can enroll themselves in the course room. The enrolment key must then be made available to the target groups of self-enrollment in advance. Please note that the enrolment key can be passed on. It therefore only offers limited protection against unwanted enrolments.
The following explanations describe the main setting options. If you request to set up self-enrollment, please inform the IT-ServiceDesk of the desired settings.
2. Set a key for self-enrolment
2.1. Setting a course enrolment key
If only certain students should have access to the course room (and no one else), then assign an enrolment key. This is a course room-specific password that is needed to enroll in the course room and to deny unauthorized persons access to it. If no course key is assigned, any person with access to RWTHmoodle can enroll in the course room without entering a course key beforehand.
If you want to enter a course key for self-enrolment, please tell the IT-ServiceDesk the password you want to use. There are no specifications for the password to be assigned. In principle, a single letter or number is sufficient.
2.2. Setting a group enrolment key
If users are to be automatically enrolled into a group in the course via self-enrollment, then assign an enrollment key for groups. This group key then serves both as an enrollment key for access to the course room and for the automatic assignment of students to the correct group. Unlike the course key, managers can set the enrollment key for groups themselves. In this case, you as a manager must set an individual password via the group settings for each group in which self-enrollment is to take place.
Note
If you want to set group keys, proceed as follows:
- Inform the IT-ServiceDesk in which course room you would like to use group enrolment keys, stating the course number. In addition, inform the IT-ServiceDesk of a course key (= password) of your choice that is to be set for the entire course room. As soon as the IT-ServiceDesk has activated the self-enrollment including group enrolment, it will be available to you in the course room. As a rule, you will receive a notification by e-mail.
- Click on the "Participants" section in the navigation bar on the left to open the list of participants.
- Click on the "Groups" button to enter the group area.
- If you have already created groups and you just want to add the group key to them, select the desired group in the "Groups" field and then click "Edit group settings".
If you have not yet created any groups, click on "Create group". In this case, also note the associated instructions for creating groups via the participant administration.
Enter your desired password for the group enrolment in the text input field at "Enrolment Key". In contrast to the course key, whose composition does not have to follow any precise specifications, the group key to be assigned must be at least 8 characters long and contain at least 1 digit as well as 1 capital letter and 1 special character each.
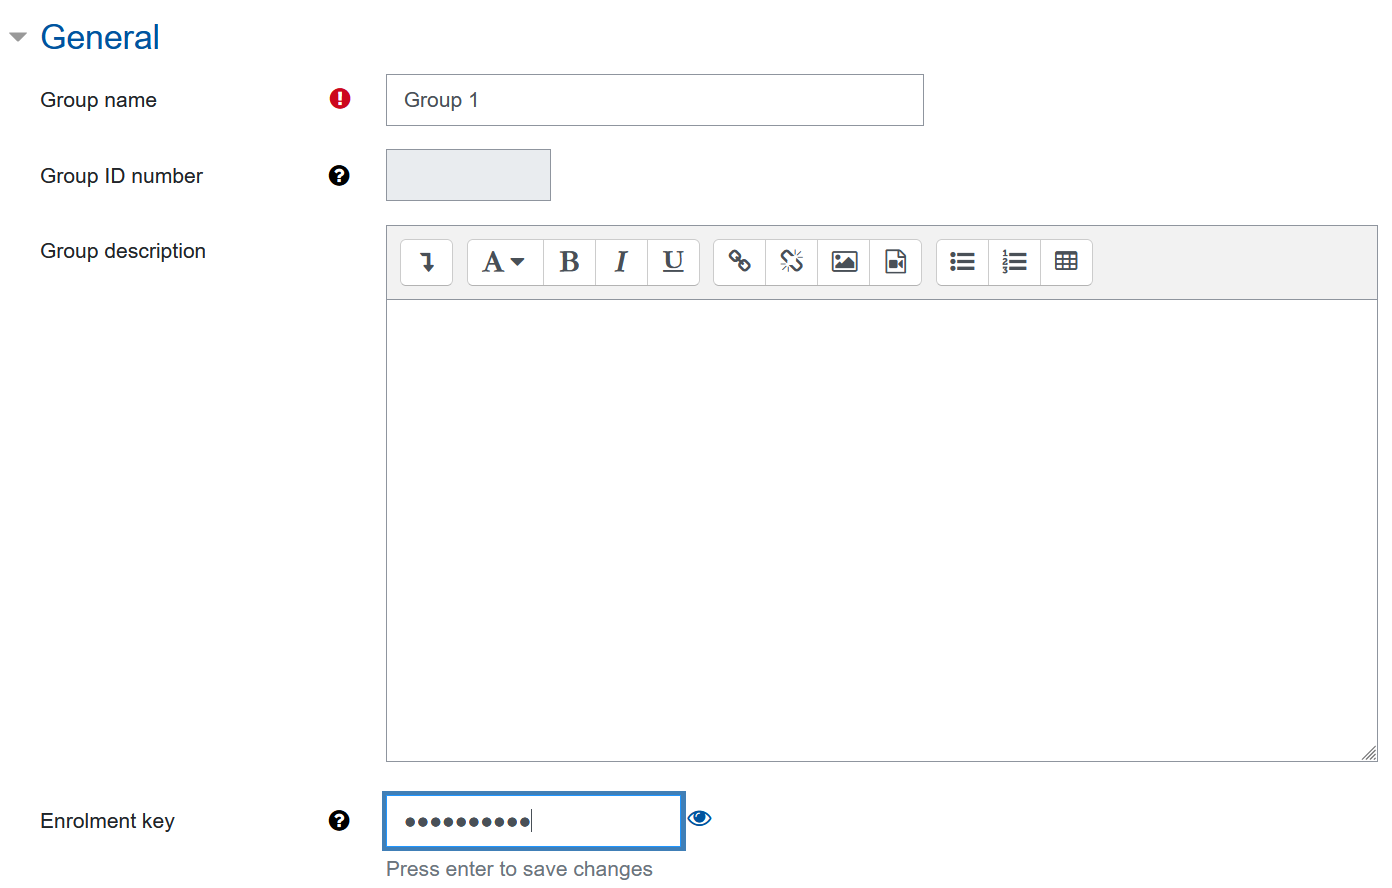
If you want to assign a group key for several groups, repeat this process for the remaining groups. Please note that it is not possible to assign the same passwords to multiple groups, as otherwise no clear group assignment can be made during self-enrolment.
Note
Group keys can also be set if self-enrollment has not been activated. In this case, the keys have no effect. The mere assignment of group keys, therefore, does not allow any conclusions to be drawn as to whether self-enrollment has been activated or not.
- Click on "Save changes".
3. Further configuration options for self-enrolment
- Set enrolment duration
- You can limit the period during which participants are enrolled in the course room with the status "active", e.g. to 100 days. After this specified period has expired, the status of the participants is automatically set to "inactive". This means that they are still enrolled in the course room, but no longer have access to it. All activities done by a participant in the course room during their active enrolment (e.g. forum posts, tests, or submitted assignments) remain visible in the course room even getting in the "inactive" status. Note: The date of the last course room access has no influence on the status change to "inactive", since this is always carried out after the defined period. Therefore, accessing the course room only a short time ago cannot prevent the status from changing to "inactive".
- If the option "Unenroll inactive after" is also activated (see below), persons with the status "inactive" are automatically removed from the course room after the deadline set there has expired. For the automatic unenrollment it is irrelevant whether the students have the status "active" or "inactive". The only decisive parameter for the automatic unenrollment is the time the student last accessed the course room. After the automatic unenrollment, students can self-enroll again if desired. Before the deadline expires, persons whose enrolment duration has passed and who still want to have access to the course room must contact the managers. They can manually remove persons with the status "inactive" from the list of participants.
- You can limit the period during which participants are enrolled in the course room with the status "active", e.g. to 100 days. After this specified period has expired, the status of the participants is automatically set to "inactive". This means that they are still enrolled in the course room, but no longer have access to it. All activities done by a participant in the course room during their active enrolment (e.g. forum posts, tests, or submitted assignments) remain visible in the course room even getting in the "inactive" status. Note: The date of the last course room access has no influence on the status change to "inactive", since this is always carried out after the defined period. Therefore, accessing the course room only a short time ago cannot prevent the status from changing to "inactive".
- Set the beginning and end of the enrolment period
You can limit the time period in which an enrollment can take place, e.g. start on 1 April 2022, 00:00 hrs and stop on 30 September 2022, 23:59 hrs.
Note
After the end of the enrolment period, those students who have enrolled in the course via self-enrollment will automatically be set to the status "inactive". The students then continue to have access to the content of the course room but maybe automatically unenrolled from the course room after a certain inactivity period, depending on the configuration selected (see the "Unenroll inactive after" option below).
- Unenroll inactive after
- If participants have not accessed the course room for a long time, they will be automatically unenrolled. The default setting is "Never", i.e. inactive participants will not be unenrolled automatically. For data protection reasons, we recommend setting the period of inactivity to six or a maximum of 12 months.
- If participants have not accessed the course room for a long time, they will be automatically unenrolled. The default setting is "Never", i.e. inactive participants will not be unenrolled automatically. For data protection reasons, we recommend setting the period of inactivity to six or a maximum of 12 months.
- Max enrolled users
- An optional upper limit for the number of course participants can be set. Once this limit is set, no one can enroll in the course room.
- An optional upper limit for the number of course participants can be set. Once this limit is set, no one can enroll in the course room.
- Send a welcome message to newly registered users
- If new participants should receive an automatic welcome message by e-mail after successful self-enrollment, please inform the IT-ServiceDesk of the desired text.
4. Check if self-enrollment is enabled in the course room
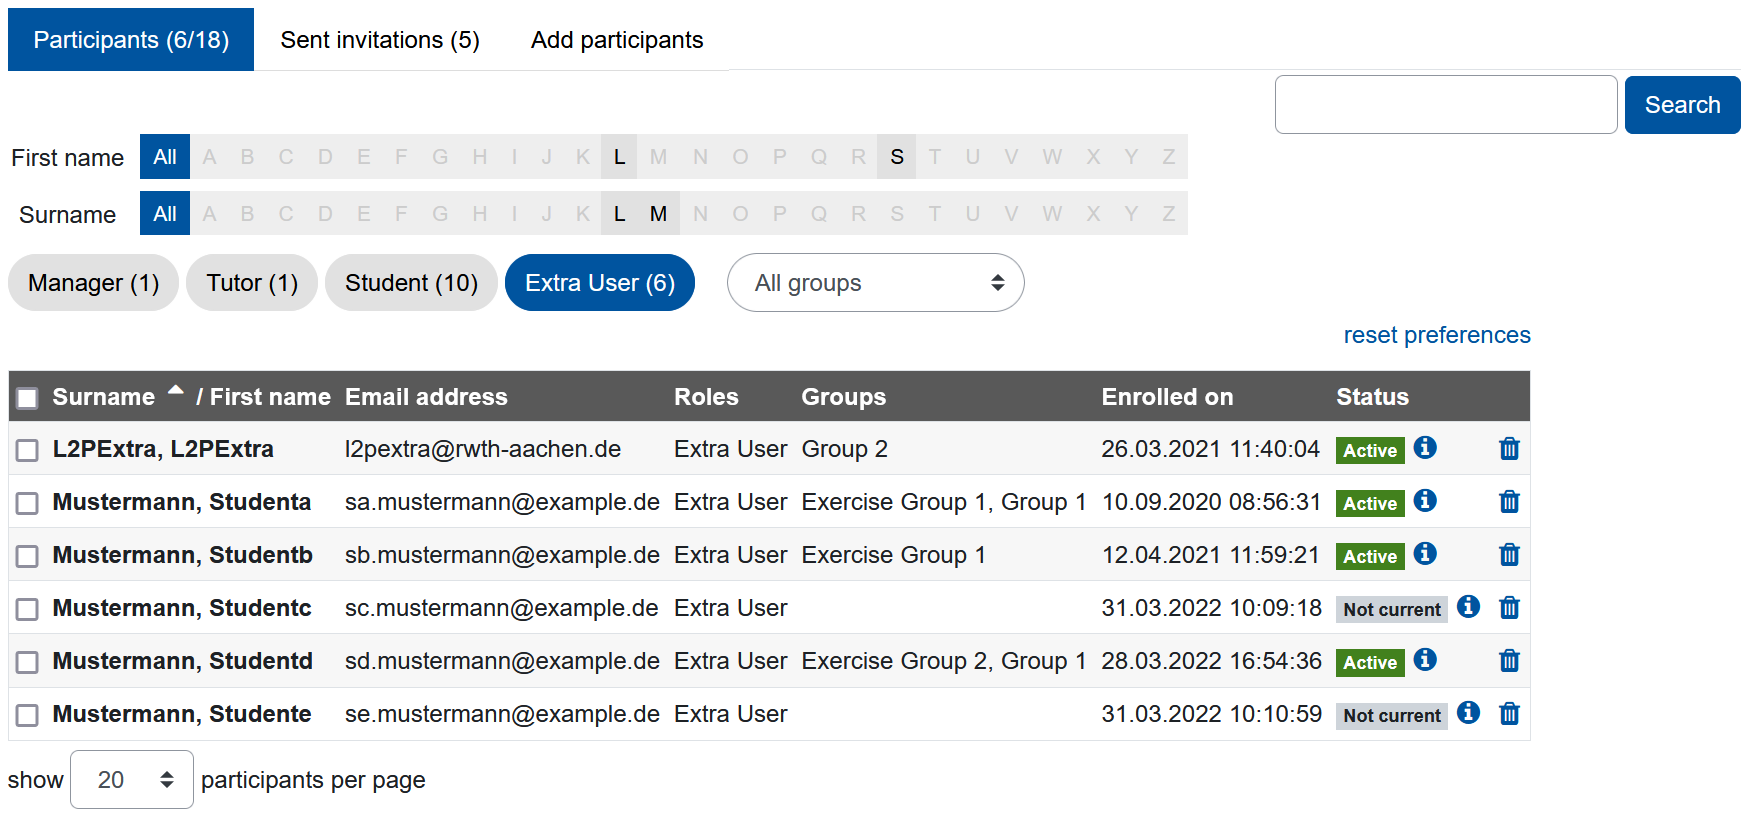
- You can use the list of participants to determine whether self-enrollment has been activated in the course room. To do this, click on the "Participants" area in the navigation bar on the left.
Self-enrolment in the course room is activated only if the "Status" column appears in the participant list. The status "Active" means that a person is enrolled and has access to the content of the course room. "Inactive" means that a time-limited participation period has been defined for self-enrollment and the person has exceeded this period. This means that the person no longer has access to the content of the course room.
In order to give him/her access to the course room again, the person must be deleted from the participant list by a manager. The person can then self-enroll again. The data from the previous enrolment will then be restored.
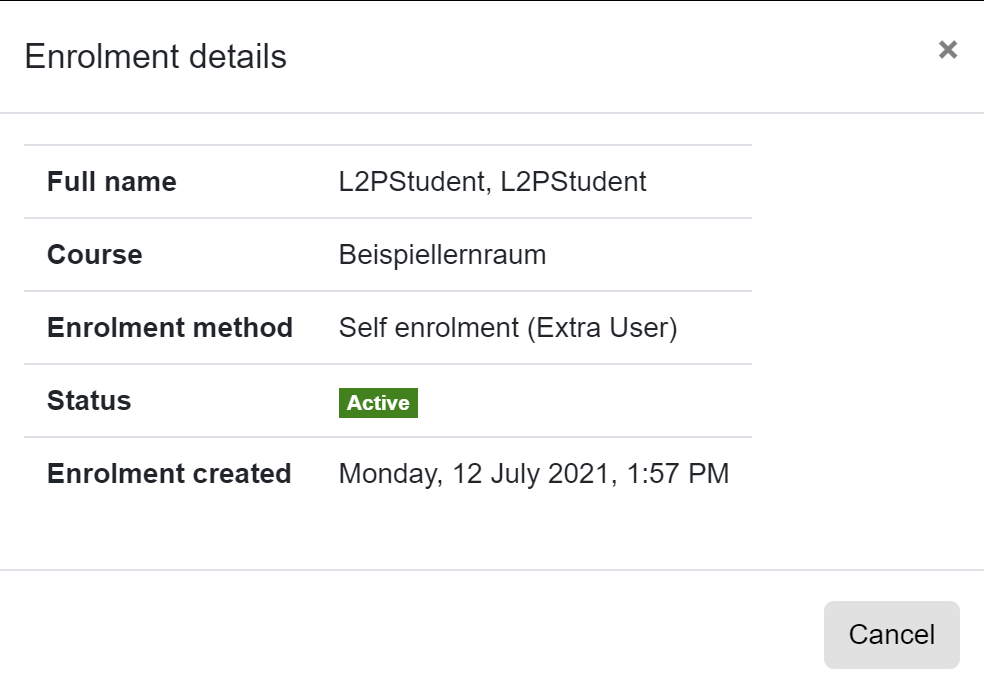
- To check which participants have enrolled themselves, move the mouse pointer over the info button
 . You will now be shown whether the person has been enrolled by a self-enrollment, a manual enrolment, or by synchronization from RWTHonline. If necessary, you can display the exact enrolment details by clicking on the info button. For certain configurations, additional information may be displayed, e.g. the exact duration of participation in the case of time-limited self enrolment.