


Provide literature (Electronic reserves)

You can add literature entries to a list by searching the University Library system. The literature section serves to provide students with course-relevant or further literature in the form of course-related electronic reserves.
- You can instruct the library to digitize the entry as a PDF document and provide it as a link.
- Alternatively, you can attach an existing full text in PDF format to the entry and have it checked for copyright.
- You can also place the individual list entries as text fields anywhere in the course room.
If you have problems finding literature on the system of the University Library, please contact: semesterapparat@ub.rwth-aachen.de
- Activate the literature section
- Add literature entries
- Display the literature entries
- Insert literature list entries as a Label resource in the course room
- Hide or deactivate the literature section
- Reuse literature entries and digital copies (import)
1. Activate the literature section
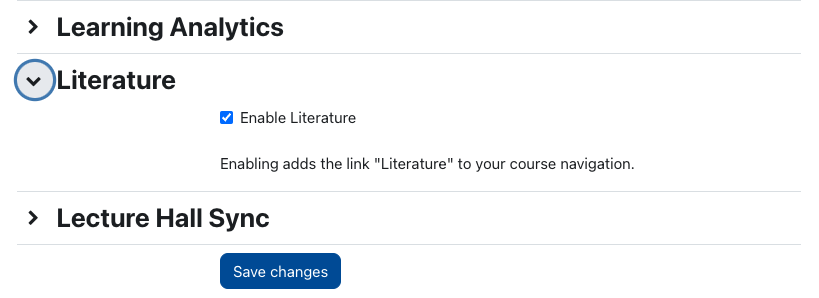
By default, the literature section is deactivated. Managers can enable it via course administration.
- Open the course room and click on "Settings" in the horizontal menu.
- Enlarge the section "Literature" at the bottom of the sections list.
- Activate the checkbox "Enable Literature".
- Open the "Literature" link in the horizontal menu to activate it, it should now appear in the horizontal menu for every student. Note that the option "Literature" might be visible in the "More" option of the horizontal menu.
At the same time, the necessary configuration for the course room is generated in the background in the third system for the administration of the semester apparatus (https://reserves.ub.rwth-aachen.de/?ln=en).
2. Add literature entries
To add literature, proceed as follows:
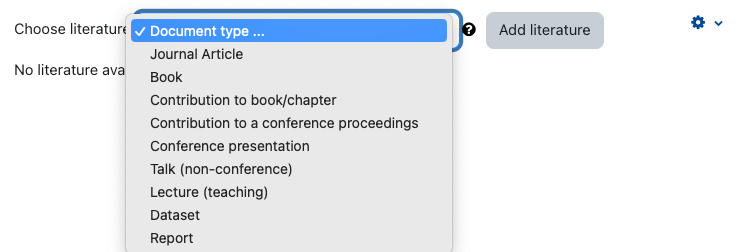
- Open the literature section in the course room.
- Select the desired document type in the drop-down menu and click on "Add literature".
- A new browser tab opens. When you log in for the first time you have to confirm the data transfer according to Single Sign-On as well as the authorization to query your course rooms and functions. This is necessary to provide you with the required authorizations in the target system. The e-mail for user identification and your course rooms are transferred.
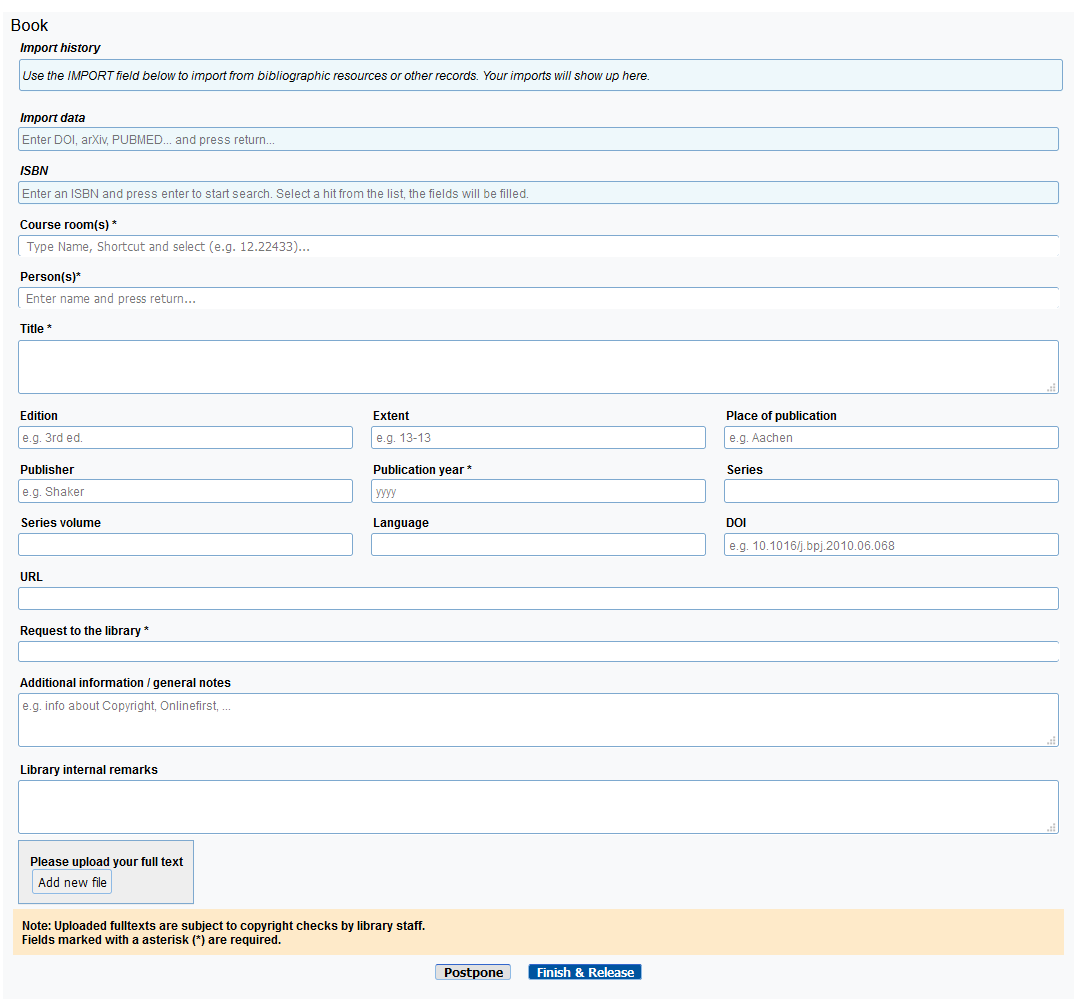
2.1. Data form of the electronic reserves
You can use the data form of the electronic reserves to enter the relevant data for your literature entry. You can also import data by DOI or ISBN.

Note
2.2. Importing data
- You can initiate a data import via DOI, Pubmed-ID, HT number etc. by means of the "Import data" input field. After confirmation with the Enter key (or the Tab key), the fields are pre-filled with the corresponding data.
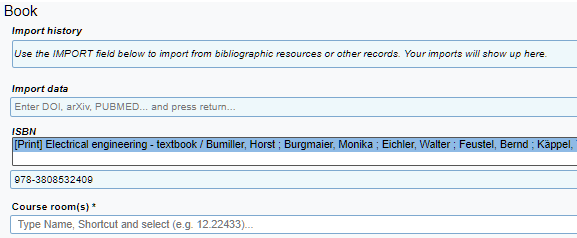
- There is a separate import field for data import based on an ISBN. After confirming the input, a list of hits is displayed here. Select the appropriate hit to transfer the title data to the fields provided.
Note
- In the field "Course room(s)*" only course rooms can be selected for which the literature module is already activated. The displayed selection contains rooms for which we have an assignment for you - but you can search for further rooms by entering the appropriate data.
- In the field "Title*" LaTeX code in the form of MathJax is allowed.
2.3. Request to the library
- In the mandatory field "Request to the library" you can choose what you want to commission the library with. Four options are available to you:
- Purchase request - Here you propose the registered title for purchase for the library stock.
- Check copyright - Here you instruct the library to check the digitised version of your literature entry for possible copyright issues. The version to be checked is uploaded below via "Add new file".
- Digitization request - You hereby instruct the library to digitise the registered title and to make it available to students as an attachment to the entry in the course room.
- Reference only - With this option, you make it clear that you only want to display the registered title as a reference in the course room without an attached digitised version.

- With the button "Add new file" you can upload a (PDF-)file containing the full text of your entry. In the field "Name" a different display name can be entered.
2.4. Additional information / general notes
If you have any additional remarks for this entry enter them here. Please note that the text will be visible to your students.
2.5. Library internal remarks
The library will add important remarks regarding your request in this field. You can also add information for the library staff here. The information won't be visible for your students.
Note
2.6. Finish and release
If your entries are complete, confirm this with "Finish & Release". The University Library will then receive a notification and, if necessary, process your entry (copyright check or digitisation order).
If necessary the message "You didn't assign publications to individual authors?" will appear. You can ignore it by "Proceed anyway". The message "If available, choose a DFG, EU or 3rd party funding in the Grant name field." can always be ignored with "Proceed anyway".
You can use the button "Postpone" if you want to keep your entry and finish it later.
Once you have completed the process of adding an entry on the library system side, you will receive a confirmation email from the library with the ID of your entry. The entry will be transferred to the course room with a slight delay and will appear in the literature area under "Literature in the process by the library" (manager view) or "Literature" (student view).
After approval, the entry for managers in the literature section will appear under "Literature" to indicate that the processing is complete.
3. Display the literature entries
The detailed display format is selected by default. This typically displays the following data for an entry:
- Document type e.g. book, article, book contribution, ...
- Authors
- Title with link to the entry on the Semesterapparat page
- Place and year of publication
- DOI, ISBN
- Link to the full text
- Export links for literature management (BibTex, Endnote, Citavi, etc.)
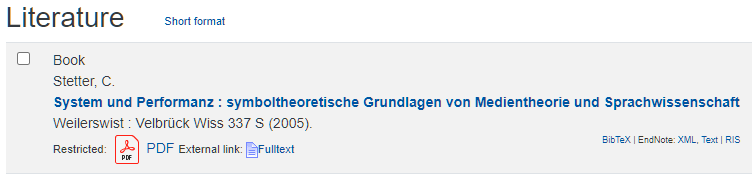
- Click on the "Short format" link to change the display to a more compact format. Here the ad is reduced to the first author, year, title and full-text links. By clicking on "Long format" you switch back to the standard display format.

4. Insert literature list entries as a Label resource in the course room
You can include references to individual entries from the literature list as a Label resource in the course room. Proceed as follows:
- In the literature, section selects the list entry you want to add to a topic.
- Select the topic to which you want to add the entry as a Label.
- Finally, click on "Insert as the label".
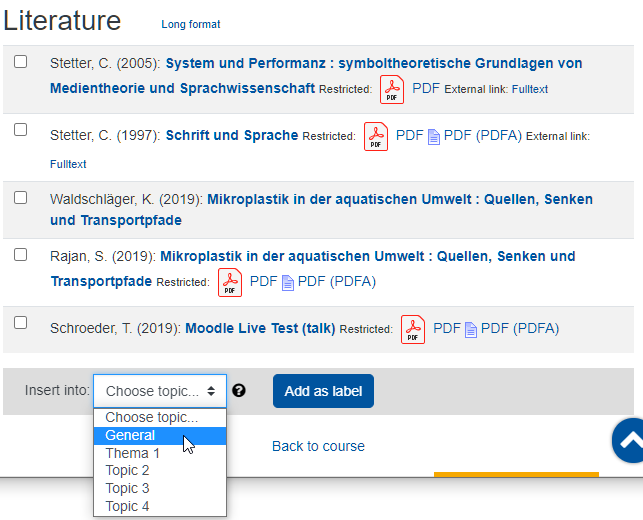
The entry is now inserted as a text field at the bottom of the topic section. You can use the cross icon in front of the text field to move it to the appropriate place in the section.
5. Hide or deactivate the literature section
You can hide the literature area for students or disable it completely. To hide the literature area only, click the gear in the upper right corner of the literature area and select "Hide site". Students will then see the "Literature" item in the horizontal menu bar, but will not be able to access it.
To completely disable the literature section, follow these steps:
- On the course page,click "Settings" to access the course settings.
- Go to the section "Literature" and uncheck the option "Enable literature". After saving the settings, the "Literature" entry disappears from the horizontal menu bar under "More".
Note
6. Reuse literature entries and digital copies (import)
It is possible to reuse literature entries from one semester in another semester. Technically, only the new course room is added to the existing entry. Since some literature may only be digitized at a certain percentage, this process must always be subject to a legal examination. Therefore, adding a new course room to an existing entry and thus an "import" may only be done by a library staff member. For this purpose, it is sufficient to send an appropriate e-mail to l2p@ub.rwth-aachen.de or Semesterapparat@ub.rwth-aachen.de. After the check by a library employee, the course room is added to the entry.
