


Adding an assignment

The Assignment activity allows students to submit solutions to assignments that teachers evaluate and provide feedback on. Assignments allow different types of submission, feedback, and grade.
For this activity, you can use Tagging (Tags).1. Add Assignment
2. Configurate Assignment
2.1. General
2.2. Availability
2.3. Submission types
2.4. Feedback types
2.5. Submission settings
2.6. Group submission settings
2.7. Notifications
2.8. Grade
2.9. Common module settings
2.10. Restrict access
2.11. Activity completion
2.12. Save
2.13. Notification about conten change
3. Individual availability settings for single students/groups
1. Add Assignment
To add an assignment, you need the role "Manager" in the course room. Please follow the steps below::
- Switch the course room to edit mode using the "Edit mode" slider next to your name in the upper right corner.
- Click "Add an activity or resource" in the section where you wish to add the assignment activity.
- Mark the checkbox at "Assignment".
- The Assignment activity is created. You will now be taken to the settings page to configure the activity.
2. Configurate Assignment
2.1. General
2.1.1. Name, description and activity instructions
Give the assignment a meaningful name. This will be displayed in the course room and will open the assignment details when clicked.
The description explains what is expected of the students and gives them as precise instructions as possible on how to complete the assignment correctly. It includes the assignment, grade criteria, or formal requirements. Information and materials needed to solve the assignment also belong here, such as references, texts, images, video clips, or links to websites. Alternatively, you can make the materials available as working materials in the course room and give links to them in the assignment description.
If you want the description to be displayed on the course room page, select the corresponding checkbox.
In addition, you can write activity instructions that will only appear on the submission page where students complete and submit the assignment.


Note
2.1.2 Additional files
Upload files here that will help the students to complete the assignment, for example, answer templates, program frameworks, or grade criteria.

2.2. Availability

Note
2.2.1. Allow submissions from
Set a date here from which students are allowed to submit solutions. If you deactivate the "Allow submissions from" date, submissions are allowed directly after saving the assignment.
Note
2.2.2. Due date
The due date marks the submission deadline for the assignment. Students will automatically see the due date on the assignment page, in their calendar, and under upcoming events. Students can also submit assignments after this date. Such submissions are marked late in the assignment list. By default, the due date is disabled.
2.2.3. Cut-off date
After the cut-off date, new submissions cannot be added and existing ones cannot be modified. The cut-off date is not displayed to students in the assignment.
Note
2.2.4. Remind me to grade by
The date set here will appear to managers in the course room and in the dashboard under "Current events" as well as in the calendar. The entry reminds us that the assessment phase for submissions starts.
2.3. Submission types
With these settings you determine in which form students should submit their submissions. In principle, you can combine the submission types. However, we recommend that you choose one submission type.
For all submission types, students can add a comment for the evaluators. For blind marking, these comments will be displayed as "from student 01", etc.

2.3.1. Online text
Students enter the solution in a text input field directly in the course room. The entries are automatically cached in the text editor at regular intervals.
Optionally, you can set a word limit. Students receive a warning when entering if this limit is exceeded. Numbers are counted as words and abbreviations such as "e.g." are counted as a single word.

2.3.2. File submission
Students upload one or more files for submission. Managers can optionally specify the maximum number of uploaded files and the maximum submission size. In RWTHmoodle a maximum of 250 MB is possible.
Note
Under “Accepted file types“, specify which file types you expect to be submitted. The allowed file types are entered with their file extensions, e.g. as .pdf, .mp3 or .png or as audio/mp3 or image/mp3. If you allow multiple file types, enter them as a comma-separated list. By clicking the "Choose" button you can also simply select the allowed file types from a list. If you leave the field blank, all file types will be accepted as a submission.

Students will be shown any restrictions on file number, size, and type when adding and editing the submission.
2.4. Feedback types
Use these settings to specify the form in which evaluators provide feedback to students on their submissions. When selecting the feedback type, make sure it matches the submission you selected above. Students will see the feedback on their view of the assignment after the grading was completed.

2.4.1. Feedback comments
With this feedback type, evaluators comment on a submission using a text entry field. They can also use the text editor to upload images and record audio or video directly in the browser.
The additional option "Comment inline" only works in combination with the submission type "Online text". If the option is activated, the text of the submission is copied into the comment field. There the evaluators can comment inline (preferably in a different color).
2.4.2. Annotate PDF
If the submitted file is a PDF, evaluators can leave comments directly in the submitted file.
If the submission type is "Online text", the entered text is automatically converted into a PDF and can then be annotated.
2.4.3. Offline grading worksheet
This option allows evaluators to download a grading worksheet as a CSV file and enter grades into it offline, for example in Excel. They then upload it back to the course room as a CSV file. The grades are automatically transferred to the grading table of the assignment and the course.
If the option "Feedback comments" are activated simultaneously, the CSV file contains an additional column in which feedback can be entered. When uploading the file, the comment will be assigned to the appropriate submission.
2.4.4. Feedback files
This option allows evaluators to upload their feedback as the file(s). This can be corrected submissions, documents with comments, an evaluation guide, or simply verbal feedback. You can also upload multiple feedback files at the same time. Please read the instructions for "Grading Assignments".
2.5. Submission settings

2.5.1. Submission button must be pressed
By default, students do not need to press the submit button. This allows them to create and save a submission. This has the status "Submitted for grading". However, it can be edited and changed until the cut-off date is reached. Only then is the submission automatically locked for further editing.
If the submit button must be clicked, students can also create and save a submission. This has the status "Draft (not submitted)". Drafts can also be edited and changed until either the cut-off date is reached or students click the button "Submit assignment". The submission will then change status to "Submitted for grading". When students click the "Submit assignment" button, the signal to the evaluators that they have completed editing the assignment.
Note
2.5.2. Require that students accept the submission statement
If you set this setting to "Yes", students have to confirm a prepared declaration that they have written the work independently and with reference to all sources.
2.5.3. Additional attempts
This setting allows managers to allow students to revise a solution already submitted for grading and submit it as a new attempt. Possible options are:
- Never (default) - Students submit only once.
- Manual - Managers manually allow resubmission for individual submissions when grading.
- Automatic until pass - Students will continue to submit until they achieve the grade to pass set in the gradebook. This is defined in the assignment settings in the section "Grade".
Under "Maximum Attempts", you specify the number of times students may submit an assignment. Once the maximum number of attempts is reached, no further submissions can be made.
Note
When changing the draft status, however, students always see one and the same submission and can continue to edit it. The status of the submission is then "Draft (not submitted)".
2.6. Group submission settings
These settings allow students to work together on a submission. For grading, evaluators can choose to assign a common grade and feedback for all students in the group or to grade each group member individually. In the grading table, all group members are listed individually. However, the "Groups" column will indicate which group they belong to.
Note

2.6.1. Students submit in groups
By default, this option is set to "No." Students who are not in a group can then also submit submissions.
Note
At the same time, make sure that all students are in no more than one group. Otherwise, the submissions of such students will also be assigned to the default group, in which all students who have more than one group will be. By working with groupings that combine all delivery groups, you can ensure from the start that all students within the grouping used are in exactly one group.
If you set the option "Require group to make submission" to "Yes", RWTHmoodle will display this message to all students without a group who want to add a submission: "This assignment is submitted in groups. You are not a member of a group, so you cannot submit the assignment at this time. Please contact your instructors to be added to a group."
2.6.2. Requires all group members to submit
This setting will only appear if the "Require students to click the submit button" setting was previously enabled.
If set to No:
- All group members have the ability to create a submission on behalf of the group.
- All group members can edit and change the submission at any time.
- After the submission deadline (= cut-off date), the submission is automatically considered accepted by each group member.
If set to Yes:
- All members of the group have the ability to create a submission on behalf of the group.
- Each group member can edit the submission and make changes until they click the Submit button.
- The submission remains in draft status until each group member has clicked the "Submit assignment" to confirm that this is the final version of the submission. Only then is it considered submitted for evaluation.
- All group members will see which members have not yet submitted and may still need to submit.
2.6.3. Grouping for student groups
By default, no grouping is considered for the assignment. In this case, the submission overview shows the group membership of the students. Students without a group or those with more than one group are assigned to the default group.
If you select a grouping here, the submission overview shows the group name for all students who belong to a group of the selected grouping. Students of all other groups or without group membership will be assigned to the default group.
2.7. Notifications

2.7.1. Notify graders about submissions
If you set this to "Yes", then graders (= managers and supervisors) will receive a message as soon as someone has submitted something. Only the people who are allowed to grade this assignment will be notified. The type of notification (web notification or e-mail) is determined by the graders individually in their system notification settings.
2.7.2. Notify graders about late submissions
If you set this setting to "Yes", a notification will be sent as above if a solution is submitted for evaluation after the due date.
2.8. Grade

2.8.1. Type
Select the type for the assignment. You can either assign points (default) or use a scale. This allows you to assign non-numerical grades as well.
If you want to assign points, enter the maximum number of points that can be achieved for the task in the "Maximum grade" field.
If you decide to use the "Scale" grading type, select an appropriate scale. You can create your own scales via the gradebook of the course room and use them here.
If you do not want to assign any grades for the task, select "None" as the grading type.
2.8.2. Grading method
Using "Simple direct grading", enter the number of points achieved when grading the assignments in the field provided or select the appropriate value on the scale.
Alternatively, you can use "Marking guides" and "Rubric".
2.8.3. Grade category
Select to which grade category the assignment should be assigned.
- Grade categories are used to summarize graded activities (= grade items).
- A grade category has an overall grade, which is calculated from the individual grade of the grade items belonging to the category.
- Predefined calculation forms are available for the calculation. Alternatively, you can use your own calculation formulas.
- By default, each course room has one main grade category, which is named exactly like the course room itself. If you do not create additional categories, all grade items belong to this main category.
2.8.4. Grade to pass
Enter here the minimum grade required to pass the assignment. The value will be used in the activity and course completion. In the grader report passing will be marked in green and failing will be marked in red.
2.8.5. Anonymous submissions
In the "Anonymous submissions" mode (also known as blind marking) graders do not see names of students who have submitted anything. Instead, anonymous names "Student X" are displayed in the grader report. After grading, managers can still see who submitted what by clicking the gear icon in the upper right > (or in the Settings > Assignment Administration block) and clicking Reveal student identities. Note: Because of this possibility to reveal the identity afterward, anonymity is not really guaranteed.
2.8.6. Hide grader identity from students
This option allows you to hide the identity of the people who are grading a submission. Students will not see who has graded them.
2.8.7. Use marking workflow
The marking workflow is deactivated by default. When grading a submission, the achieved grade and feedback are immediately visible to students after saving.
If you enable the marking workflow, graders can flag the status of a grade as it progresses through the grading process. The advantage is that grades can be hidden from students until the status is set to released. This allows you, for example, to release grades and feedback for all students to view at the same time or to coordinate secondary gradings. The individual statuses in the marking workflow:
- Not marked - the grading has not yet been started
- In marking - the grader has started his or her work but is not yet finished
- Marking completed - the grading is completed, but can be reviewed and corrected again
- In review - the assessment is under review
- Ready for release - the review of the grades is complete, the grades can be released to students
- Released - the grades can be viewed by students
2.8.8. Use marking allocation
If you have activated the marking workflow in the previous setting, you can use this setting to assign students' submissions to individual grades. They will then only grade the work of the students assigned to them.
2.9. Common module settings
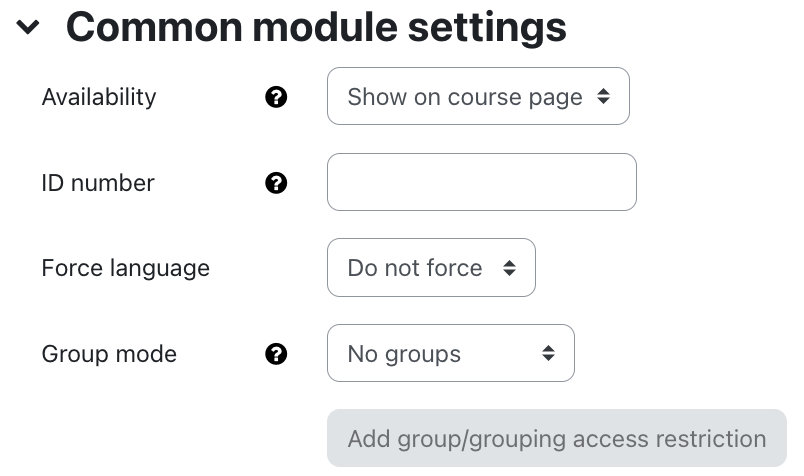
- Availability: choose whether the assignment should be immediately displayed to students or hidden from them.
- ID number: The ID number is used to assign a label that can be used in the "Gradebook setup" when calculating overall grades. If the assignment is not needed to determine grades, the field can be left blank.
- Group mode: These settings are important if you want to allow group submissions. Please read the article Group Assignments.
2.10. Restrict access
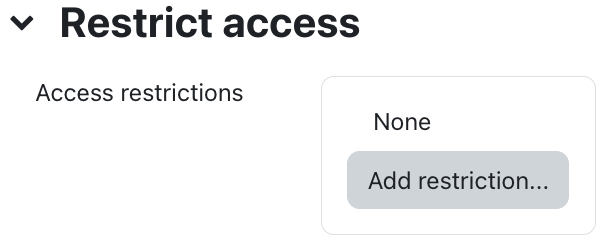
With these settings, you can link the visibility and availability of the assignment to the students to certain conditions. In general, read the article Restrict Access.
Note
2.11. Activity completion
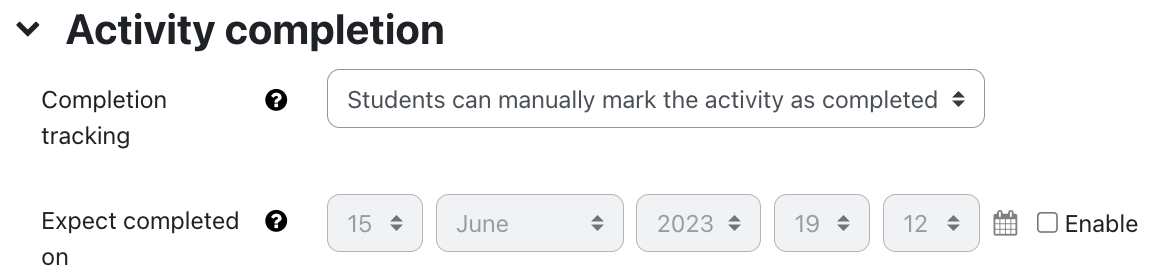
With these settings, you define criteria or conditions when an activity is considered completed (i.e.: successfully processed). For detailed information, read the article Activity completion settings.
2.12. Save

Clicking on "Save and go to course" will return you to the course page.
2.13. Notification about content change
The settings for the activities can be reached after creating them within the activity via the central menu navigation. Here you will find activity-specific settings and you can also save the activity directly individually.
If you subsequently make changes to the settings, activate the checkbox "Send notification of content change" to inform all participants about the new or changed activity. All participants who can access the activity receive the notification.

3. Individual availability settings for single students/groups
Beyond the cut-off date, as a manager you can also override all availability settings for selected students or groups:
- Click the assignment on the course page.
- Click on the edit icon on the top right and select the entry "Group overrides" or "User overrides".

- Click on the button "Add group override" or "Add user override" and select the group or person and the new due dates.

- Finally, click the "Save" or "Save and enter another override" button.
The submission overview will later show you in the "Status" column which individual changes apply to the individual persons and groups.
