You are located in service: RWTHmoodle

Allocate Groups to a Grouping

Allocate Groups to a Grouping

Kurzinformation

The formation of Groupings is a two-step process in RWTHmoodle. In the first step, grouping is created, in the second step, the groups are assigned to it.


Detailinformation

1. Allocate Groups to a Grouping

To allocate groups to the created grouping, proceed as follows:

  1. As a manager, open the course room in which you want to assign groups to a grouping.
  2. Click on "Participants" in the center menu to open the list of participants.
    The screenshots shows the horizontal menu with the options "Course", "Settings", "Participants" (highlighted)", "Grades", "Reports", and "More".
  3. Here, click on "Groupings" in the drop-down menu. You will then see the list of existing groupings with the groups that belong to a grouping, the number of activities that work with that grouping, and buttons for actions.
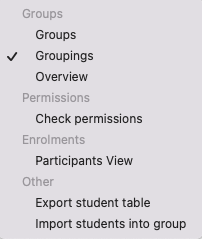
    The screenshot shows the actions available after selecting the "Participants" option in the horizontal menu. Under "Groups" the actions "Groups", "Groupings", and "Overview" can be found. "Permissions" offers the action "Check permissions" and "Enrolments" offers "Participants View". Both actions "Export student table" and "Import students into group" can be found under the last header, "Other".
  4. Click the group icon next to the grouping.
    The screenshot shows the row for the grouping "Gruppierung 1". It states, that the groups "Gruppe A" and "Gruppe B" belong to it. In the right corner three symbols are linked to actions, a gear wheel for settings, a trashcan to delete the grouping and a person to edit the groups belonging to the grouping.
  5. The allocation window of the selected grouping now opens.
    The screenshot shows the "Add/remove groups" functionality. On the left there is a large area for "Existing members" showing 2 groups, "Gruppe A" and "Gruppe B". On the right, the large area titled "Potential members" is empty. Between both areas the buttons "Add" and "Remove" allow the user to move groups from one area to the other.
  6. Now select the groups that you want to assign to the grouping. You can select several groups at the same time by pressing and holding the CTRL-key. By clicking on "Add" you add the selected groups to the grouping. Similarly, you can remove groups from the grouping by clicking on "Delete".
    The screenshot show the two buttons "Add" and "Remove". Both buttons also contain a small arrow to indicate how groups are moved, the "Add" has an arrow indicating to the left, "Remove" has an arrow showing to the right.
 

2. Overview of Groupings

The Overview of groupings lists the existing groupings and displays the groups they contain. In addition, the overview shows in the "Activities" column how many activities use a certain grouping.

Existing groupings can be edited or deleted by clicking on the gear symbol or the trashcan symbol behind the grouping in the table.


 Zusatzinformation

For more information:

last changed on 08/28/2023

How did this content help you?

GNU General Public License 3
This work is licensed under a GNU General Public License