


Upload videos to the RWTH streaming server (Opencast)

The block "Video streaming (Opencast)" on the right side of a course room shows all streaming videos that are on the RWTH streaming server and that can be used in this course room. Managers can use this block to upload videos to the streaming server that should be available in the current course room. The videos can also be deleted here. Students do not see the block.
Videos from the RWTH streaming server are made available to the participants of an event in two steps:
- Upload the videos to the streaming server via the block "Video streaming (Opencast) (this tutorial)
- Embedding videos using the Video activity (recommended). When using the Video Activity, embedding and importing are less time-consuming compared to embedding via the Editor. With the Editor, videos can be included via a Page resource, a Text and Media Area or other places such as forum posts or book chapters where the editor is available. There they are then visible and playable for the participants.
- Another particularly space-saving option for using streaming videos is linking them as a "Link/URL" material.
You can add various metadata to the video, thumbnails, and WebVTT files that contain subtitles or chapter marks.
- Block "Video streaming (Opencast)"
- Add video
- Processing of the video
- Edit metadata and attachments or delete the video

Note
1. Block "Video streaming (Opencast)"
The block "Video streaming (Opencast)" lists the videos that are available for a course room on the RWTH streaming server. It also shows their processing status.
New videos are uploaded to Opencast by clicking the "Add Video" button in the block.
The block and its contents are only visible to managers.
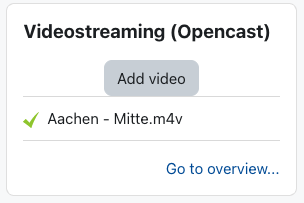
Since the block shows only a part of the available videos due to space restrictions, the link "Go to overview" leads to the complete list of videos. In addition to the list of videos that have already been processed or are being processed, a separate list shows the videos that are still in the queue where they are waiting for the Opencast system to start processing them. In the course of processing the videos are converted into several quality levels.
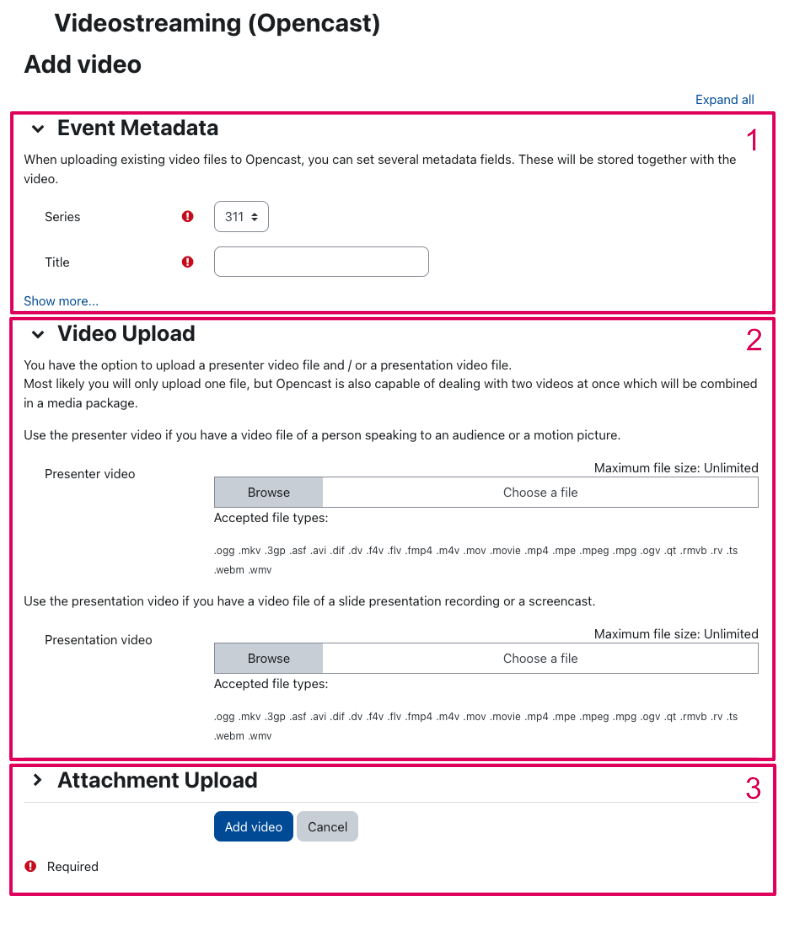
2. Add video
To upload a video to the RWTH streaming server, click "Add Video" in the “Video streaming (Opencast)" block.
A new page opens where you can enter various metadata, upload the video file and attach a WebVTT file with subtitles or chapter skip marks.
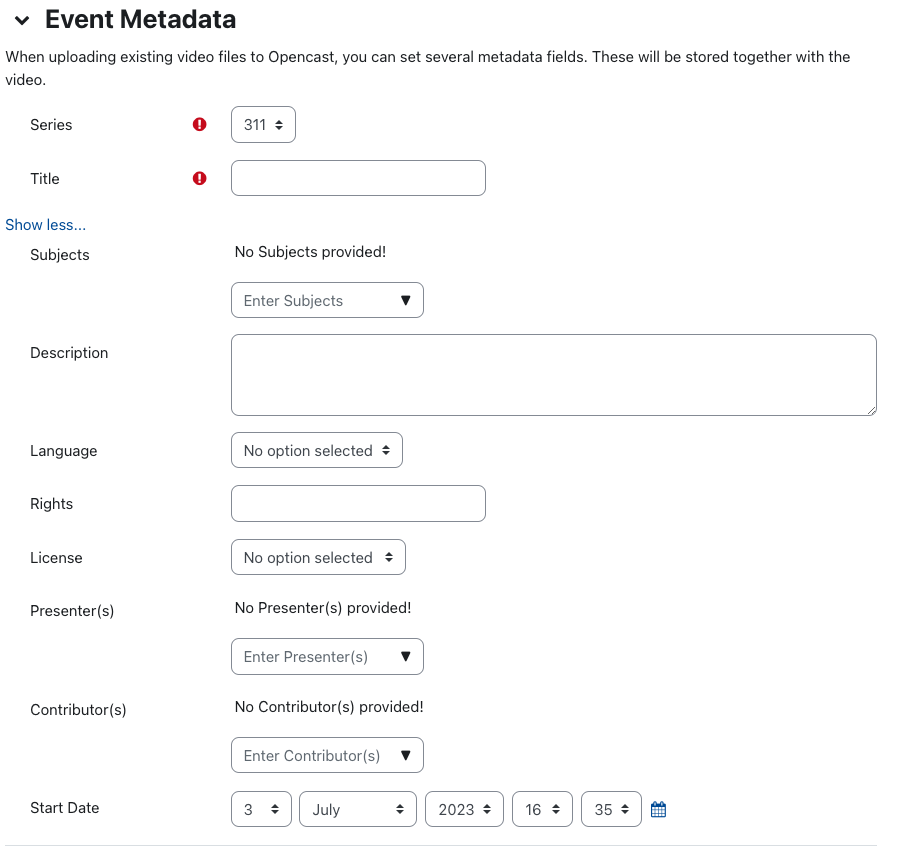
2.1. Entering Metadata
- Enter the title of the video under "Metadata".
- When clicking on "Show more…" you can optionally enter additional data, which can be viewed as "Description" when the video is playing:
- Subjects - Keywords describing the video
- Description - Written description
- Language - Language used in the video
- Rights - This information remains hidden in the learning room.
- License - This information remains hidden in the learning room.
- Presenters / Contributors - Speakers or contributors of the video
- Start Date - The date is shown as the upload date in Opencast and in the video's description, but otherwise has no effect on the upload. However, the start date plays a role in another place: If you embed the videos as a series in the course room via the video activity, the order of the videos is based on the start date.
2.2. Choose a video file
Drag and drop your video file under "Choose a file" into one of the two upload fields for "Presenter" or "Presentation". The difference between the two fields is explained below. The possible file formats are listed below the upload field.
If you have two separate, synchronized video streams for the presenter and the presentation slides during a lecture recording, you can also upload them simultaneously as presenter and presentation video. During playback, the users can then arrange the videos as they wish and, for example, view both videos in parallel or bring only one of them to the foreground.
Note
2.2.1 Presenter
Use the Presenter Video if you have a video file with a recording of a presenter or a movie.
2.2.2 Presentation
Use the Presentation video if you have a video file with a recording of a slide presentation or a screencast. It is important that the focus of the video is more on the presentation and less on the person giving the presentation, who may also be in the video.
Videos uploaded as "Presentation" have a slide navigation in the timeline automatically generated by Opencast from the video, which allows you to switch between frames in the video. In addition, the video has a transcription area. This is currently not editable.
2.3. Add subtitles or chapter marks (WebVTT)
Optionally, you can attach one or more WebVTT files. This allows German and English subtitles or chapter skip marks to be added to the video. The advantage of chapter markers from the WebVTT file compared to the slide navigation automatically generated by Opencast is that the users do not just see unlabeled markers on the timeline, but can call and navigate to the chapter titles. If you want to add a Camtasia screencast video with chapter marks, see the related instruction Share Camtasia videos with chapter track.
Upload your WebVTT file with the necessary information under "Attachment Upload" via the appropriate file section.
- Use "Captions(en)" to add a file with English subtitles,
- via "Captions(de)" a file with German subtitles,
- via "Chapters" a file with chapter marks.
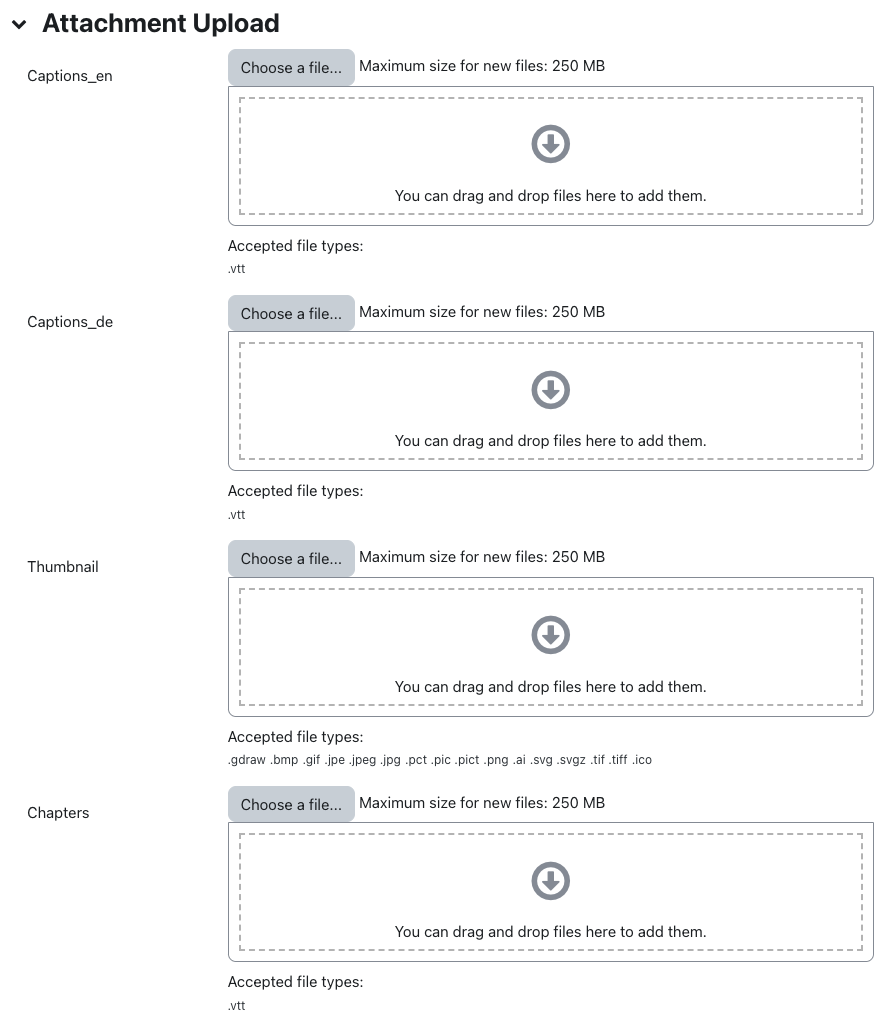
2.4. Add a thumbnail
Note
For choosing a thumbnail, all common file types for image formats are available (BMP, JPG, GIF, PNG etc.).
The thumbnail can be added both 1) during the video upload to the RWTH streaming server (Opencast) or 2) added afterwards to videos uploaded before.
2.4.1. Add thumbnail on video upload
- If you want to upload the thumbnail together with the video upload, add a thumbnail file on the page "Attachment upload" in the option "Thumbnail" at the bottom of the page. Upload the file using drag&drop or by clicking on "Choose a file..." to search for the file on your computer.
- When you have entered all the data and uploaded video file(s) and attachments, click "Save changes" to complete the process. The video will then be processed by Opencast.
2.4.2. Add a thumbnail to an existing video
- If you want to add a thumbnail to the video uploaded before, click "Go to overview..." in the "Videostreaming (Opencast)" block.
- On the overview page that appears now, all previous video uploads are displayed.
- Click the gear icon at the desired video in the "Action" column. With a mouse click on "Add attachment" you get to the page "Attachment upload".
- In the options displayed here last, you have the option to select a thumbnail by clicking on "Choose a file ...". After you have added the thumbnail, click "Save changes".
3. Processing of the video
After the upload, Opencast starts processing after a few minutes. The video is converted into three quality levels for different end devices: 360p, 720p and 1080p. Currently Opencast needs about 60 minutes of processing time for a video of 90 minutes in length.
You can see the processing status of the video in the block "Videostreaming (Opencast)" or in the overview under "Videos available in this course".
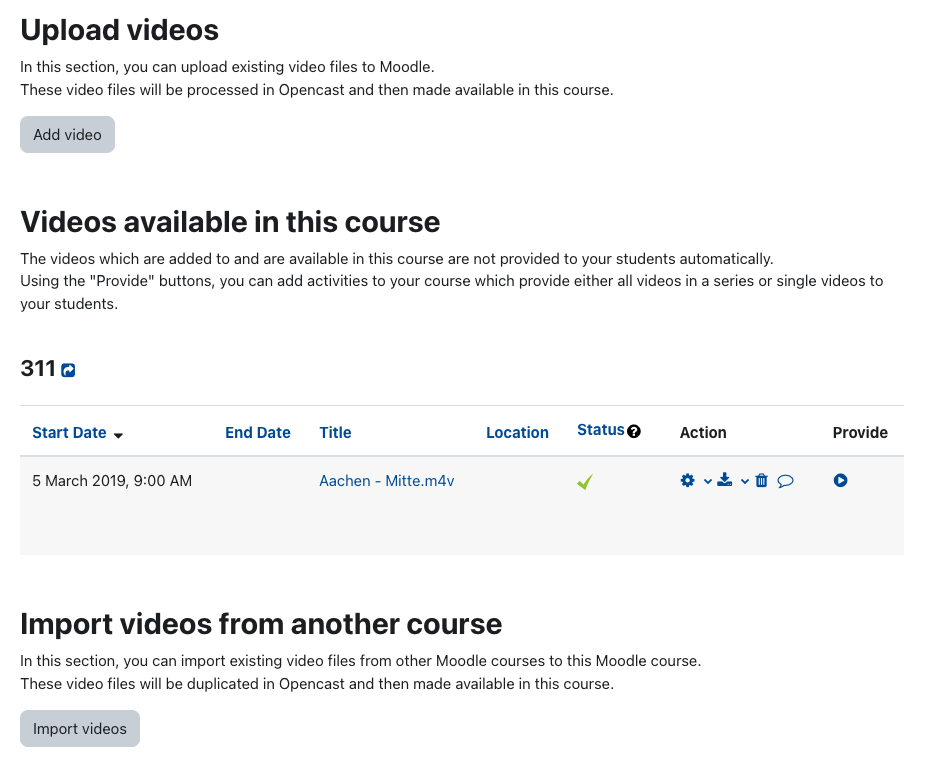
Videos can have different statuses in this list
 The orange clock symbol indicates videos that are being processed.
 The scissors symbol indicates videos that have been fully coded but not yet published. If this symbol appears on one of your videos, please contact the RWTHmoodle support. In this case, the publishing has to be initiated again separately.
 The warning symbol indicates videos that have been processed with an error. In this case please contact the RWTHmoodle support. If possible, tell us where the video came from and how and with which tool it was (re)edited.
 Finished processed and published videos are marked with a green tick. "Published" in this case means that the video can be embedded at a suitable place in the course room, where the students of this learning room can watch it. For embedding the videos we recommend embedding them in text pages
4. Edit metadata and attachments or delete the video
To edit the metadata for a video or to delete the video, click "To Overview" in the "Streaming Video (Opencast)" block. You will then see a tabular overview of all videos available in this learning room and their status.
4.1. Edit Metadata
- To edit the metadata for the video, click on the gear wheel behind the desired video.
- Edit the data. The start date cannot be changed or added afterwards. However, it has no relevance to the visibility of the video.
- Save the adjustments with "Save changes".
4.2. Subtitles or chapter marks can be added afterwards (WebVTT)
- To subsequently add subtitles or skip marks to a video, click on the plus symbol behind the desired video.
- Upload your Create WebVTT files for captions and chapters with the necessary information about the appropriate file space. Uploading attachments allow you to overwrite existing attachments. If a file has already been uploaded for a specific field, a new file in the same field will overwrite the previous file.
- Save the adjustments by clicking on "Save changes".
4.3. Delete Video
- If you want to delete videos from the Opencast server again, click on the trashcan icon behind the desired video. The following note will appear: "You are about to delete this video permanently and irreversibly from opencast. All embedded links to it will become invalid. Please do not continue unless you are absolutely sure."
- Confirm with "Delete video permanently".
Videos for which uploading failed (indicated by the warning symbol) can also be deleted by the managers using the trashcan symbol.
Videos that are still being converted (indicated by the orange clock icon) cannot be deleted by managers. Please wait here until the video has finished converting.
Additional information:
- Embedding videos from the RWTH streaming server
- Direct embedding of videos in the course room with the video-activity
- Linking streaming videos
- Share Camtasia videos with the chapter track
- Tutorial: How to create a WebVTT file
- Tutorial on how to write a WebVTT file
- Create WebVTT files for captions or chapters
