


Checking the course room for accessibility

To support you as lecturers in creating accessible course content, an accessibility toolkit is available in the course room. This allows managers to check the accessibility of the course room and course content to identify errors. A graphical display of the accessibility deficiencies found makes it easy for managers who are less familiar with the topic to see them at a glance and correct them accordingly. Previous knowledge of checking course content for accessibility is therefore not required to use the toolkit.
This manual explains how to use the toolkit. If you are looking for information on the enterprise version of the toolkit, visit the Brickfield Education Labs Website.
- Add block "Check accessibility"
- Check accessibility
- Heatmap
- Detailed results on accessibility
- Deactivation of the accessibility check
1. Add block "Check accessibility
- Switch the course page into the edit mode in the upper right corner.
- Click "Add a block" and choose the "Accessibility review" block. It is automatically added below the other blocks.
2. Check accessibility
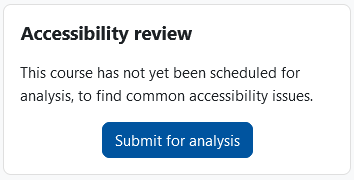
- If you want to check your course room for accessibility, you must start the analysis process required for this once. To do this, click the "Submit for analysis" button in the "Accessibility review" block.
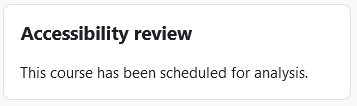
- The course room accessibility check is now started. A note to this effect appears in the "Accessibility review" block:
This process may take a few minutes depending on the server load. For this purpose, an additional note field is displayed on the course page informing you when the accessibility check will be completed at the earliest. Experience shows that the analysis process takes a few minutes longer, but usually no longer than 10 minutes.
- You can recognize the successful completion of the analysis process by the fact that the "Accessibility review" block now shows the number of accessibility deficiencies detected, separated by content type (image, display, link, media, table, text):
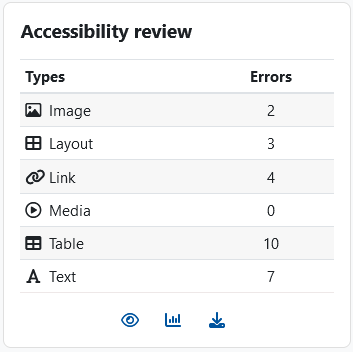
- Below the list you can find three clickable icons:
 Eye - By default, the so-called heatmap is enabled. In this, the course page uses different colors to visualize which content types have successfully passed the accessibility test and which still have deficiencies. The heatmap is only displayed to managers, it is not visible in the student perspective. If you want this to be hidden for managers as well, click on the eye icon . By mouse click the symbol changes to a "crossed out eye"
  . The heatmap is now hidden.
 Diagram - By clicking on the diagram icon, you can call up differentiated accessibility result reports with a detailed list of the deficiencies identified.
 Download - By clicking on the download icon, you can download the accessibility results report as a PDF file and save it locally.

Note
3. Heatmap
With the heatmap displayed, you can see which content types on the course page are considered accessible and which still need optimization by looking at the different colors. The colors green, yellow/orange and red are used for visual differentiation.
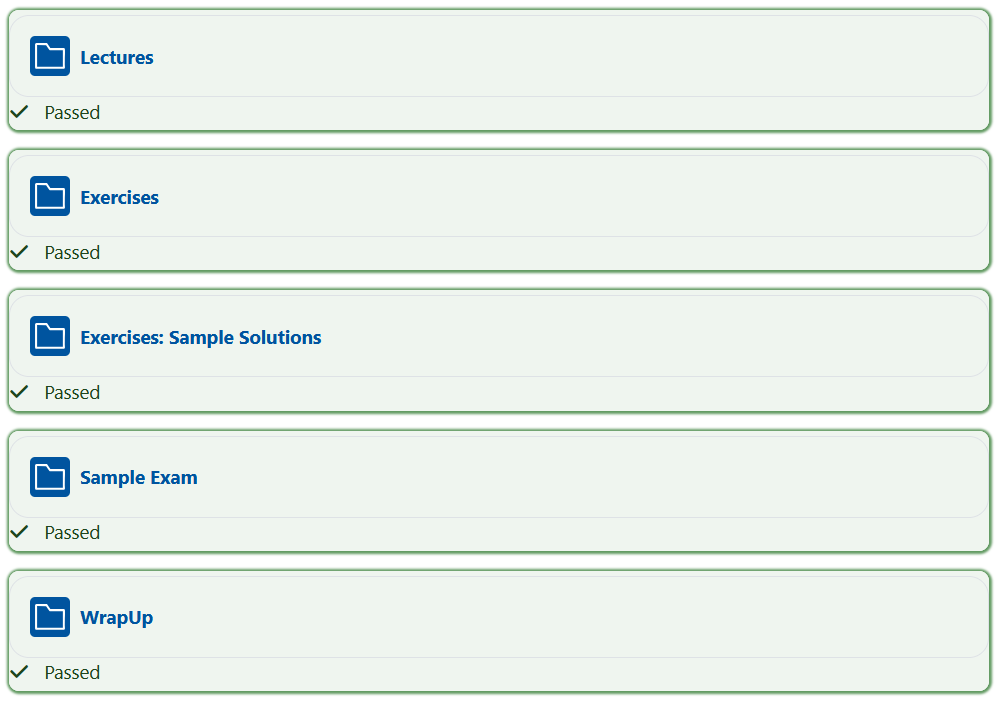
 Green - If the element meets the criteria for accessibility, it is highlighted in green and additionally marked with a green checkmark and the note "Passed"
  . The element has thus successfully passed the accessibility check and no further adjustments are required.
 Yellow/Orange - If the element has minor accessibility deficiencies, it is highlighted in yellow/orange and additionally marked with the note "Failed" and the number of identified errors
  . You should take a closer look at the detected errors and correct them if necessary. More detailed information on the identified errors can be obtained by clicking on the diagram icon in the "Accessibility review" block.
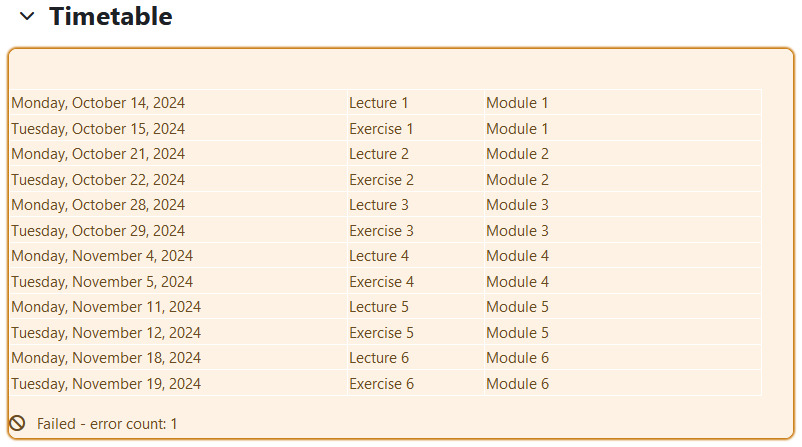
 Red - If the element has major accessibility deficiencies, it is highlighted in red and marked with "Failed" and the number of identified errors
  . You should take a closer look at the detected errors and correct them if necessary. More detailed information on the identified errors can be obtained by clicking on the diagram icon in the "Accessibility review" block.
- No color coding
RWTHmoodle has a modular structure and provides users with a number of extensions in addition to the so-called core plugins. Certain extensions (e.g. the activities Interactive Content (H5P), Progress List, Cardbox, StudentQuiz, Etherpad, Anonymous Forum and Attendance) do not support the accessibility test. You can recognize such elements by the fact that they are not color-coded, even though the heat map is activated (as an example, the "H5P" and "Checklist" activities are shown in the screenshot below):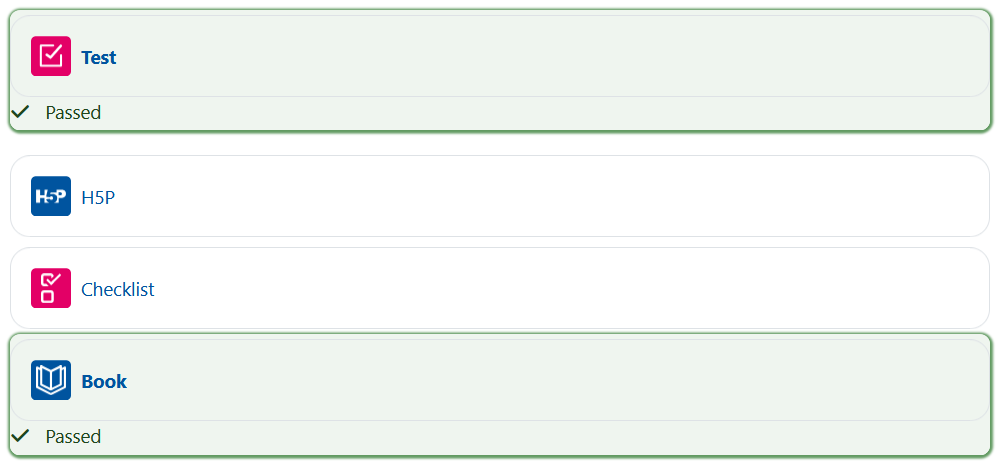
For these elements, however, you have the option of checking content created using Text Editor using an alternative "accessibility test". In the menu bar of the text editor, click on "Tools" and select "Accessibility checker". After that, you will immediately see whether any accessibility issues have been identified, and if so, which ones.
Note
When the heatmap is enabled, color markings are only made on the course page. Activity page content is included in the accessibility check, but the corresponding content on activity pages is not color-coded. If there are accessibility deficiencies on activity pages, these are only color-coded on the course page for the corresponding activity using a heat map. Regardless of this, the content of the activity pages can alternatively be checked using the "Accessibility checker" of the text editor.
4. Detailed results on accessibility
More detailed information on the identified errors can be obtained by clicking on the diagram icon  in the "Accessibility review" block. You now have 4 different tabs to choose from: Error list, Activity breakdown, Content types and Summary report. The following sections explain the content of the tabs in detail.

4.1. Error list
The "Error list" tab shows you detailed information on the errors highlighted in color using the heat map:
- Activity - The column "Activity" shows the concrete element that contains an error.
- Check - The column "Check" shows the specific defect, e.g. missing context in a link text or a missing label of a table.
- Existing HTML code - The "Existing HTML code" column shows any existing HTML code. Since the identified accessibility deficiencies can often be remedied by adapting the HTML code, the relevant sections of the faulty HTML code are shown here.
- Line - The "Line" column indicates the specific line where the HTML code has deficiencies and should be adjusted.
- Edit - Click on "Edit" to make any necessary adjustments to the element with regard to the HTML code. The corresponding element will now open. If the element contains a text editor, you can use it to adjust the HTML code:
- In the menu bar, click on "Tools" and select "Source code".
- Make the adjustments you want now.
- Save by clicking the button "Save and return to course".
Note
Certain accessibility deficiencies are not detected by the toolkit. If, despite a successful check by the toolkit, it is still unclear whether the content is actually accessible, we recommend additional testing with the accessibility check of the text editor.
The rechecking of the adapted elements for accessibility takes place automatically without having to start this process again manually. This is because once the accessibility check has been activated in a course room, follow-up checks are carried out permanently at five-minute intervals. The heatmap and error list are automatically updated on an ongoing basis with regard to current deficiencies, without this process having to be carried out by the managers. You can therefore be sure that the current accessibility status is displayed on the course page with a delay of just a few minutes.
4.2. Activity breakdown
The "Activity Breakdown" tab provides a summary overview of the test results differentiated by activity using bar charts. Activities are included either as activities, resources, or other content areas related to courses.
- Any activity without detected errors is counted as passed.

- Any activity with one or more detected errors is counted as failed.

The ratio of passed to failed activities is then displayed: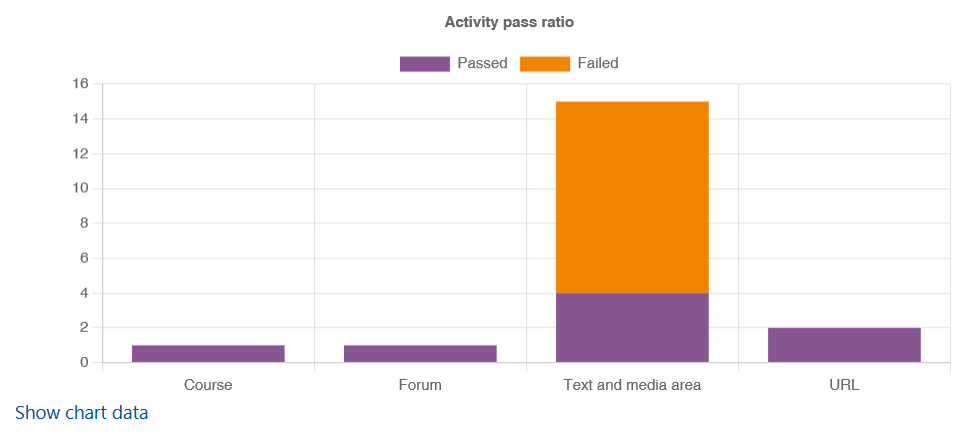
If required, click on "Show chart data" to display the number of passed and failed activities in tabular form: 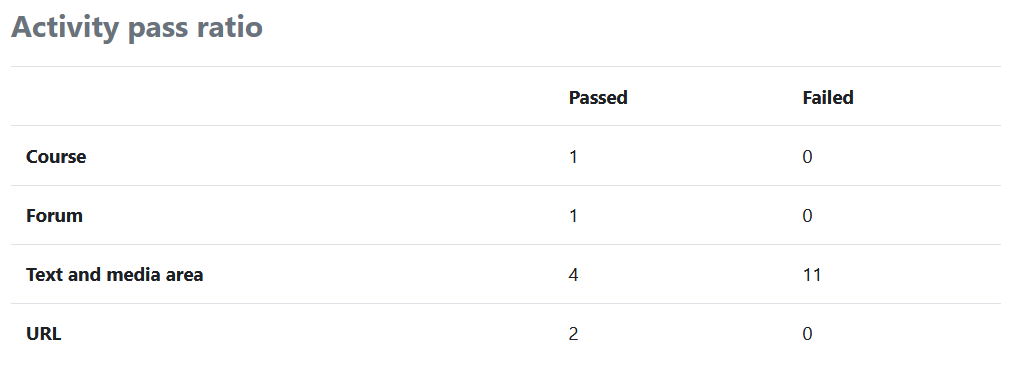
4.3. Content types
The "Content types" tab provides a summarized overview of the test results differentiated by content types using a circular diagram. There are a total of six different content types: Image, Layout, Link, Media, Table and Text. The results of the image-related accessibility check in the content type group "Image", all results of the layout-related accessibility check in the content type group "Layout", etc.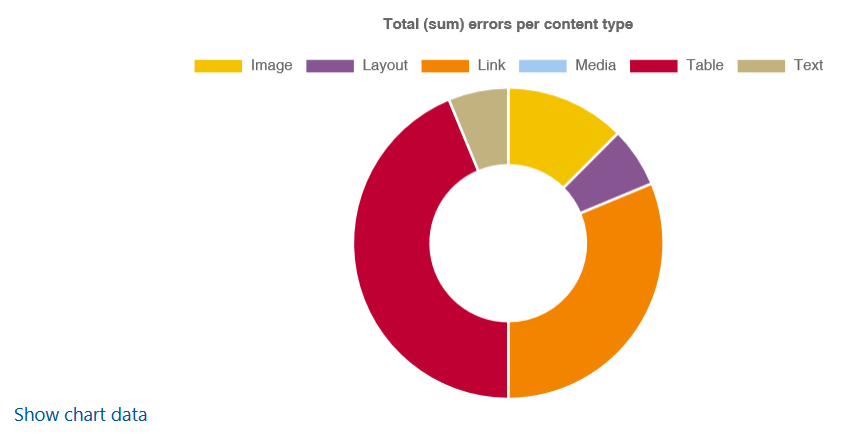
Move the mouse pointer over the diagram to a content type to view its specific error count.
If required, click on "Show chart data" to display the number of errors in tabular form, differentiated by content type: 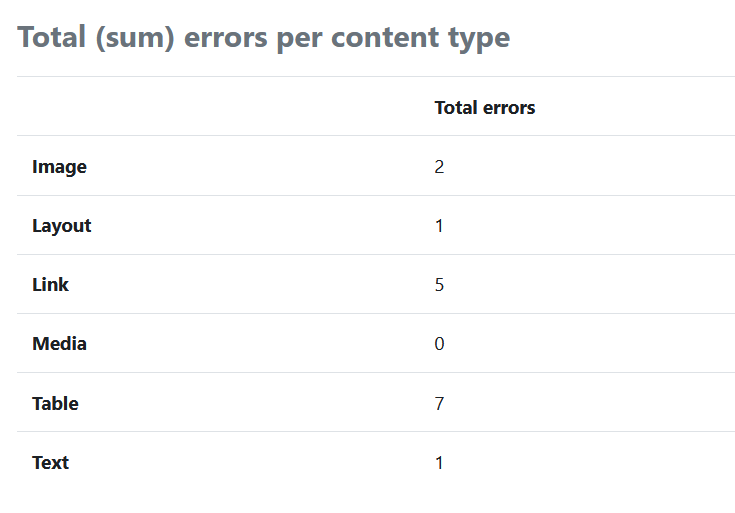
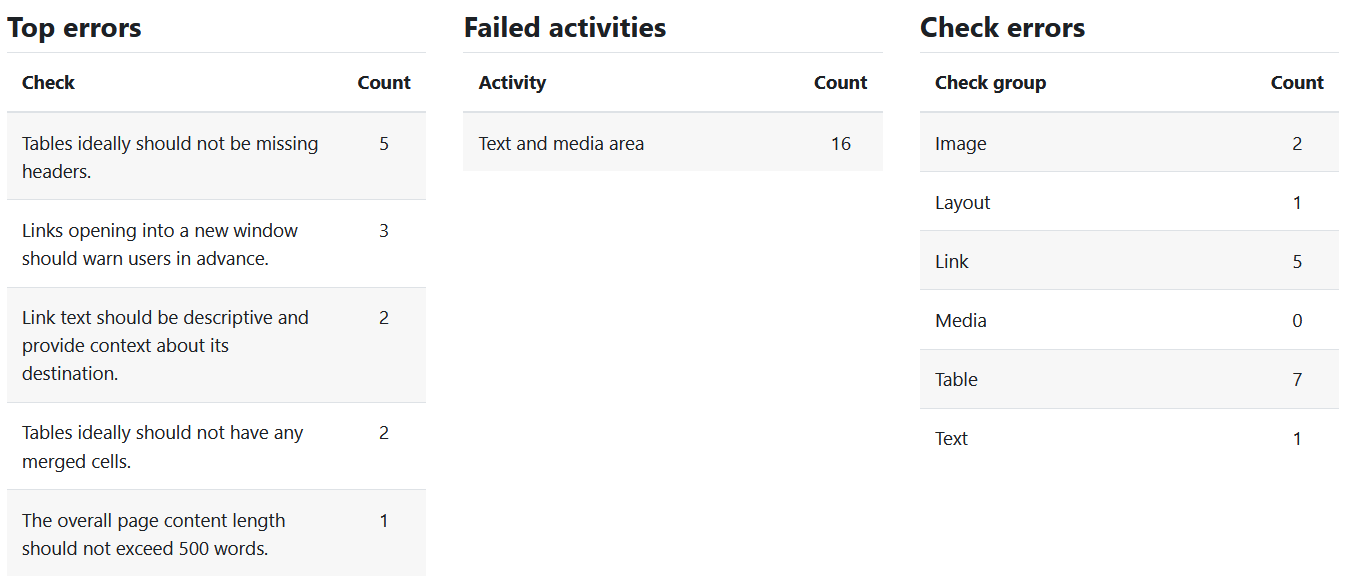
4.4. Report Summary
The Report Summary tab provides a summary overview of the information from the Error List, Activity Breakdown, and Content Types tabs.
- The column "Top errors" shows the concrete accessibility deficiencies independent of content type or related activity ( = information of the "Error list" tab).
- The column "Failed activities" shows the number of failed activities, differentiated by concrete activities, working materials and other content areas of the course ( = information of the tab "Activity breakdown").
- The column "Check errors" differentiates the failed activities according to content types ( = information of the "Report summary" tab).
5. Deactivation of the accessibility check
Once you have activated the "Submit for analysis" button  in the "Check accessibility" block, you no longer have the option of deactivating the accessibility check. However, you can deactivate the heatmap at any time by clicking on the eye symbol in the "Check accessibility" block . This means that the accessibility check continues to run in the background and can be reactivated by clicking on the eye again . Complete deactivation of the accessibility check is only possible by removing the corresponding block from the course room.
