Backing up a course

The content and structure of a course room can be backed up in whole or in part by performing a course backup. All users with the role of manager can independently create course backups of their RWTHmoodle course rooms, download them and then restore them to another course room or another Moodle system Course restore.

To backup a course room, do the steps below:
- Go to the course page.
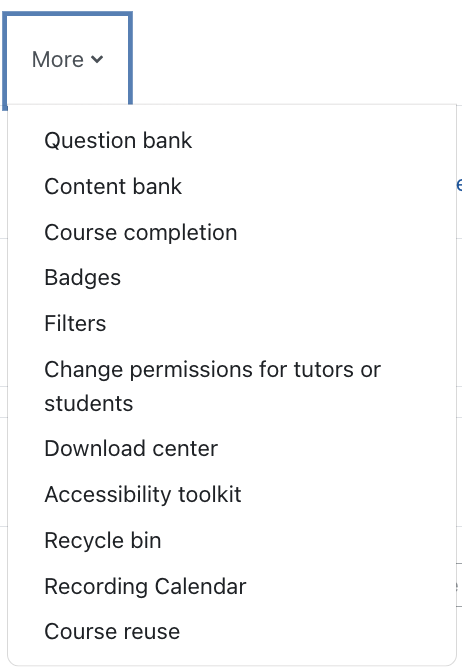
- Click "More" in the center menu guide and select "Course reuse".

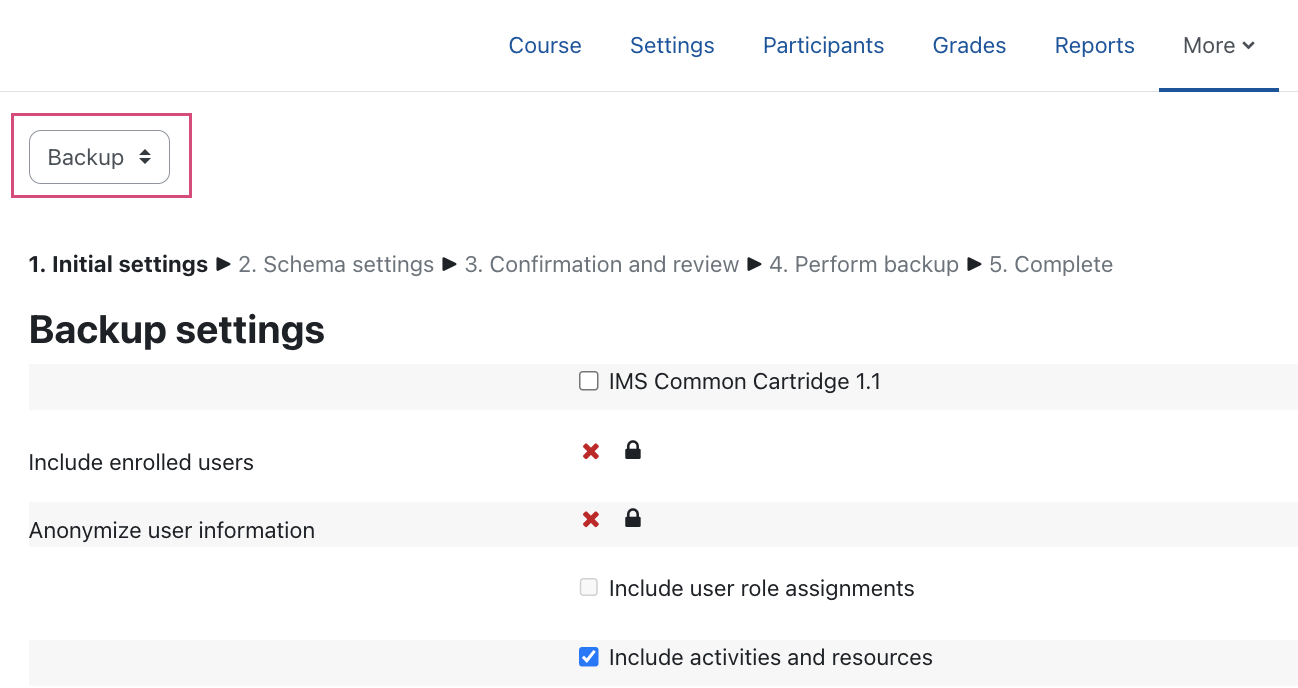
- Select the "Backup" option in the drop-down menu.

- The course backup is performed in several steps. The first step is to set the general backup settings.
- By default, the checkbox of the “IMS Common Cartridge 1.1.” option is disabled. This is a system-wide backup format. Therefore, leave the checkbox unchecked if you need the course backup for a later restore in Moodle. The course backup will then be created in the moodle internal course backup format.
Note
Basically we recommend to backup in moodle's internal course backup format (file extension *.mbz). Course backups with the format "IMS Common Cartridge 1.1" (file extension *.imscc) offer the advantage of exchanging backup files across systems and importing them into external systems. However, if the *.imscc course format is selected, certain contents such as blocks, files or filters cannot be backed up and would therefore be lost if the course backup were to be used. Since there are also reports of occasional compatibility problems when using *.imscc files, the moodle-internal MBZ format is preferable in any case, unless the file backup is to be used in a third-party system. If the use in a foreign system cannot be excluded, it is recommended to backup the course in both file formats (i.e. *mbz and *.imscc) if necessary. By default, the checkboxes in the options “Include activities and resources”, “Include blocks”, “Include files”, “Include filters” are activated. If you do not need certain selection options for course backup, you can deactivate the checkboxes by clicking on them with the mouse. Please note that as a manager you cannot include user data in course backups (e.g. forum posts, glossary entries, grades, etc.). Since it is not possible to ensure that third parties have access to user data when creating course backups, it is not possible to export user data for data protection reasons. The relevant options "Include enroled users" and "Anonymize user information" are therefore marked with a red cross as not selectable.
Note
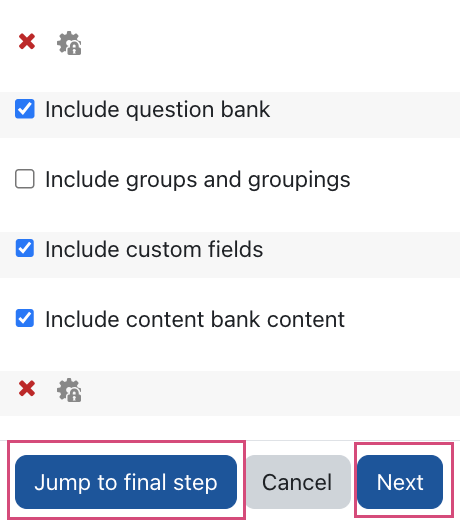
Within the scope of course backup by managers, only course structures can be saved (configured activities, resources, etc.), but no student data (e.g. forum posts, glossary entries, grades, etc.). Backing up user data is not possible for data-protection reasons.- Scroll further down the page and (de-)activate further backup options if required. If the “Test” activity is used in the learning space and/or H5P elements have been included in the learning space via the content store, the test questions of the question collection and the H5P elements are included in the course backup by default. If you do not want this, deselect the corresponding checkboxes. Groups and groupings are not included in the course backup by default. Therefore, activate the "Groups and groupings" option if required.
Note:This only saves the groups or groupings, but not the participants in the groups/groupings. Some other backup settings have been locked for managers. You can recognize them by the gear with the lock icon.
- With the "Next" button, you now go to the next step. If you want to skip all subsequent steps and already create the backup file now, click on "Jump to final step". In this case, go on to step 13.

- All elements of the learning space are now listed. In this view, you can explicitly select and deselect the checkboxes to determine which content elements should be transferred to the backup file.
Note
Since it is not possible to back up user data, the checkboxes in the “User data” column are deactivated by default. Although it is possible to activate this checkbox, it has no effect on course backup, as student data cannot be exported. Therefore, leave the corresponding checkboxes deactivated. - Then click “Next” to proceed to the next step.
- In the third step, you now have the possibility to specify the name of the backup file. Basically, you can use the entered name. If you use your own name, do not forget the file extension *.mbz (respectively *.imscc).
- Check that all the settings from the first step have been correctly applied. Also check in the "Included elements" section whether all elements to be backed up are listed correctly. All elements to be backed up are marked with a green check mark. Elements that are not to be backed up are marked with a red cross. If all settings meet your expectations, go to the end of the page.
- To start the backup process, click on the "Perform Backup" button.

- Once the process has been performed, the message "Your backup was successfully created." will appear.
- Then click on "Next". You will now be redirected to the course's backup area. In the section "User private backup area" you will see the backup file you have just created. By clicking on “Download” you can now download the file locally.
Note: Course backups made by Moodle administrators are located in the "Course backup area" section. You can also download these as needed.

Read more about this:

