Feedback

The activity Feedback is used to create and conduct surveys. Unlike tests, no evaluation of the questions is required. The activity Feedback is particularly suitable for evaluating an event or the teachers themselves.
Please also note our netiquette and general rules of conduct as well as our information on anonymity in RWTHmoodle when using the activity Feedback.

Table of Contents
- Create feedback in the course room
- Feedback configuration
- Create questionnaire
- Types of questions
- Dependent elements and dependent values
1. Create feedback in the course room
To add a activity feedback, proceed as follows:
- Switch the course room to edit mode using the "Edit mode" slider next to your name in the upper right corner.
- Click on "Add an activity or resources" in the section where you want the feedback to be visible.
- Under “Activity”, select the option “Feedback”.

- Click “Add” to create the feedback activity. You will be automatically redirected to the settings page to configure it.
2.1. Basic settings

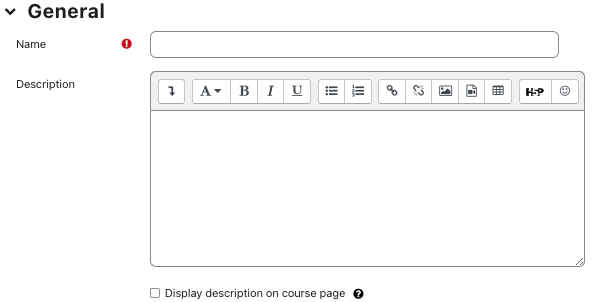
- Name- Give your feedback sheet a title.
- Description- This text is displayed before students fill out the feedback sheet. Here you can, for example, store information about the purpose of the survey.
- Display description on course page- Check the box if you want the description to be displayed on the course page as well.
2.2. Availability
You can specify a time period within which students can complete the feedback form. You can specify start, end, both, or neither of these times.

- Allow answers from- Select the checkbox and choose the start of the period if you want the feedback sheet to be available only from a specific date.
- Allow answers to- mark the checkbox and select the end of the period, if the feedback sheet should be available only until a certain date.
2.3. Questions and submissions settings

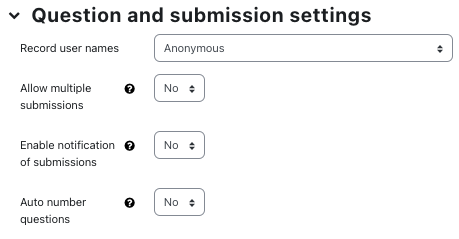
- Record user names- Select whether the survey should be anonymous or not. Note: If this setting is set to Anonymous, then instructors will not receive web notification of new feedback submissions.
- Allow multiple submissions- If set to Yes, then participants are allowed to fill out the feedback form as many times as they want for anonymous surveys.
- Enable notifications of submissions- If you set this to Yes, you as a manager will receive a notification in RWTH-Moodle that someone has completed the feedback form.
ATTENTION: Due to bugs in Moodle, anonymous feedback currently sends an email but does not display a web notification. - Auto number questions- If you set this to Yes, then the individual questions in your feedback sheet will be numbered automatically
2.4. After submission

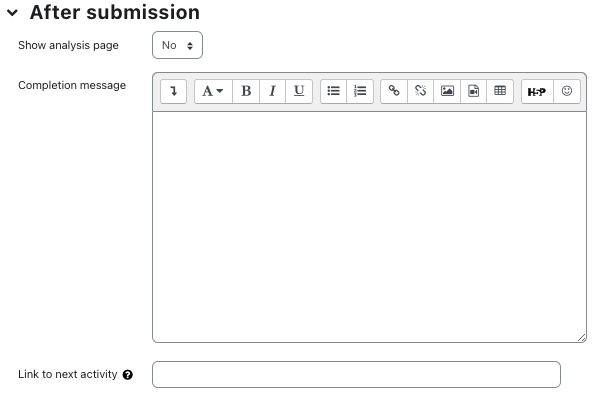
- Show analysis page after submission - Choose whether you want participants to see an analysis of the survey after they have completed it.
- Completion message - Here you can enter a text that will be displayed to the participants after submitting the feedback sheet, for example, a thank you or something similar.
- Link to next activity- After submitting the feedback sheet, a page with the Next button will appear. By default, when students click it, they are taken back to the course room. If you want to redirect to another page, enter the corresponding URL of that page here.
2.5. Common module settings
- Availability - Select whether the feedback activity should be immediately displayed to students or hidden from them.
- ID number - The ID number for Wiki is used to assign a label that can be used in the Assessments section when calculating overall assessments. If Wiki is not needed to determine ratings, the field can be left blank.
- Group Mode - There are three different settings for group mode: No groups - Separate groups - Visible groups.
- Grouping - A grouping is a collection of groups. If the availability of the wiki is restricted to group members, only students in the groups that are in the selected grouping will be able to edit the wiki. The group settings must be set to separate or visible groups.
2.6. Restrict access
With these settings you can link the visibility and availability of the feedback activity for students to certain conditions. For general information, read the article restrict access (prerequisites).
2.7. Activity Completion
With these settings you define criteria or conditions when an activity is considered completed (i.e.: successfully processed). For detailed information, see the article activity completion settings.
2.8. Notification about content change
The settings for the activities can be reached after creating them within the activity via the central menu navigation. Here you will find activity-specific settings and you can also save the activity directly individually.
If you subsequently make changes to the settings, activate the checkbox "Send notification of content change" to inform all participants about the new or changed activity. All participants who can access the activity receive the notification.
2.9. Save
Clicking on "Save and go to course" will return you to the course page.
After you create a feedback activity, you need to create the questions in the feedback sheet:
- Click the feedback activity.
- Click on "Edit elements".
- In the Add question section, select an appropriate question type from the Select drop-down menu. The available question types are described below.
4.1. Longer text answer
You use this to create a text area in which the person filling out the feedback form can enter a response as free text. You define the size of the text area by specifying the number of rows and columns.
4.2. Short text answer
You use this to create an input line in which the person filling out the feedback form can enter a short response. You define the length of the input line by specifying the number of characters.
4.3. Information
- This element adds an additional field of information to the feedback form. It can be:
- Course - indication of the course room to which the feedback sheet belongs.
- Course catagory- indication of the course area to which the feedback sheet belongs.
4.4. Multiple-Choice
- With this question type, you specify multiple answer options. You can choose between three different display options:
- Single answer -Radiobutton - next to the individual answers a checkbox is displayed, from which the person filling in the feedback sheet can mark one;
- Multiple answers - a checkbox is displayed next to the individual answers, several of which can be marked;
- Multiple choice - single answer (dropdown) - the possible answers are displayed in the form of a dropdown menu from which one must select an applicable answer.
4.5. Multiple-Choice (Rated)
This question type is similar to the multiple choice question with drop-down list above, with the difference that there is a number behind each possible answer. This number enables averaging of the answers, for example when using a Lickert scale.
4.6. Numeric answer
- For this question type, a number is expected as the answer. Optionally, you can specify a range from which the answer number should be given. E.g. How many consultation appointments (0-10) would you like to have?
4.7. Add page break
- Inserts a page break. You can use this to break a long questionnaire into several parts.
4.8. Label
- Use this element if you want to insert a text for explanation or information between two questions. This way you can structure a feedback sheet, divide it into sections, etc.
5. Dependent elements and dependent values
It is possible to redirect the user to a specific question depending on the last answer. For example, if a user selects 'Yes' to the question "Do you have a car?", he will be redirected to a different page than if he selects the answer 'No'. To set up this dependent question:
- Set up the initial question. In any case, in addition to the "Question" field, the "Text field" field must also be filled in. This is because the initial question is only available as a "Dependent element" if a freely selectable name has been assigned in the text field and can be selected at the appropriate point.
- Add a page break.
- Add the question to navigate to in case of a 'Yes'.
- In "Dependent Element", select the name of the first question.
- In "Dependent Value" enter the answer that should lead to this question (in this case Yes).
- Repeat this process for all other desired answers.

See also:

