Embedding of interactive content (H5P) with the editor

In addition to the option of making H5P content available in the course room via the activity "Interactive Content (H5P)", there is also the alternative option of integrating H5P content into other activities or resources via the editor. This is particularly recommended if, e.g. interactive videos are to supplement or complete the content of existing activities or materials.
For this activity, you can use Tagging (Tags).
Note
If you want to provide the H5P content via the editor, you will find it i.a. in Text and media areas (label resource), Pages, Books, Forums, the field "Description" in all activities and materials or in a block of the type "HTML".
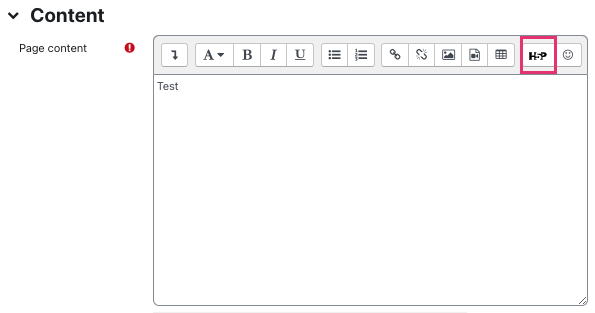
In the editor toolbar, you will find an H5P button, which can be used to easily embed already created H5P content into the activities and materials. In the following, the integration of an H5P content into a "Page" is described as an example. The procedure for the other activities and materials is basically similar to this one.
- Switch the course room to edit mode using the "Edit mode" slider next to your name in the upper right corner.
- Click on "Add an activity or resource" in an appropriate section.
- Click in the "Resources" tab on the option "Page".

- Give the Page an appropriate name.
- Optionally, enter a brief description of the page content. This will be displayed - if you select the corresponding option - either on the course page or on the left in the navigation bar under "Activities" > "Resources". Note: An optional H5P video can already be included here. If you wish to do so, please follow the instructions in step 7.
- In the "Content" field, optionally enter a heading or a short explanatory text.
- In the editor toolbar, click on the arrow symbol in the upper left corner. The complete editor toolbar will then open.
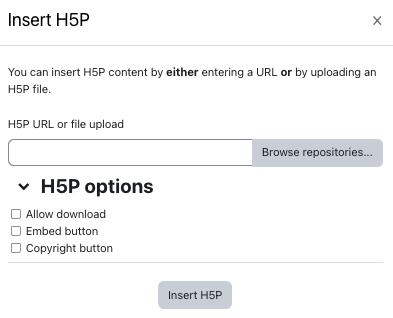
- First, click on the position in the field "Page content" where you want the H5P content to appear embedded. Then click the "Insert H5P" button.

- The "Insert H5P" dialog box opens. Click on "Browse repositories".

- In the new window, select the option in which the content should be uploaded by simply clicking on it. You can either choose to "Upload a file" that has already been created or to fetch suitable H5P content from the "Content bank".
- Upload file - Externally created H5P content can be selected here and uploaded with a mouse click. Please note that the H5P content uploaded in this way does not allow any subsequent editing or changes in RWTHmoodle. H5P content that has already been uploaded can only be replaced and thus modified by uploading new H5P content.
- Get H5P content from the Content bank
- Make a copy of the file - The H5P content is copied from the Content bank and saved in the context of the embed.
- Create an alias/shortcut of the file - The H5P content is linked from the Content bank. Changes made in the file of the Content bank are automatically applied to the embed.
- By clicking on "Select file" you accept the H5P content and return to the "Insert H5P" dialog.
- Under "H5P Options", customize which links should be displayed in the embedded content. We recommend that you select only "Copyright button" here.
- Close the dialog with "Insert H5P".
- The H5P content now appears as an inset at the previously selected position. If necessary, make further adjustments to the text page. Finally, save the changes by clicking "Save and display".
- The H5P content is now displayed and can be started.

