You are located in service: RWTHmoodle

Import groups

Import groups

Kurzinformation

The Import Groups function is an easy way to import groups via a CSV file. However, this function only creates empty groups. Group members are not allocated. To import group members, use the Group Tool activity.


Detailinformation

1. Prepare a CSV file with Group info

First, create a CSV file with the desired groups. Write the mandatory field "group name" in the first line of the first column of the CSV file. In each subsequent line, write the names of the groups you want to import. They must not contain umlauts ä, ö, ü. Create the file as shown here:
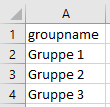
The small screenshot shows one column from a spreadsheet programme. It has four rows with one cell each, the first  contains the header text, "groupname". In the other three cells there are the following texts displayed: "Gruppe 1", "Gruppe 2", and "Gruppe 3".

Save this table as a CSV file. The file must be saved in ANSI encoding, at least not in UTF-8 encoding.


2. Import prepared CSV file

You can now import the file into your learning room:

  1. As a manager, open the course room in which you want to create groups.
  2. Click on the "Participants" section in the center menu to open the list of participants.
    The screenshot shows the horizontal menu with the options "Course", "Settings", "Participants" (which is highlighted), "Grades", "Reports", and "More".
  3. Here, click on "Groups" in the drop-down menu to get to the groups area.
    The screenshot shows a view of the dropdown menu with all accessible actions. Under "Groups" there is "Groups", "Groupings", and "Overview". Under "Permissions" there is "Check permissions" and under "Enrolments" you can find "Participants View". "Other" has two actions, "Export student table" and "Import students into group". The action "Groups" is highlighted.
  4. Click on the "Import Groups" button.
    The image shows buttons that can perform group related actions. It starts with "Edit group settings" and "Delete selected group" which are greyed out indicating that they are not accessible. "Create Group", "Auto-create groups", and "Import groups" are the other three buttons, where "Import groups" is highlighted using an arrow.
  5. Drag and drop the file into the file storage area.
    The screenshot shows the upload form for a file. In the first row the button "Choose a file..." allows selecting a file, next to it there is a text saying "Maximum size for new files: 250 MB". Below this there is a drag and drop area, where a file can be dragged to upload. A text here says "You can drag and drop files here to add them".
  6. Click on the button "Import groups".
     
  7. If the import was successful, the imported groups are listed. Click on "Next" to return to the group's area.

 Zusatzinformation

For more information: 

last changed on 08/23/2023

How did this content help you?

GNU General Public License 3
This work is licensed under a GNU General Public License