You are located in service: RWTHmoodle

Adding and editing blocks
Adding and editing blocks

Kurzinformation

Blocks are elements that contain various information and can be added to the right column of an RWTHmoodle course room.


Anleitung 

1. Add blocks

  1. Switch the course room to edit mode using the "Edit mode" slider next to your name in the upper right corner.

    The screenshot shows the "Edit mode" switch which is turned on.

  2. Select the block from the drop-down menu "Add block" above the existing blocks. The new block is automatically added to the other blocks.
    The screenshot shows the "Add a block" button.
     

2. Move blocks

  1. Switch the course room to edit mode using the "Edit mode" slider next to your name in the upper right corner.

    The screenshot shows the "Edit mode" switch which is turned on.
  2. Move the mouse into the block you want to move and drag it to the desired position using the crosshair symbol Screenshot: Crosshair symbol.
 

3. Edit and delete blocks

  1. Click the gear shown in the upper right corner of the block.
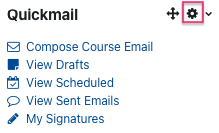
    The screenshot shows the "Quickmail" block. Next to the name there are two icons, a crosshair to move the block and a gear icon to edit the settings. Below this headline the available options are listed, "Compose Course Email", "View Drafts", "View Scheduled", "View Sent Emails", and "My Signatures".
  2. In the menu which pops up, select the respective adjustment (configuration, visibility, rights of the block) you wish to set.
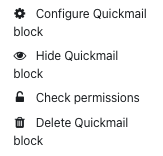
    The screenshot shows the options in the block edit menu, "Configure Quickmail", "Hide Quickmail", "Check permissions", and "Delete Quickmail block".
  3. The block can also be deleted this way.

Zusatzinformation

For more information:

last changed on 07/26/2024

How did this content help you?

GNU General Public License 3
This work is licensed under a GNU General Public License