


Electronic post-exam reviews for face-to-face exams or online remote exams with Dynexite

You can use the option “Provide feedback file” within the activity “Assignment” to upload the exam correction file. The students do not need to create their own submissions as they usually do in assignments. Instead a so-called "feedback file" is assigned to them without them having created a submission of their own.
The exam correction file can be uploaded via the grading view of the assignment for each student individually or via a specifically prepared ZIP archive for all students simultaneously. The ZIP archive contains an individual folder for each student. You can create this folder structure manually or automatically via script.
As an alternative to the manual reconstruction of the necessary folder structure, you can have the students who want to do the review create a dummy submission. You then download these dummy submissions as a ZIP archive which already contains the required folder structure. The feedback files then only need to be placed in the appropriate folders and a new ZIP archive needs to be prepared for upload.
For the preparation of the review, it does not matter whether you have digitized the exams of a face-to-face exam for the review or whether you have carried out a Dynexite online remote exam with offline correction. In both cases, the exam papers are available digitally in PDF format together with a list of the names and matriculation numbers of the exam takers.
Content
1. Create and configure the assignment
2. Provide exam correction files one by one
3. Provide exam correction files with a ZIP file (without student submission)
4. Provide exam correction files with a ZIP file (with student submission)
5. Students view
6. Limit access period of the review
1. Create and configure the assignment
- Open the course room where you want to upload the exam files.
- Turn on the edit mode by clicking “Turn editing on” (top right).
- Click “Add an activity or resource” in a fitting section.
- Choose “Assignment” in the list of activities. A new assignment will be created.
- Give the activity a meaningful title.
- Briefly state the purpose of the assignment under “Description”. In addition, describe the general conditions that apply to the post-exam review. Following the cease-and-desist declaration template by Department 1.1 - Academic Affairs, Examination, and University Law, point out in particular that the exam documents made available via the assignment may be distributed neither in written form nor digitally and that their content may not be made accessible to other persons.
- Under “Availability” choose past dates for “Allow submissions from” and “Cut-off date”. “Due date” may remain unselected.
- Under “Submission types” do not select any option as the students are not supposed to hand in solutions.
- Under “Feedback types” select “Feedback files”. This setting allows you to assign students their feedback file (= exam file) individually via the grading view of the assignment. If you would like to use a ZIP archive to assign the feedback file (= exam file) to multiple or all students at once, select the option "Offline grading worksheet". This requires additional steps to prepare the ZIP archive appropriately so that the assignment works correctly. However, especially for larger numbers of students, this will speed up the process of providing the exam files (see below 3. Providing exam files with a ZIP file (without student submission)).
- Under “Notifications”, set “Default setting for ‘Notify students’” to “No”. This ensures that students are not automatically notified when uploading and saving the feedback (=exam) file. Instead, upload all data before turning the assignment visible and notify the participants via an announcement or the quickmail block as to when the exam file may be reviewed. The two remaining options under “Notifications” (“Notify grades about submissions” and “Notify graders about late submissions”) may remain on “No”.
- Under “Grade” choose “None”. Exam results are later published in a separate grade item directly in the grades section (see manual “Publishing exam results”).
- Under “Common module settings”, set “Availability” to “Hide from students” so the activity will not be visible to students after saving. This way you can ensure that the exam file is visible to the students only after you have uploaded all files and manually set the availability to “Show on course page”.
- All other settings can remain on default. Save the newly created assignment by clicking “Save and display”.
2. Provide exam correction files one by one
Open the assignments and click “View all submissions”. Now you see all course participants in one list.
Click “Grade” next to the students who will review their exams. You will be forwarded to the grading summary page.- Upload the participant’s exam using the upload box for feedback files and end the process by clicking “Save changes”. Alternatively, “Save and show next” will forward you to the next participant.
- Once all files are uploaded, make the assignment visible to the students on the course page using “Edit” > “Show”.
- Send out an announcement or a quickmail to notify the students that the results may now be viewed.
3. Provide exam correction files with a ZIP file (without student submission)

Note
If you selected the Offline Grading Worksheet option when you configured the assignment in step 9, you can also use this worksheet to create a ZIP file containing the exam correction files. The files in the ZIP file must be named appropriately. Then they can be assigned directly to the students. The script mentioned above in the blue box will automate the preparation of the ZIP file described in steps 3 to seven.
Since the manual creation of the appropriate folder structure described below is time-consuming and comparatively error-prone, we rather recommend the procedure described under 4. Provide correction files via ZIP file (with student submission).
- Open the assignment and click "View all submissions”. Now you can see all participants of the course room in a list.
- Select "Download grading worksheet" from the "Grading action" drop-down menu above the list.
- Open the downloaded CSV file with a spreadsheet program, for example, Microsoft Excel or LibreOffice Calc.
- The table consists of a series of columns. The relevant columns are "Identifier" (Column A: Student 123456), "Full Name" (Column B: Last name, first name) and "Registration number" (Column C: 876543). Please note: The identifier of the participants from this list is not identical with the matriculation number! It's an assignment-specific identifier instead.
- Now adjust the file names of the exam files. Prefix the file name with the combination "Last name, first name" from column B, the ID from column A (without the specification "participant"), and the specification "assignsubmission_file_". Also, make sure that you use the correct separators. The correct file name must have exactly this format: "Last name, first name_456789_assignsubmission_file_filename.pdf". Instead of the .pdf file type, you can also use other file types. Column C with the matriculation number is only needed to verify that you are assigning the files correctly if the names are identical.
- Instead of customizing the file names, you can also create folders on your computer that are named using the same naming scheme: "Last name, first name_123456_assignsubmission_file_". Again, the folder name must exactly copy the data in the grading worksheet and must have the correct separators. The variant with folders also allows you to provide several exam files per person.
- Then place the appropriate exam files in the prepared folder. The filename does not have to adhere to a predefined scheme. However, if you use the script linked above, the naming scheme "matriculation number_surname" is assumed. The script also always follows this variant with folders in which the exam file(s) are saved.
- Save the prepared files (or the prepared folders from variant 5.1.) in a folder on your computer.
- Create a ZIP file from this folder. To do this, right-click on the folder and select "Send To" > "ZIP Compressed Folder" (Windows) or "<Folder Name> Compress" (Mac).
- Now switch back to the submission list in RWTHmoodle. In the drop-down menu "Grading action" above the list, select the option "Upload multiple feedback files in a zip".
- Drag the prepared file into the "Upload a file" field and then click "Import feedback file(s)“.
On the following page "Confirm zip upload" check the correctness of the data. Click "Confirm" to accept the files.
Note
If the information in the zip file is incorrect, for example, due to wrong IDs, wrong name spellings or wrong separators, RWTHmoodle will automatically display the message "No changes" after the upload. In this case, check the content of the zip file.- RWTHmoodle first shows you an overview of how much feedback has been added or updated. With a click on "Continue" you get to the list of submissions. There the files are assigned to the students according to the information in the file names (variant 5.a.: folder names).
- Once all files are uploaded, make the assignment visible to the students on the course page using “Edit” > “Show”.
- Send out an announcement or a quickmail to notify the students that the results may now be viewed.
4. Provide exam correction files with a ZIP file (with student submission)
Since the manual creation of the folder structure required under 3. Provide exam correction files with a ZIP file (without student submission) is error-prone, we recommend another way, in which the folder structure can already be downloaded from RWTHmoodle. To do this, have the students who want to review the exam create a dummy submission in the prepared assignment. After closing the login window you can download the submissions of these students as a ZIP file. This then contains the required folder structure. The exam review files are then placed directly into the folders and a new ZIP folder is created that can be uploaded.
- Call up the assignment and adjust the settings made above at 1. Create and configure the assignment as follows.
- In the "Description" field, explain what you want students to do. For example, ask them to upload the signed Cease-and-Desist Declaration Template provided as an "Additional File" from Division 1.1 - Academic Affairs, Examination, and University Law as a dummy solution. This advises students that the exam materials made available via the assignment may not be distributed in written or digital form, and their contents may not be made available to others.
- Under Availability, set a "Allow submissions from" as well as a "Due date" by which the dummy submission should be created. Set the "Cut-off date" to the same date as the due date.
- For "Submission types", select the "File submission" option.
- Set the "Number of uploadable files" to "1".
- Set the "Maximum number of uploaded files" to a low value, e.g. "1 MB".
- Click "Choose" at "Accepted file types". In the selection window, scroll to "Documents", click "Expand" there, and then select "PDF". Then scroll all the way down in the selection window and select "Save Changes" to apply the selection.
- All other settings can remain as before. Save the new settings with "Save and return to course".
- Now collect the students' submissions. After the due date or the cut-off date has passed, you can download the solutions as a ZIP file.
- To do so, open the assignment and click on "Show all submissions" in the "Grading summary.
- You are now on the submission list. Scroll down to the bottom of the list and in the "Options" section, select the "Download submissions in folders" setting.
- Next, click on the "Grading action" field above the list and select "Download all submissions".
- The submissions will now be downloaded as a ZIP file. Based on the settings made in step 11, the ZIP file with the submissions contains a folder for each student with the name of the person and a submission ID, which contains the documents of the respective person. So, in the example for "Mustermann, Studenta", the signed Cease-and-Desist Declaration.
- Click again in the "Grading action" field and select "Download grading worksheet". It will be automatically downloaded as a CSV file.
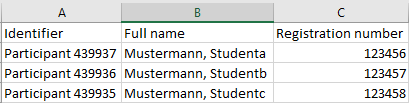
- Then open it with a spreadsheet program, for example, Microsoft Excel or Libre Office Calc. The grading worksheet consists of a number of columns. The relevant columns are "Identifier" (column A: Participant 1292934), "Full Name" (column B: Last Name, First Name) and "Registration number" (column C: 101012). Please note: The Identifier of the participant from this list is not identical to the registration number, but represents an assignment-specific ID!

- Now use the data contained in the table (registration number and assignment ID) to place the prepared correction files in the appropriate folders.
- Then follow the steps described above in 3. Provide exam correction files with a ZIP file (without student submission) from step 7 to upload the correction files and have them assigned to the students.
Once you have made the assignment visible, the students can see the exam file. They can also download and save the provided feedback file.
6. Limit access period of the review
6.1. Limit access period manually
Hide the assignment manually in order to restrict the review period.
Note
- Open the course page and access edit mode by clicking “Turn editing on” (top right).
- Behind the assignment, click “Edit” > “Hide” to hide the assignment from students.
Once the assignment has been hidden, it cannot be accessed anymore. If students have still got the feedback file open, it can still be clicked but will not be shown anymore. Also, it cannot be downloaded anymore. Clicking the file will open a notification that reads “This activity is currently not available.”
6.2. Limit access period automatically
To automatically limit access to the review, use the "Restrict access" section in the activity settings. Here you can limit access to certain groups available in the course and/or to a certain time window. To limit access to a certain time window add a condition of the type "Date" with the start date of the review and a second condition with the end date. Set the mode of the conditions to "must" and "all", i.e. both conditions must be fulfilled by the students.
If access is to be additionally restricted to a group, use "Add restriction" to add a third condition that must also be met.
These restrictions ensure that only a smaller group of students can access the review at once and ask questions directly afterward.
For details on the setting options, please refer to the instruction Restrict access.
Additional information:
- General information on digital post-exam reviews
- Framework for electronic reviews
- Signing up for post-exam review
- Restrict access
- Scripts for preparing the review for exams with a large number of participants
