Flexible sections format

The flexible sections format is an alternative to the section format that is activated by default. In both formats, the course content is structured by topic and displayed one below the other as topic sections. The key difference of the flexible sections format is that any number of subsections marked as such by indentation can be added to a section, which can be expanded and collapsed as required. The flexible sections format is therefore a useful alternative for lecturers who prefer a vertical arrangement of the individual sections but, due to the amount of materials and activities provided, require several levels of structure and therefore a higher nesting depth of the topic sections in order to create more structure and clarity in the course room.
Contents
1. Configuring the flexible sections format
To change the standard format to the flexible sections format, you should use the following steps:
- Open the course room in which you want to change the layout.
- Choose "Settings" in the central menu to open the course settings.

- Scroll down to the "course format" section
- Select the "Flexible sections format" from the "Format" drop down menu.
- After selecting the format, further options will be displayed to configure the format.
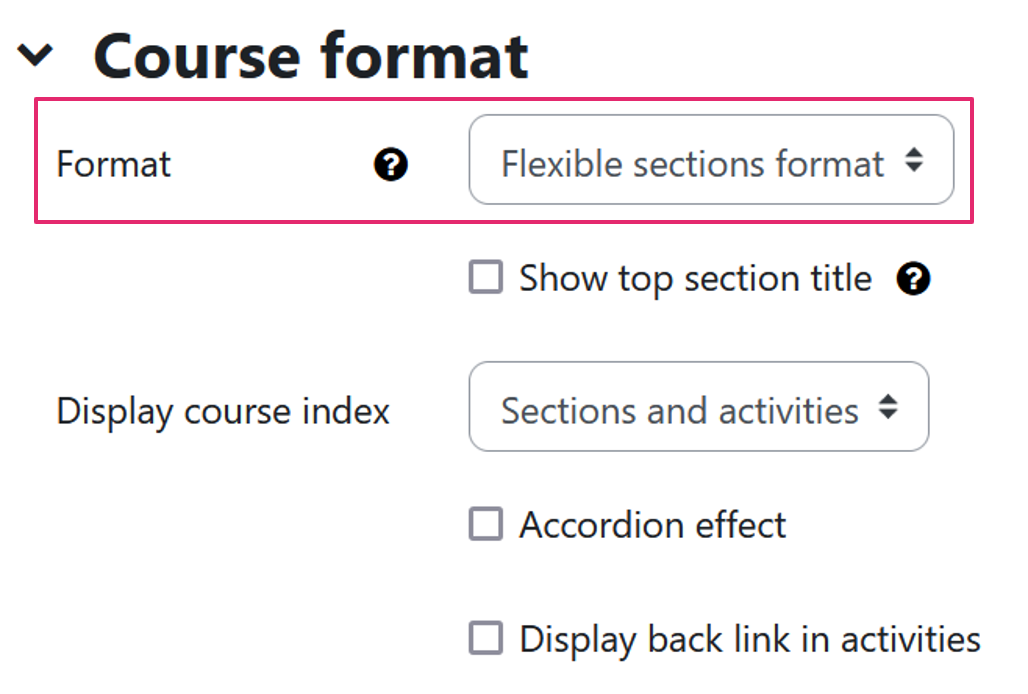
- After selecting your settings, you must save your changes with "Save changes".
1.1. Show title of parent section
By default, the content of the top section is permanently visible on the course page and cannot be collapsed. The name of this " section 0" is not displayed in this case. If you would like to make this section collapsible and expandable like all other sections, activate this option and check the box "Show title of parent section". Section 0, which can now be expanded and collapsed, is then given the title "General".
1.2. Displaying the course index
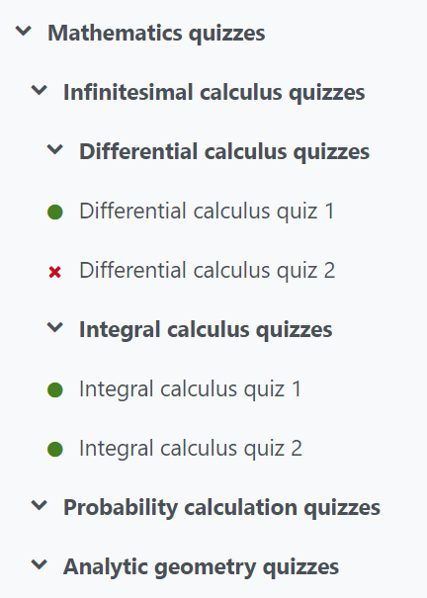
The course index is the left-hand sidebar in the learning space. It shows the course sections and the course content they contain and simplifies navigation in the course room, among other things. The structure hierarchy of the course page is mapped in the course index. This means that subsections are also indented in the course index.
- "Sections and activities": In the default setting, the activities and study materials assigned to the sections are displayed in the course index alongside the sections, which has the advantage that all course content can be accessed directly from the course index:
- "Sections only": Only the sections are listed in the course index, not the course content (activities and study materials) they contain. This has the advantage, particularly in course rooms with lots of material, that the structure of the course room and its sections can be seen more easily. It also reduces the amount of scrolling required. The disadvantage of this option is that in this case it is no longer possible to navigate directly to the learning content via the course index:
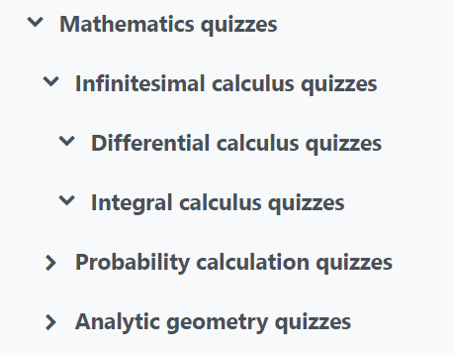
- "Do not display": The course index is completely hidden.
1.2. Accordion effect
By default, you can expand any number of sections in the learning space at the same time. To do this, click on the corresponding arrow icon in each section that you want to expand ![]() . If you only want one section and its content to be visible at a time, activate the "Accordion effect" checkbox. In this case, all other sections and subsections are automatically collapsed as soon as you expand another section. This reduces the amount of scrolling in course rooms with a lot of material, which can become a problem when too many sections are expanded at the same time. One disadvantage is the increased clicking effort, as it is no longer possible to display the course content of several sections at the same time.
. If you only want one section and its content to be visible at a time, activate the "Accordion effect" checkbox. In this case, all other sections and subsections are automatically collapsed as soon as you expand another section. This reduces the amount of scrolling in course rooms with a lot of material, which can become a problem when too many sections are expanded at the same time. One disadvantage is the increased clicking effort, as it is no longer possible to display the course content of several sections at the same time.
1.3. Display return link in activities
If you activate this checkbox, a return link is displayed in all activities and study materials, which enables users in the course room to return directly to the section or subsection in which the selected course content is located by clicking the link. This can simplify navigation in the course room, as it would otherwise be necessary to return to the section via the course index.
2. Using the flexible sections format
Once you have selected the desired settings for the course format, you can add as many sections and subsections to the course room as you like.
2.1. Adding a section
To add a section, proceed as follows:
- Switch the course room to edit mode using the "Edit" slider next to your name in the top right-hand corner.

- Click on "Add section" in the content area at the point where you want to add a new section. The section is added by default with the title "Section" and a number.

2.2. Editing a section
Click on the "three-dot icon"  to the right of the name of the added section and then select the "Edit section" option. You can now customize the title, description and design. Alternatively, you can also customize the title by clicking on the pencil icon
  .
.
2.3. Adding a subsection
To add a subsection to an existing section, click on the "three-dot icon" ![]() on the right-hand side of the desired section in edit mode and then select the "Add subsection" option.
on the right-hand side of the desired section in edit mode and then select the "Add subsection" option.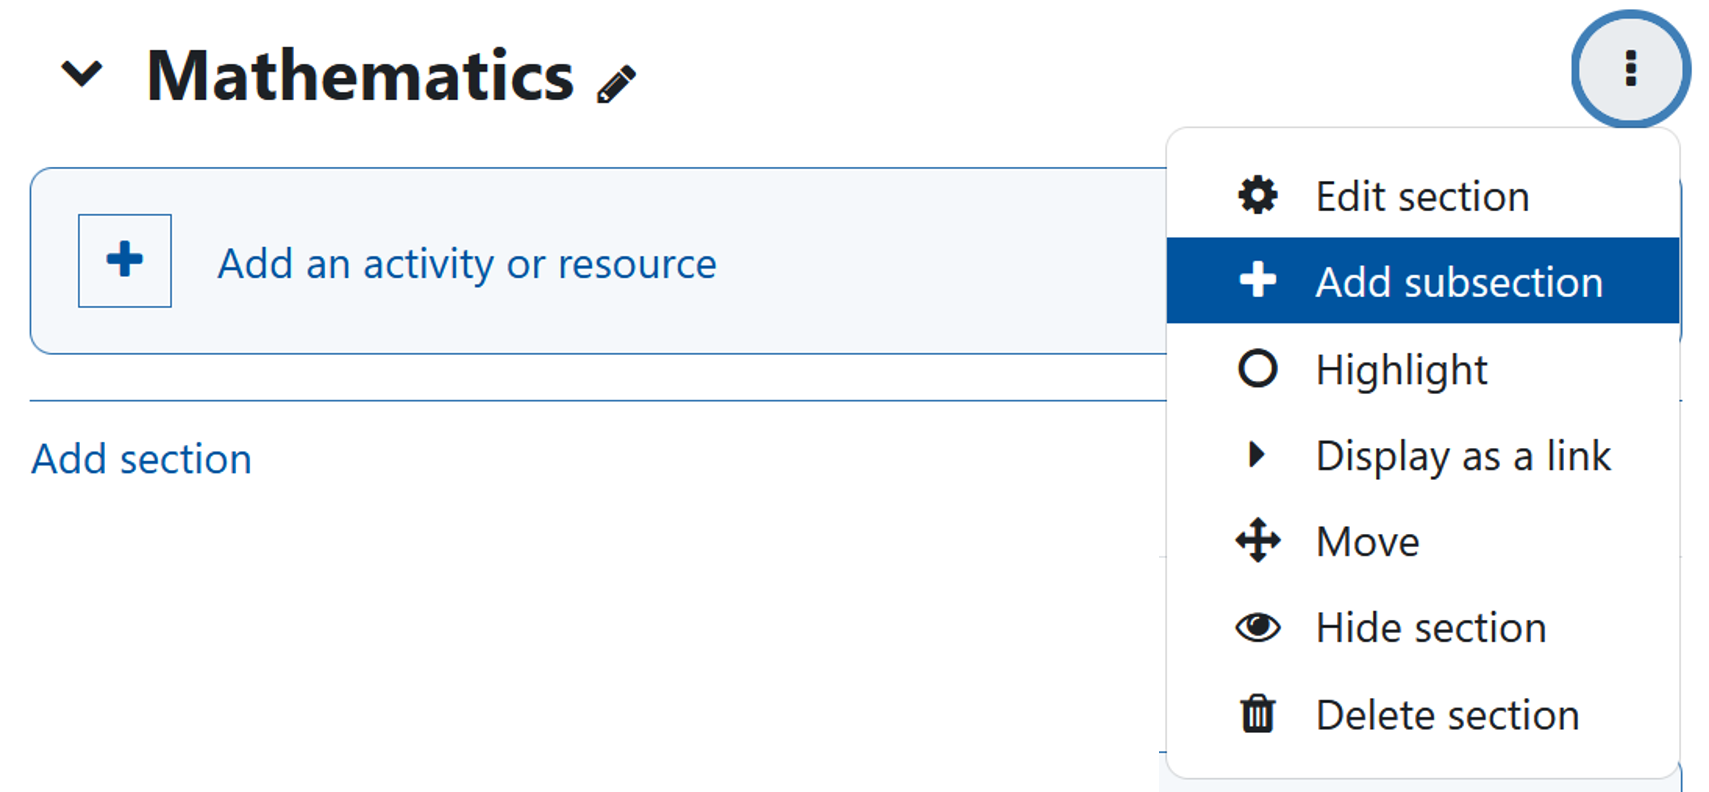
By default, the subsection is added with the title "Section" and a number and indented below the parent section on the right: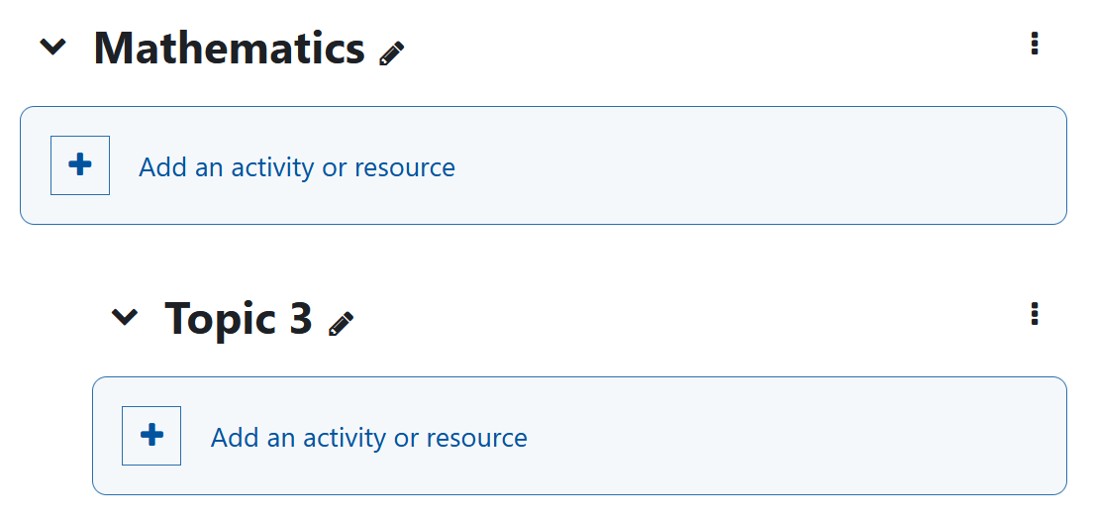
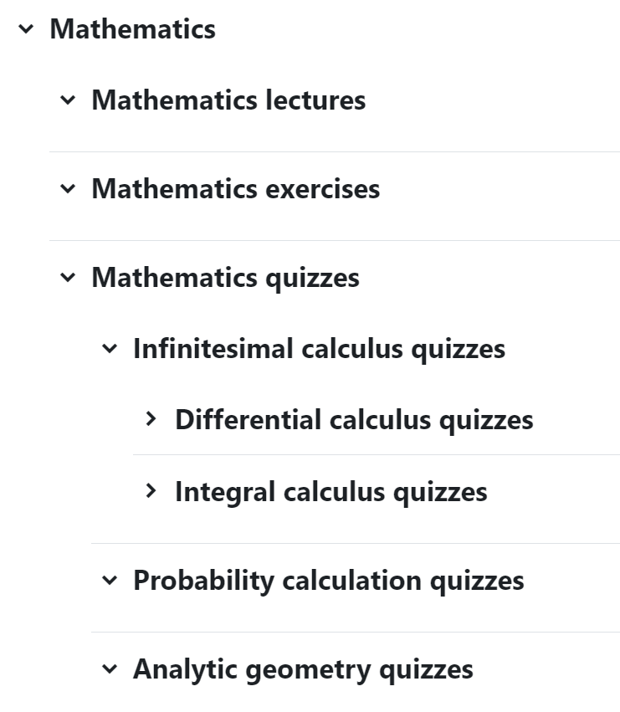
If the selected section already contains one or more subsections, the newly added subsection is added to the list of existing subsections. A separate subsection can also be added to a subsection. By adding subsections to existing subsections, several levels of structure are possible:
2.4. Moving a section
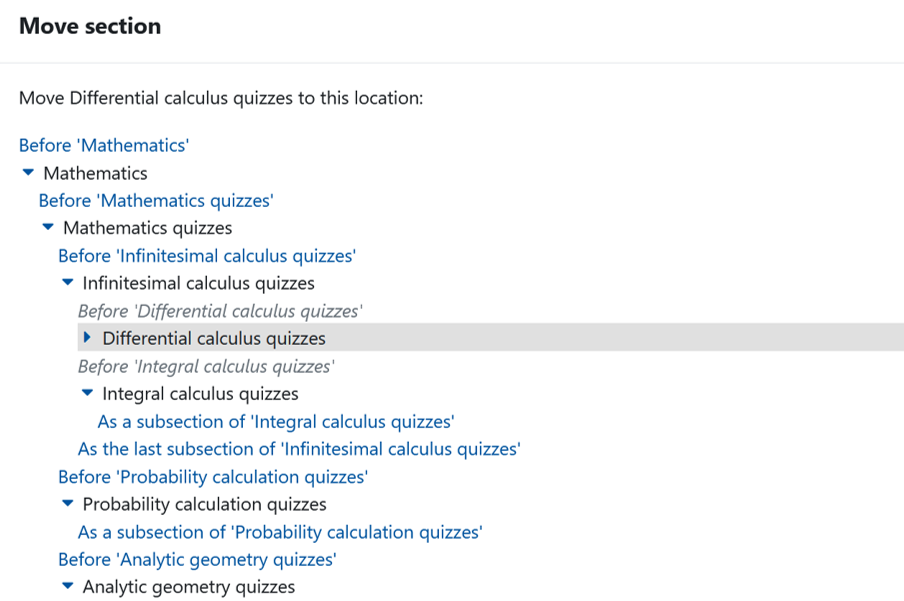
In contrast to the standard theme format, sections in the flexible themes format cannot be moved using drag & drop. If you want to move a section, click on the "three-dot icon" ![]() on the right-hand side of the desired section and then select the "Move" option. A window will now open showing all sections and subsections. Select the desired target position of your selected section to which it should be moved. For example, you can move a subsection to a higher structure level or change the order of the subsections within a higher-level section.
on the right-hand side of the desired section and then select the "Move" option. A window will now open showing all sections and subsections. Select the desired target position of your selected section to which it should be moved. For example, you can move a subsection to a higher structure level or change the order of the subsections within a higher-level section.
2.5. Highlighting a section
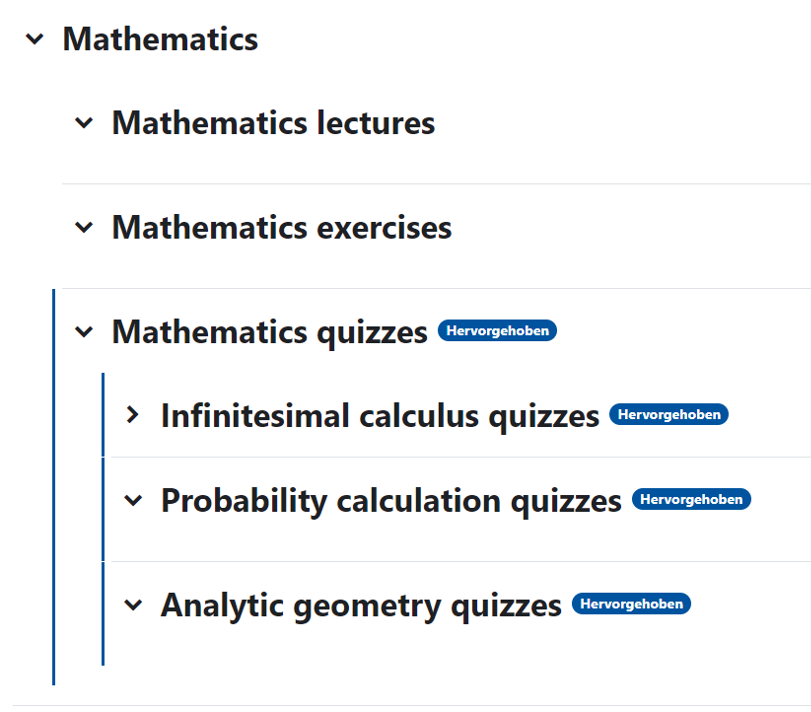
To highlight a section, click on the "three-dot icon" ![]() on the right-hand side of the desired section and then select the "Highlight" option. Only one section can be highlighted at a time within a course room. Any subsections of the highlighted section are also highlighted. Highlighted sections are marked both on the course page and in the course index with a vertical line and a blue "Highlighted" label.
on the right-hand side of the desired section and then select the "Highlight" option. Only one section can be highlighted at a time within a course room. Any subsections of the highlighted section are also highlighted. Highlighted sections are marked both on the course page and in the course index with a vertical line and a blue "Highlighted" label.
2.6. Show a section as a link
Each section (regardless of its nesting level) can be displayed either on the same page as the parent page or on a separate page. By default, all sections and subsections are visible on the course page and can be expanded and collapsed there.
If you would like certain sections and their content to be displayed on separate pages, click on the "three-dot icon" ![]() on the right-hand side of the desired section in edit mode and then select the "Show section as link" option. The section can then no longer be expanded, but must be clicked on instead. The contents of the selected section and any subsections are then displayed on a separate page. You can return to the parent section by clicking on " Return to ...". Accessing sections via separate pages is recommended for course rooms with lots of material in order to give the course page a tidier appearance.
on the right-hand side of the desired section in edit mode and then select the "Show section as link" option. The section can then no longer be expanded, but must be clicked on instead. The contents of the selected section and any subsections are then displayed on a separate page. You can return to the parent section by clicking on " Return to ...". Accessing sections via separate pages is recommended for course rooms with lots of material in order to give the course page a tidier appearance.
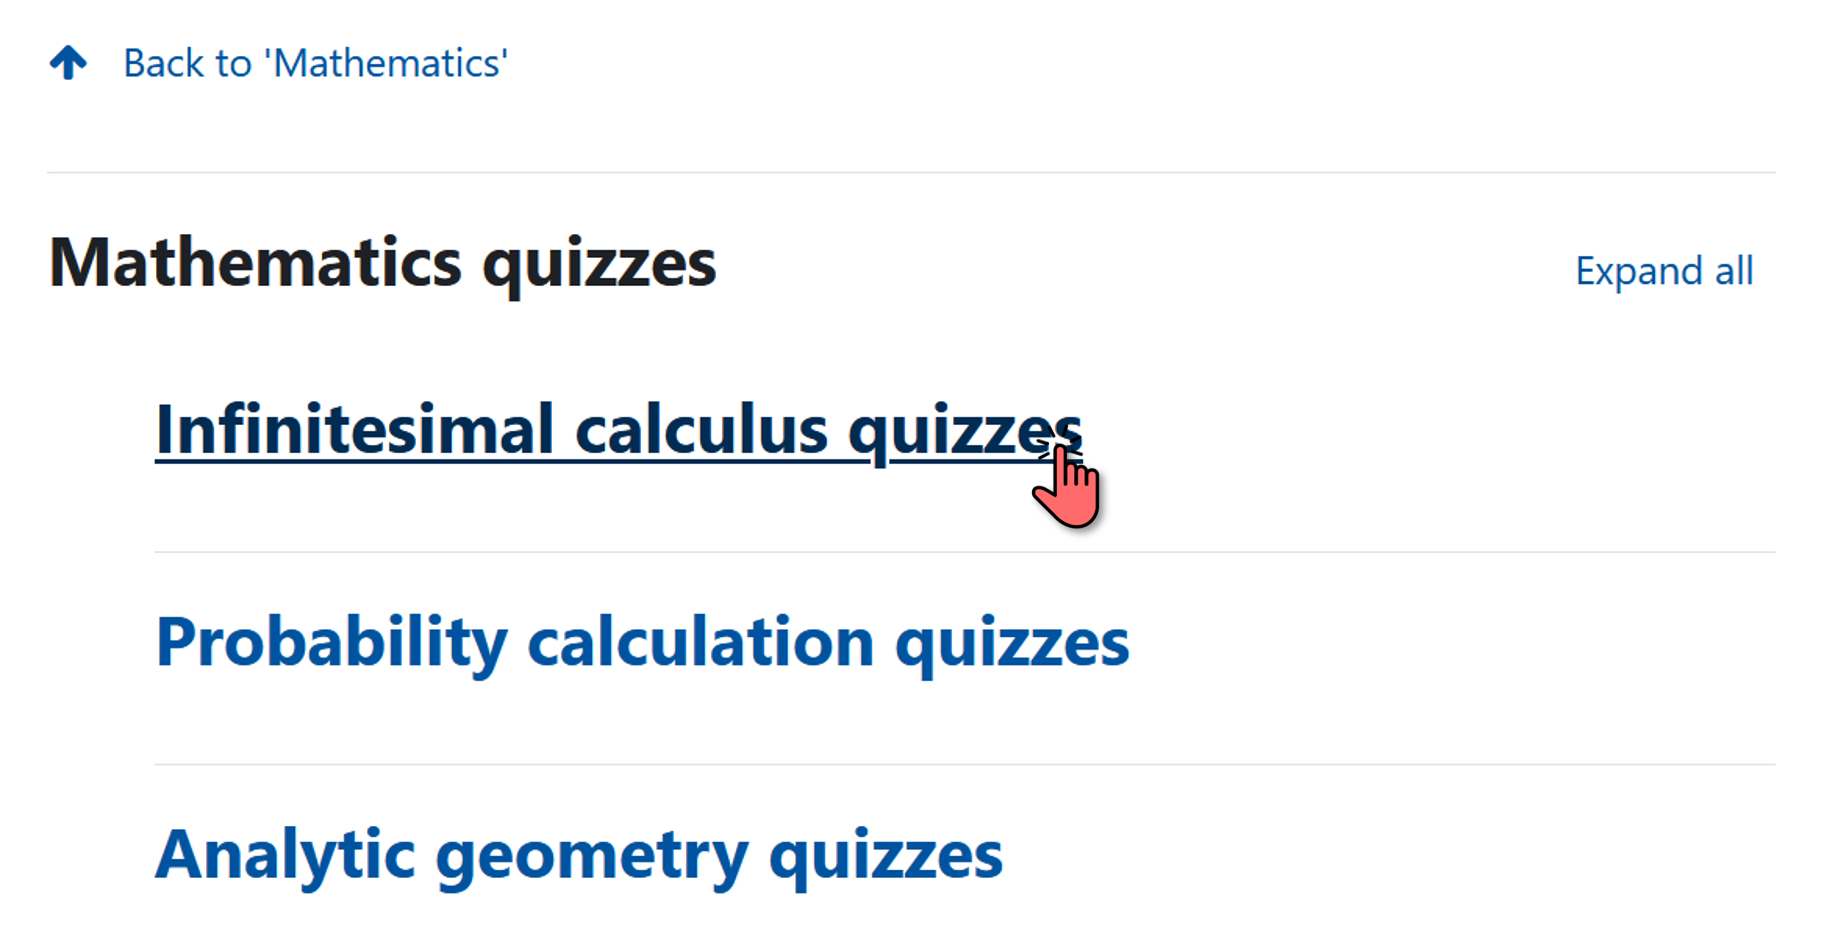
The disadvantage of selecting this option is that the different structure levels are no longer directly recognizable on the course page.
Note: If you want to use the "Show section as link" option, you must set this separately for each section. It is not possible to set all sections of a learning room to display as a link en bloc.
2.7. Adding a section to a higher-level section
If you would like to add an existing section to a higher-level section, click on the "three-dot icon" ![]() on the right-hand side of the desired section and then select the "Add to higher-level section" option. Please note that in this case the structure of the sections and activities subordinate to the section is completely retained. Merging a section with a higher-level section therefore simply moves all subordinate sections and activities to a higher organizational level without losing their previous organizational structure.
on the right-hand side of the desired section and then select the "Add to higher-level section" option. Please note that in this case the structure of the sections and activities subordinate to the section is completely retained. Merging a section with a higher-level section therefore simply moves all subordinate sections and activities to a higher organizational level without losing their previous organizational structure.
2.8. Hidden section
If you would like to make an existing section and its content invisible to students, click on the "three-dot icon" ![]() on the right-hand side of the desired section and then select the "Hide section" option. Please note that by hiding a section, all subordinate sections and course content will also be hidden.
on the right-hand side of the desired section and then select the "Hide section" option. Please note that by hiding a section, all subordinate sections and course content will also be hidden.
2.9. Delete section
If you would like to delete an existing section, click on the "three-dot icon" ![]() on the right-hand side of the desired section and then select the "Delete section" option. Please note that deleting a section also deletes all subordinate sections and learning content.
on the right-hand side of the desired section and then select the "Delete section" option. Please note that deleting a section also deletes all subordinate sections and learning content.

