


Webex User Interface

Below you will find a description of the functions available to you in the Webex user interface:

- Your Profile
- Set status
- Forwards and Backwards
- Search bar
- Plus Button
- Connect to a device
- Messages
- Meetings
- Calls
- Teams
- Contacts
- Voice mailbox
- Further
- Settings
- Help
- Call Settings
- Select Line
- Pick up call

Click on your profile in the app header to update your picture and display name or to access your settings. You also have the option to set your status, availability and read receipts and to log out.

Edit profile:
Here you can edit your profile picutre (1) and cover image (3) as well as your display name.
If you have not added a profile picture, your initials will be displayed. To add a picture, click on Upload picture (1). If you already have a profile picture and would like to change it, click on Change picture. This button is displayed in place of Upload picture.
You can edit the name of your profile under Display name (2).
Under Select cover image (3), you have the option of uploading and inserting a desired cover picture.
Then click on Save (4) to save your changes.

Here you have the choice between four given status variants or an individual formulation of your own status. You have the option of deactivating the status in the data protection settings in your profile.

Here you can go back or forward with a simple left or right click. You can also right-click to display the history of activities.
Further information can be found on the Webex Help Center website.

Use the search bar to find people, areas, messages, files and devices. You can also use it to call people directly.

Using the plus button next to the search bar, you can easily send messages, make calls, schedule meetings or create an space.

Further information can be found on the Webex Help Center website.
(6) Connect to a device
Here you have the option of connecting to a device using its name or a Webex code. This code appears on the device when connecting.

Here you will find a message overview in which all chats are displayed. You will see all individual conversations with other people in the "Direct" section. You can use the plus button to contact other people and create both spaces and space sections.

Here you will find an overview of the scheduled meetings and have the option of starting a Webex meeting (1). You can also start a Personal Room meeting (2). The subtitling function is available for barrier-free meetings.

Start a Webex meeting:

Start a Personal Room meeting:

If you want to schedule meetings with the highest possible security, you can create a private meeting. This type of meeting is restricted to people who are registered at RWTH and are also connected either to the RWTH data network or via VPN.
To do this, click on Meetings (1) and then on Schedule a meeting (2).

In the next window, click on Advanced options and select the meeting type Webex Meetings Private Meeting.

Set a meeting:

Join a meeting:

Here you have access to your call list for all incoming and outgoing calls as well as missed calls. You can also dial phone numbers manually from here using the keypad. You can decide whether you want to make calls via audio or video.
It is possible to make calls via the softphone of the RWTH telephone system or via Webex Cloud Calling. With a softphone call, the Webex client connects to the TK-Portal and enables calls to be made using the business telephone number. In contrast, cloud calling is purely a call via the Webex cloud and only allows calls to be made via the Webex client. To be able to use Webex as a softphone, you must have a registration in the new Cisco phone system and activate the Softphone-mode in the TK-Portal.

You can find an overview of all teams and areas here.
Create a team:

Here you can find an overview of your contacts and groups. Simplify the connection with the people you are in contact with most often. You can create contact lists, then create a group of these contacts and customize contact information.

You can use your answering machine or voice mailbox if it has been activated in the TK-Portal. The "Voicebox" button is only visible if the function was previously activated in the TK-Portal.


If you are unable to answer a call and you have activated the voicemail, a voice message can be left for you. You will see a red signal counter that tells you the nature of your message. You can then check your voice mailbox directly in the app.
The received and sent voice messages are also displayed here. You can record and send voice messages using the plus button.

Here you can change the order of the menu items Teams, Contacts and Voicemail. To do this, click on Manage sidebar (1). Move the mouse to the 6 dots next to the respective menu item (2), hold down the left mouse button and move the menu items to a different position. You cannot move the grayed-out menu items. Then click on Save (3).


You can switch your availability and status on or off in the privacy settings.

You can switch read receipts on or off in the messaing settings.

Here you will find access to the Webex Help Center and the option to check for updates, set up shortcuts and view new features in Webex by clicking on What's New.

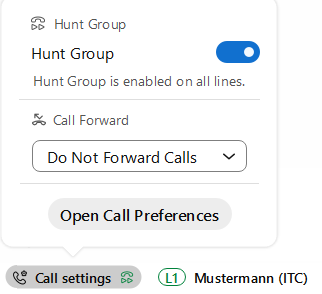
Use the quick access to the call settings or activate call forwarding.
You also have the option of activating or deactivating your hunt group. If your administrator has set you up as a member of a hunt group, you will be notified when a call comes in to this hunt group number and can answer the call from there.
Here you will find the display and selection option for the desired line, if another line is available.

The second line can be activated in the TK-Portal.
To do this, click on the settings wheel under Deskphone. Select Secret in the next window.


Here you have the option of accepting a call.
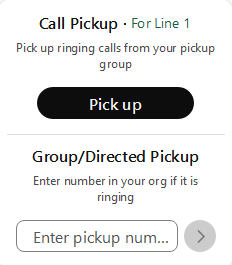
Further information can be found on the Webex Help Center website.

