


Integrate user certificates

On this page, you will learn how to integrate user certificates into supported email clients and use them for encryption and signing.
If you do not yet have a user certificate, you can apply for one via the RA portal.
Integrating user certificates in Outlook
Integrating user certificates in Outlook
GÉANT/TCS certificates for functional email addresses are issued without a CN (common name). This makes it difficult to configure these certificates via the Outlook Trust Center.
If multiple (functional) email addresses are used, it is not possible to identify which certificate belongs to which email address.
To solve this problem, you can customize the display name of certificates.
Importing p12 files
To sign documents electronically, send signed emails, or receive encrypted emails, you must first import your personal user certificate into the Windows certificate store.
Step 1
To do this, locate the certificate file (.p12 file) on your computer and double-click to run it:

Step 2
This will launch the Certificate Import Wizard:

Step 3
After clicking Next, you will be redirected to the file selection screen.
The field should already be filled in if you have already selected the file.
Alternatively, click Browse and locate the file in its storage location.
Then click Next:

Step 4
In the next step, enter the password you set when you created the .p12 file.
You can also select the import options:
- Please DO NOT activate High security for the private key. Nevertheless, always ensure that your computer is adequately protected against access by third parties.
- If you select High security, you must also set a CryptoAPI password. This password must then be entered each time you send a digitally signed email.
- You can select Mark key as exportable so that you can later create a .p12 file from the Windows certificate store.
- This option is useful as a backup in case you accidentally delete your .p12 file.
Once you have made the desired settings, click Next.

Step 5
In the next window, select Automatically select certificate store.
Then click Next.

Step 6
You can review the selected data once more.
If everything is entered correctly, click Finish.

Step 7
Confirm the successful import process with OK:

Configure automatic signature
Digital signatures allow the recipient of an email to verify...
- the identity of a sender
- that an email has not been modified while being transmitted
Old certificates can also be replaced with new certificates.
To configure an automatic signature, please follow these steps:
Step 1
Open Outlook and select File > Options > Trust Center.


Step 2
To sign your messages automatically, please select the following options in the Encrypted email messages field:
- Add digital signature to outgoing messages.
- Send signed messages as plain text.
If you have not yet imported your certificate into Windows, you can do so using the Import/Export button. You will then need to search for your p12 file and enter the appropriate password.

Step 3
Then select Settings.
Here you can select a new certificate or replace an existing certificate (e.g., if an old certificate expires).
By clicking Select, you can select a certificate as a signature certificate and encryption certificate.
If you want to add a user certificate for another email address, you can do so by clicking New.
This will clear all fields and allow you to add a new security setting.

Set the hash algorithm and encryption algorithm:
- Check the two boxes in the Cryptography Format field
- Select the hash algorithm SHA256
- Select the encryption algorithm AES (256-bit)
- Check the box Send these certificates with signed messages

Step 4
Click OK to complete the process.
Verifying certificates
Step 1
If you selected the option for automatic signing when configuring Outlook, your messages will always be sent signed.

Step 2
The digital signature is attached to the email and can be verified by clicking on the signature icon.

Step 3
In the window that opens, you can check the status of the signature.
- Valid means that the hash value of the electronic signature is correct, i.e., the email content has not been altered en route.
- Trusted means that the sender's corresponding public RSA key would be included in a user certificate issued by a PKI whose certificate chain is anchored in Outlook's Trust Center.
Step 4
To see the sender's identity, click Details.

Step 5
Select the signer and click View Details.

Step 6
Under General, you can view the certificate.
Click View Certificate... to display the certificate details.

Step 7
On the Certification Path tab, you can see the certificates in the certificate chain and the sender's certificate at the end of the chain.
- T-TeleSec is the root certificate (preinstalled in Outlook)
- DFN-Verein are the two intermediates
- the sender's user certificate is at the bottom of the chain
In this example, the sender is using a group certificate, denoted by the "GRP" prefix. The field for their certificate displays the value for the Common Name in their certificate, this is the proof of identity part. This would usually be the sender's name.

Configure e-mail encryption (optional)
Step 1
Open Outlook and select File > Options > Trust Center.
Step 2
In the window that opens, select the Email Security option.
Check the box next to Encrypt content and attachments for outgoing messages.
With this setting, Outlook will attempt to encrypt all outgoing emails. Encryption is only possible if Outlook knows the recipient's public RSA key.
To do this, either a handshake must have taken place (i.e., you have already received a signed email from the recipient) or you have saved the recipient's user certificate in Outlook using the PKI LDAP server.
In both cases, the recipient must be explicitly saved as a separate contact.

Step 3
If you want to send an email and encryption was set in step 2 via the Trust Center, this option is already preselected.
Alternatively, you must select this for each email.

Step 4
If everything has been configured correctly, emails that are sent will now be automatically encrypted and signed.
The subject line is never encrypted. The text can only be read if Outlook knows the recipient's “own” user certificate.
If the email cannot be encrypted, e.g. because Outlook does not know the recipient's public RSA key, you will receive an error message.
One way to get around this problem is to use DFN-LDAP as your address book.
To check the encryption, you can select the lock icon.

Step 5
A new window will open where you can view the signature properties.
In this example, the email is encrypted and signed.
Select Show details to view additional information about the encryption.

Configure DFN-LDAP as an address book (optional)
The DFN-PKI LDAP server is required to send an encrypted e-mail to a recipient whose public RSA key is not available.
The recipient must have received a user certificate from the DFN-PKI and have agreed to its publication in the LDAP.
Step 1
In Outlook, click File in the navigation bar.

Step 2
Then select Account Settings > Account Settings.

Step 3
In the window that opens, select the Address Books option.
To add a new address book, click New....

Step 4
A new window will open. Select the Internet Directory (LDAP) option.

Step 5
Enter ldap.pca.dfn.de as the server name.
Then click on Advanced Settings and confirm the message that Outlook must be restarted for the changes to take effect by clicking OK.


Step 6
A new window will open.
You can assign any display name you like.
Under Connection Details, enter Port: 636.

Step 7
Under Search, select Custom under Search Base.
Enter the search base for the desired address book there. For example, ou=DFN-PKI,o=DFN-Verein,c=de.
Please do not check Enable search.

To complete the settings, click Apply.
Step 8
You will be taken back to the Add Account window. Now click Next.

Step 9
The settings are now configured. Then click Finish.

You will now see the new address book in your address book overview.
Step 10
Now click Close.
If you have not yet restarted your system during configuration, please do so now to complete the process.

If you have not yet restarted your system during configuration, please do so now.
Integrating user certificates in Thunderbird
Integrating user certificates in Thunderbird
You should set a Master Passwort, to ensure only you can use this thunderbird.
Importing p12-file
The .p12 file, created with the DFN-PKI website, contains all needed certificate.
In case this file has been created with for example openssl, the CA-certificates "intermediatecacert.pem" and "cacert.pem" need to be downloaded.
These can then be imported. To do this, follow these steps.
Step 1
Open Thunderbird and click on the Options menu. Then select Options.

Step 2
In the Options window, select Privacy & Security.
Then click Manage Certificates.
Step 3
In the Certificate Manager, you will see certificates that are already active.
Make sure you are in the Your Certificates tab.
Click Import to add a new certificate and select the appropriate file.

Step 4
Once you have selected the certificate, click Open.

The certificate is now integrated.
Configure automatic signature
Step 1
Open Thunderbird and click on the Options menu. Then select Account Settings.
Step 2
Then select the End-to-End Encryption menu item.
If desired, check the box Add my digital signature by default if you want the signature and encryption to be active for every email you send.
Step 3
To select a certificate, click Select.
Configure DFN-LDAP as an address book
Step 1
Open Thunderbird and click on the Options menu. Then select Options.
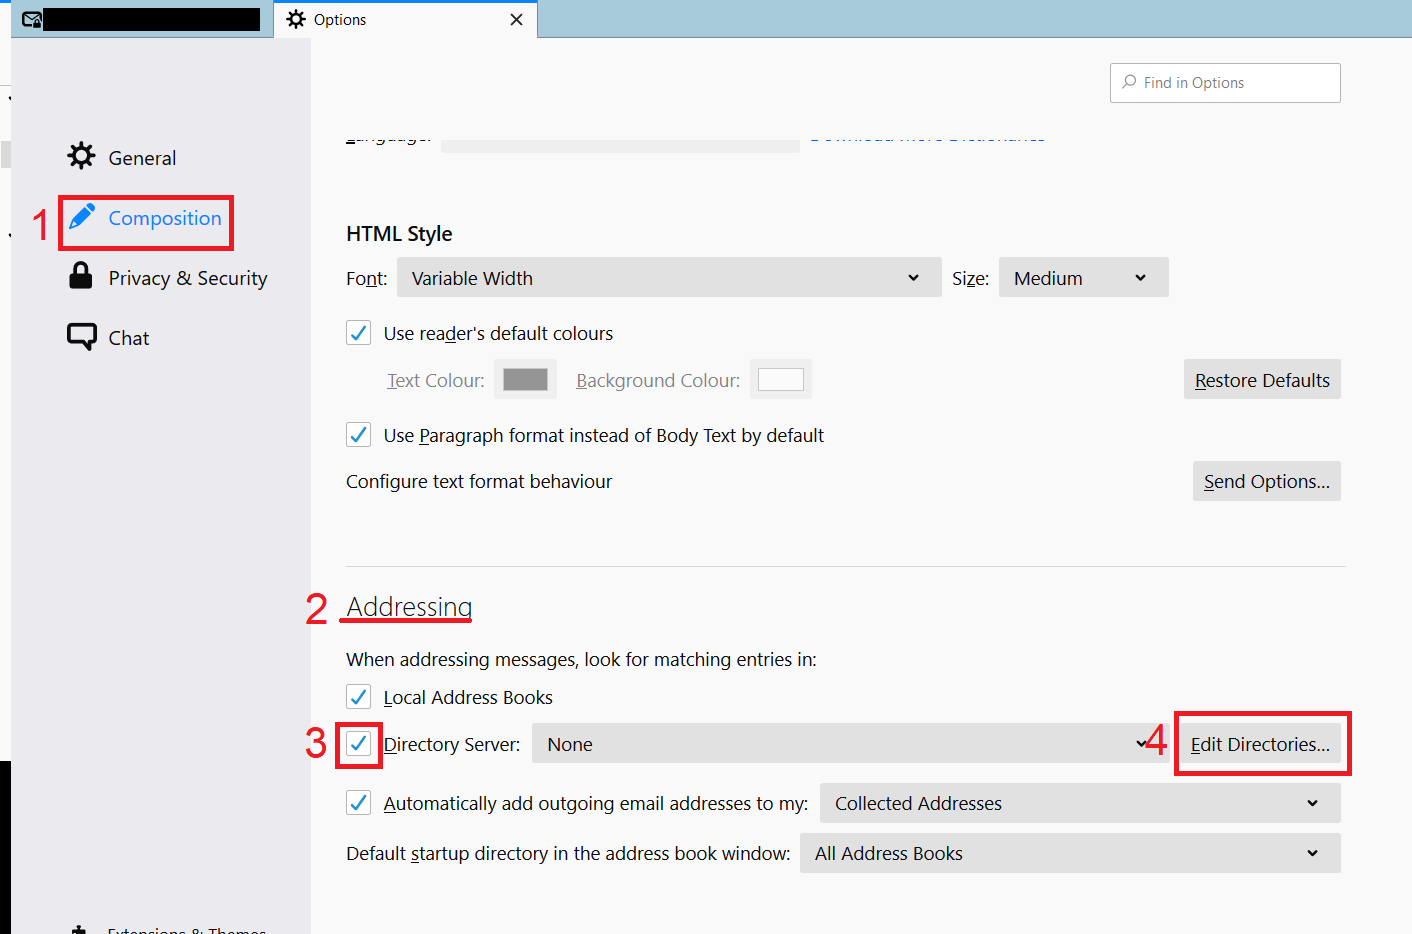
Step 2
Open the Composition (1) menu item.
Scroll to Addressing (2).
Check the box next to Directory Server (3) and then click Edit Directories... (4).
Step 3
A new window will open. Select Add.

Step 4
A new window will open. Enter the following settings:
- Name: Name of the Address Book (e.g. ldap-DFN-PKI.)
- Hostname: ldap.pca.dfn.de
- Basis-DN: ou=DFN-PKI,o=DFN-Verein,c=de
- Port-number: 636
- Bind-DN: leave empty!
- Check "Use secure connection (SSL)"
Once the settings have been configured, confirm the dialog by clicking OK.

