


Apply for user certificates via the RA-Portal


Please note:
They can/should add your email address into RA-Portal and send you a challenge email. After redeeming your token, that is after confirming your email address via the link in the challenge email, your institute email address will be shown in RA-Portal.
The following instructions describe how to apply for and collect a user certificate (also known as S/MIME certificate) in RA-Portal via your browser:
Please note:
- An existing user certificate from RA-Portal must either be revoked, expired or valid for less than 28 days before a new one can be requested.
- An existing user certificate from the DFN-PKI Global can continue to be used until it's expiration date. RA-Portal does not know about your DFN-PKI certificates and therefore does not prevent the issuance of another user certificate in RA-Portal. However, the simultaneous use of several user certificates for one email address is not recommended and leads to considerable problems with email encryption.
Request user certificate
During the certificate application process, two files are created and are to be saved locally:
- the certificate request file (.json file), containing your cryptographic keys
- the certificate file including your cryptographic keys (.p12 file)
Both of the above mentioned files contain your cryptographic keys and must be stored password protected (encrypted):
- a .json password for the .json file (certificate request file)
a .p12 password for the .p12 file (certificate file including cryptographic key)
You will need both passwords to generate and download your user certificate.
To request a user certificate, please follow the steps below.
Step 1
Log into RA-Portal via RWTH Single Sign-On
- You can only reach RA-Portal from within the RWTH intranet.
- Your session expires after 60 minutes.
During the login, your status is transmitted to RA-Portal. If you do not have an employee or student status, RA-Portal will tell you that you need to carry out an identity verification before you can continue with the client certificate application. You can find instructions under.
Step 2
Go to Meine Client-Zertifikate (my client certificates)
On your first visit, the table of your own client certificates should be empty.

Step 3
Click + Client-Zertifikat beantragen (apply for client certificate).
Step 4
Check whether the email address for which you want to request a certificate is present
- Your @rwth-aachen.de and @post.rwth-aachen.de email addresses are conveyed automatically to RA-Portal and are therefore always displayed in the list of email addresses assigned to you.
- Your institute email address(es) must be confirmed in the RA-Portal first. To do so, please contact your network contact person (IT administrator) at your institute.
Step 5
Generate a certificate request (with key generation in the browser).
Select the email address for which you want to request a certificate.
- Aliases for @rwth-aachen.de addresses can be deselected. More then 2 aliases can not be included (limit imposed by CA), hence either deselect them all or turn to the ID-ServiceDesk to have superflous ones removed and come back.
- Not requestable are email addresses for which a valid certificate exists in RA-Portal that is valid for more than 28 days. If you need a new certificate for such an email address, you must first revoke the valid certificate. To do so, go back to My client certificates.
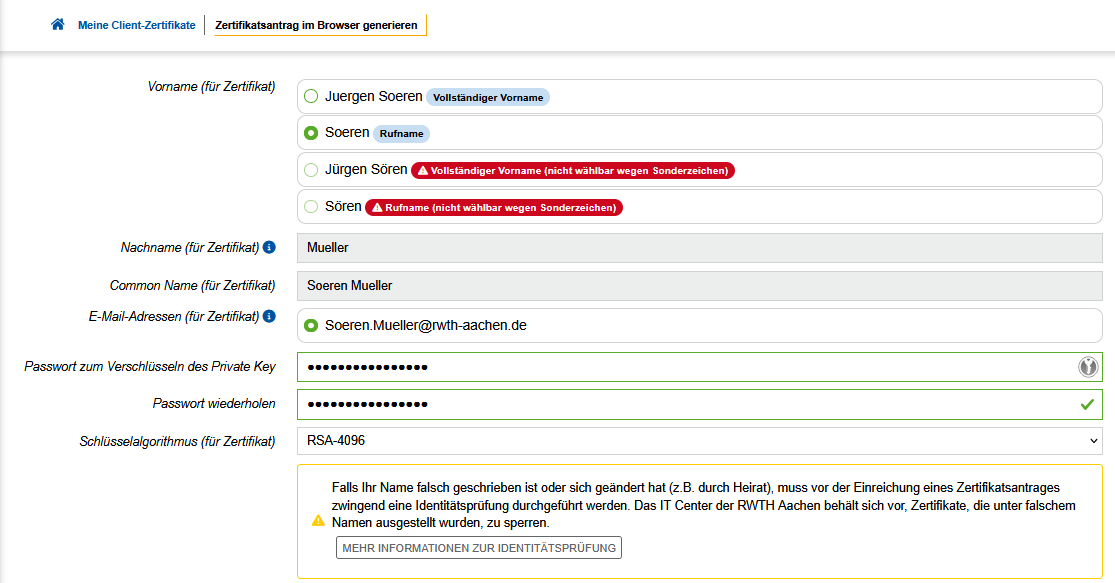
The Vorname (für Zertifikat) field is your First Name:
- For personal email addresses, you may choose to use either your given name (indicated as "Vollständiger Vorname") or your preferred name (indicated as "Rufname"). These are automatically sourced from your Identity Management data. They appear as soon as you have selected one personal email account. Please note that currently special characters in your name are not accepted by the certification authority and have been transcribed as shown.
- For functional email addresses this field is not relevant.
The Nachname (für Zertifikat) field is your Surname:
- For personal email addresses, your Surname is automatically sourced from your Identity Management data. It appears as soon as you have selected one personal email account. Please note that, currently, special characters in your name are not accepted by the certification authority and have been transcribed as shown.
- For functional email addresses this field is not relevant.
The Common Name (für Zertifikat) field is your Common Name:
- For personal email addresses, this field is a concatenation of your chosen Vorname and Nachname above. Please note that, at present, special characters in your name are not accepted by the certification authority and have been transcribed as shown.
- For functional email addresses this field is not relevant.
Passwort zum Verschlüsseln des Private Key:
- Set a password to encrypt your .json file. The .json file contains your cryptographic keys. You need this file and its password to retrieve and use your certificate. There is no password reset available, so keep the file and its password safely.
Schlüsselalgorithmus:
- Select RSA-4096 (recommended) or RSA-2048.
Your Full Name:
- If your IdM name does not match the name in your personal identification document, please contact the central university administration that manages your data in order to have your name corrected, and come back later.
- Please note that (academic) titles cannot be entered into RA-Portal user certificates, even if these are documented in your identity document.
Pflichtfelder (Mandatory fields):
- Please confirm that your name, as conveyed from your IdM data, is correct and that you have authorized access to the mailbox.
- Please consent to the processing of your data for the purposes of issuing and managing your user certificate. Please read the text carefully.
- You acknowledge that your certificate is included in the RWTH-LDAP (RWTH internal directory service) and the DFN-LDAP.

Step 6
Upload the certificate application.
Clicking on the blue button triggers three events:
- Generate certificate request in your browser (here your cryptographic keys are generated in your browser).
- Save the certificate request file locally (here the .json file is saved locally on your device).
- Upload your certificate request into RA-Portal.
Depending on your browser settings, you may be asked where and how to save the .json file. If you do not get a dialog box and/or use the default browser settings, then the .json file is saved in the Downloads.
Step 7
Send the certificate request.
After you have generated your certificate signing request (application), you have to send (submit) it to the CA (Certification Authority). There are two ways around this.
Sidenote: here is your last chance to save the .json file (again): The .json-file should have been automatically downloaded to your computer in the previous step 5 (check your Downloads folder if necessary). By clicking the Antragsdatei erneut speichern button you can request to download it again manually. The .json file is necessary in order to use your certificate later (as it contains your cryptographic keys).
Your certificate signing request (application) must now be sent to the CA (PKI).
Click Zertifikatsantrag jetzt absenden (send certificate application now) to send your certificate application to the CA immediately.
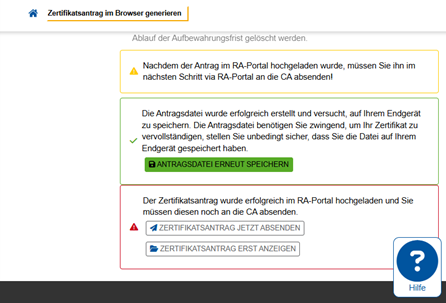
To check your request again before sending it to the CA click Zertifikatsantrag erst anzeigen (show certificate request first) button.
- You can read the plaintext content of your certificate signing request under "Inhalt des Zertifikatsantrages" (Content of the certificate request).
- You still have the option to change your mind und just delete your certificate application by clicking on the "Löschen" (delete) button.
- Or you can click on the "Absenden" (send) button, and finally send your certificate application to the CA.

Download user certificate
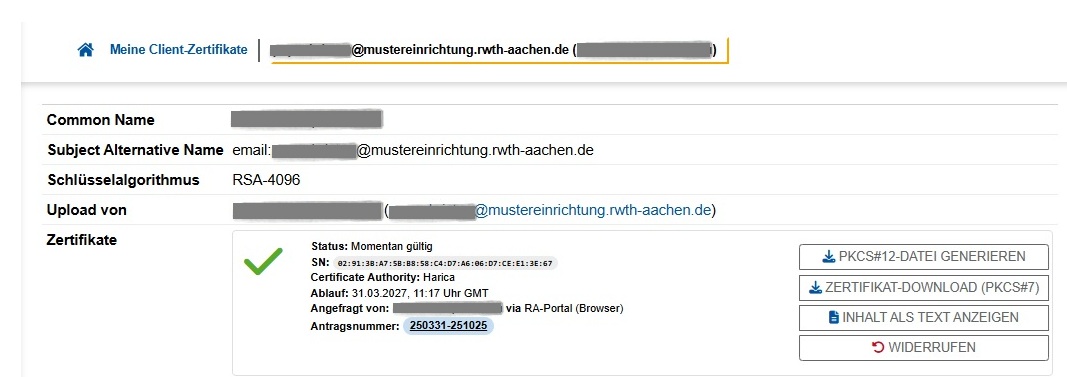
Once your certificate has been issued, you will receive an email notification from ra-portal-noreply@itc.rwth-aachen.de with subject [ra-portal] Client-Zertifikat für <email> ausgestellt (client certificate for <email> issued).
The certificate is marked Momentan gültig (currently valid). It is now possible to generate and download your p12-file:
- Select the button PKCS#12-Datei generieren to generate your PKCS#12 file. This is what you need to import into your email or document signing application.
- You may select the option Zertifikat-Download (PKCS#7): Here you can download your user certificate with its chain.
- You may select the option Inhalt als Text anzeigen: This is the content of your S/MIME certificate in plaintext.
The Durchsuchen (browse) field: Click to select the certificate request file (.json file) you downloaded in step 6.
The Passwort zum Entschlüsseln des Private Key (password for decrypting the private key) field: Enter the password for the .json file that was set in step 5.
The Passwort zum Verschlüsseln des PKCS#12-Datei (password for encrypting the PKCS#12 file) field: Set a password for your .p12 file. You need this password to be able to import your .p12 file (and consequently your certificate and the associated cryptographic keys) into your email application, for example. Keep this password safe, there is no way to recover or reset it.
Click PKCS#12-Datei erstellen (create PCKS#12 file) to generate the .p12 file and save it locally.
It is also possible to reuse the .json password for the .p12 file. To do this, click the respective box.
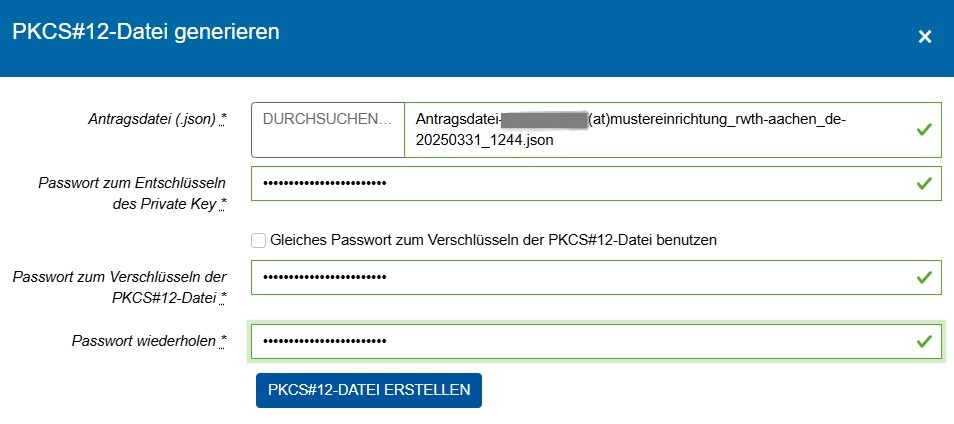
You will receive a confirmation that the .p12 file has been created. If you were unable to download the file, you can save the .p12 file again.
Once you have successfully downloaded and saved your .p12 file, you can close the pop-up.
Please keep this .p12 file safe, you need this in order to import and use your certificate into various applications.
Once you have found a secure place for your .p12 file, you can (and should) delete your .json file.
