


eduroam for Windows

This page describes how to connect your Windows device to eduroam.

Note
To connect your device to eduroam, you can set up the connection manually or using the eduroam Configuration Assistant Tool (CAT). For RWTH-institutes, only manual configuration is available:
- Configure eduroam via CAT (recommended for eduroam)
- Configure eduroam manually (only possible method for RWTH-institutes)
Configure eduroam via CAT
Note: You will need an internet connection for this configuration. If you are currently at RWTH, you can use RWTH-guests.
Step 1
Open the eduroam Configuration Assistant Tool (CAT) (opens in new tab) webpage.
Step 2
Click on Click here to download your eduroam installer.

Step 3
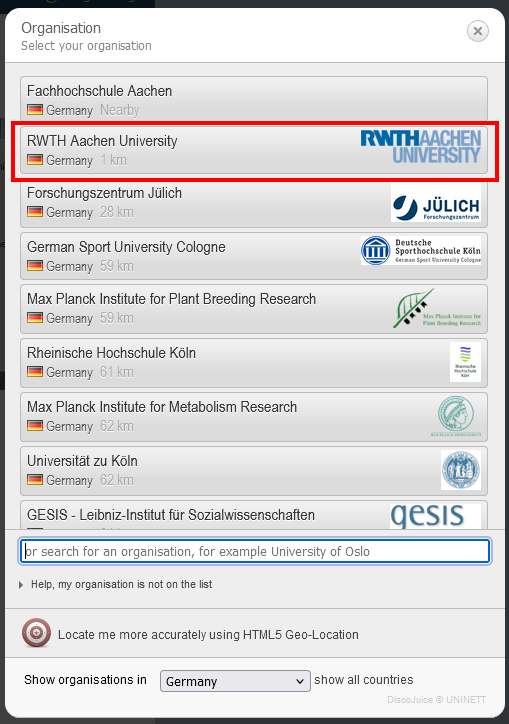
Select RWTH Aachen University from the Organisation selection list.
Step 4
Click on eduroam. The eduroam-W10-RAU.exe file will be downloaded to your device.

Step 5
Open the file to start the installer.
Step 6
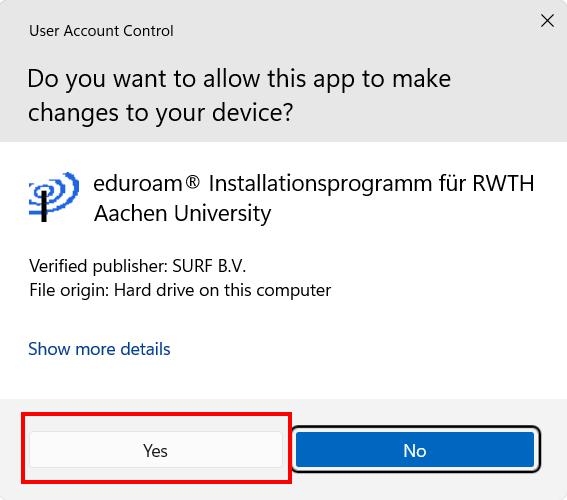
Click Yes.
Step 7
Click Next.

Step 8
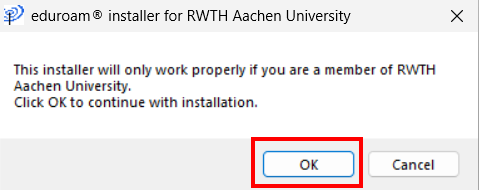
Click OK.
Step 9
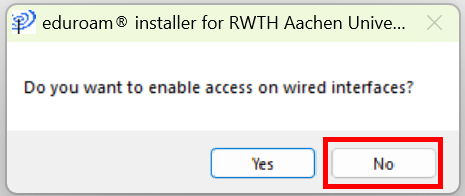
Click No.
Step 10
Enter your previously generated eduroam login credentials under Username and Password and click Install.
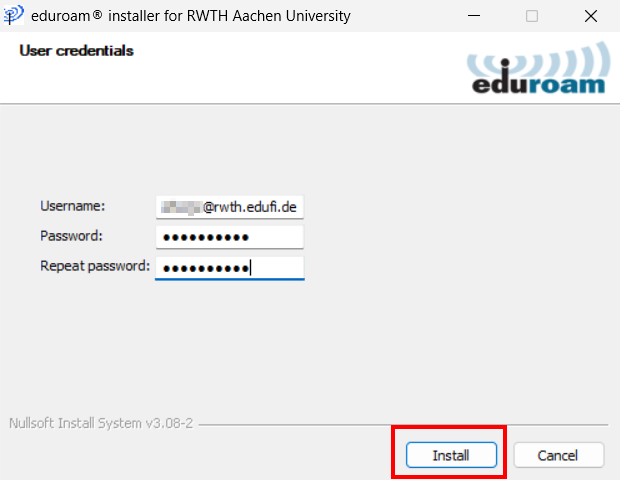
Step 11
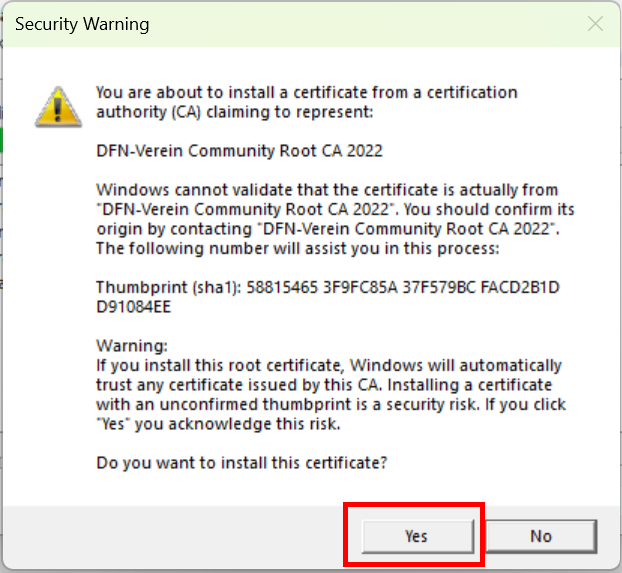
Click Yes to confirm that you want to install a root certificate which is not part of your operating system. The Thumbprint (sha1) should have the value 58:81:54:65:3F:9F:C8:5A:37:F5:79:BC:FA:CD:2B:1D:D9:10:84:EE. Then click Yes
Step 12
Click Finish.
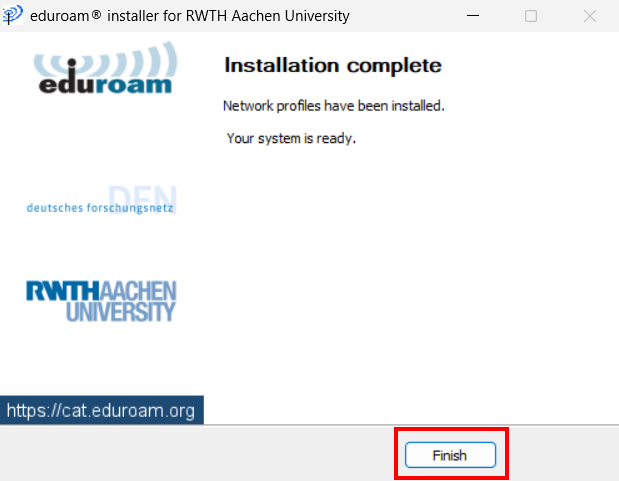
Your device is now configured. You can log in to eduroam.
Configure eduroam manually
We recommend using the CAT app to configure eduroam. If that does not work, you can set up eduroam manually. The connection to RWTH-institutes can only be set up manually.
To set up eduroam or RWTH-institutes manually, follow these steps:
Step 1
Switch on your Wi-Fi on your device.
Step 2
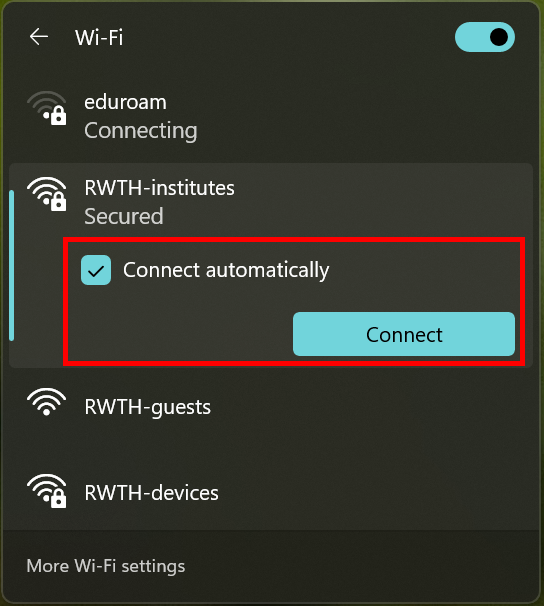
Select RWTH-institutes from the list of available networks.
Step 3
Tick the box next to Connect automatically.
Step 4
Click Connect.
Step 5
Enter your previously generated eduroam login credentials.
Step 6
Click OK.
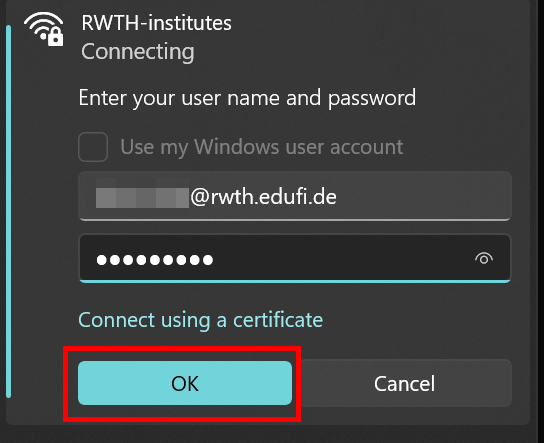
Note: If a Windows Security pop-up appears, please delete your Wi-Fi profile before proceeding.
Step 7
When connecting for the first time you need to manually verify that your credentials are sent to the correct radius server (i.e. the one at the RWTH). To do this, click on Show Certificate Details and compare the numbers displayed with the SHA1 fingerprint under Radius Certificate DFN-Verein Community PKI. It is best to establish your first connection within an RWTH building. To ensure that you are connecting to a trusted RWTH network, the data must match.
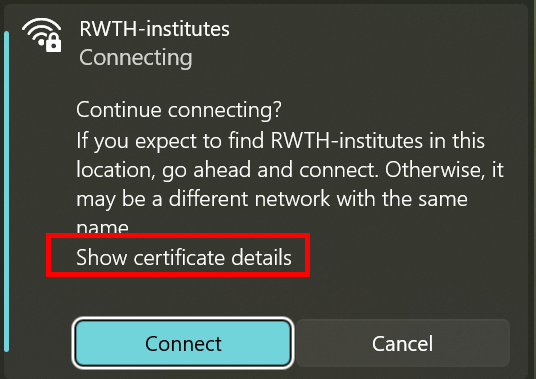
Step 8
Click Connect.
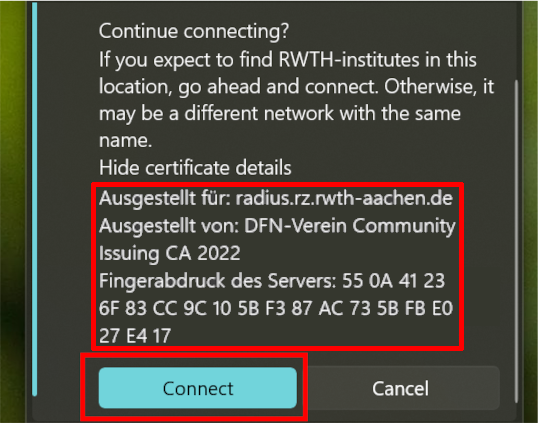
Step 9
Since the DFN-Verein Community Root Certificate is not included in the certificate store of any operating system, please import it manually.
Step 10
Download and save the DFN-Verein Community Root CA 2022 (opens in new tab) certificate on your lokal device.
Step 11
Double-click on the file.

Step 12
The Certificate window will open. Click Install Certificate.
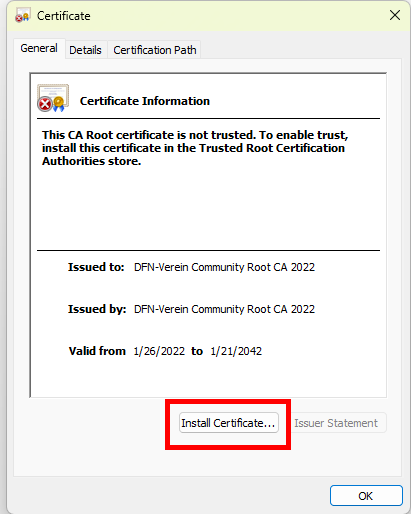
Step 13
The Certificate Import Wizard opens. Select Current user as the storage location and click Next.

Step 14
Select Place all certificates in the following store and click Browse.

Step 15
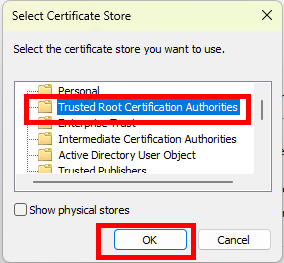
Select Trusted Root Certification Authorities and click OK.
Step 16
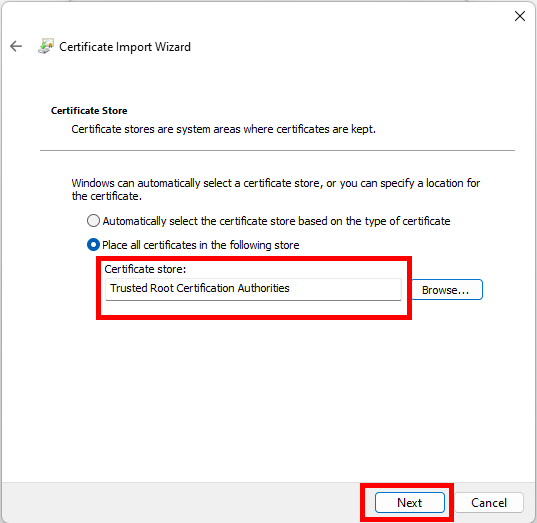
Choose Place all certificates in the following store and click Next.
Step 17
Click Finish.

Step 18
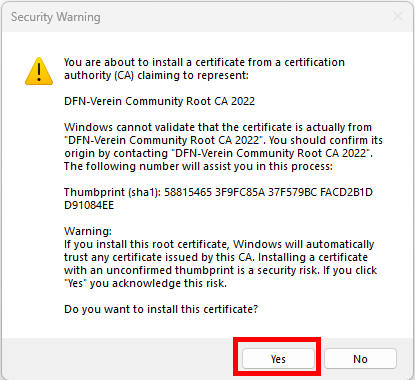
Click Yes.
Step 19
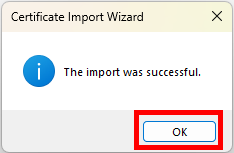
Click OK.
Step 20
Click OK. The certificate is now installed.

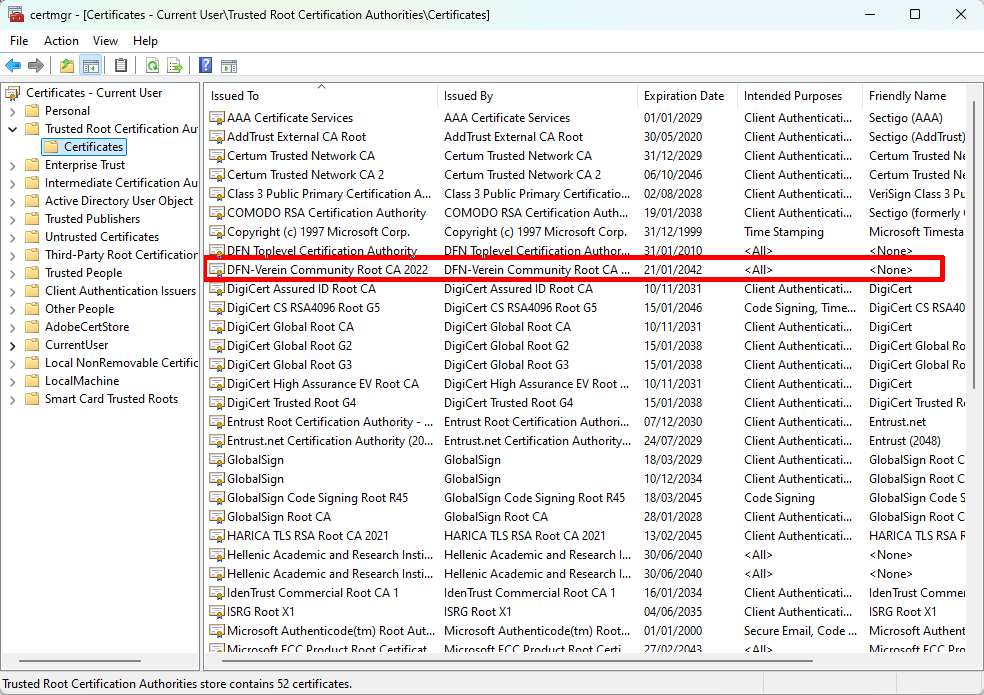
Optional: To check if the certificate is installed, use Windows Key + R to open the run dialogue and enter certmgr.msc in the dialogue field.
Click OK to open the Certificate Manager. In the Trusted Root Certification Authorities > Certificates folder, you will find DFN-Verein Community Root CA 2022 if the installation worked correctly.
Step 21
In the Windows search bar, search for Control Panel and click on View network status and tasks under Network and Internet.
Step 22
Click WLAN (RWTH-institutes).

Step 23
Click Wireless Properties.

Step 24
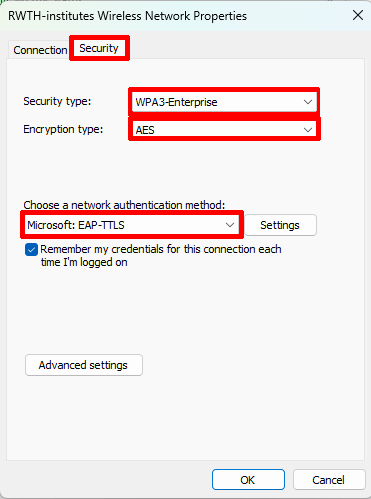
Click on the Security tab at the top of the page.
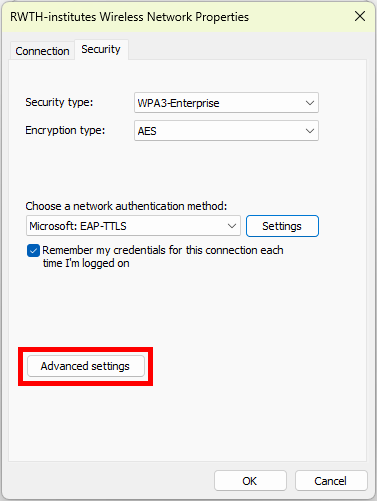
Ensure that the following settings are selected:
- Security type: WPA3-Enterprise (This option is not supported in all RWTH buildings, as it depends on what kind of hardware is currently installed. If the connection does not work with WPA3-Enterprise, please use WPA2-Enterprise.)
- Encryption type: AES
- Network authentication method: Microsoft EAP-TTLS
Step 25
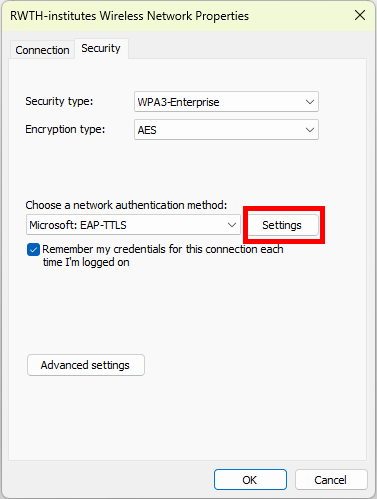
Click Settings.
Step 26
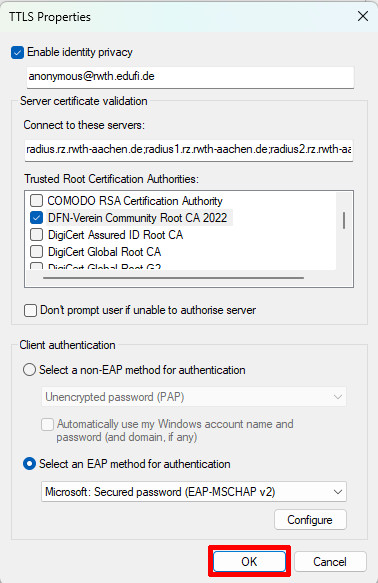
Set the following configuration settings:
- Tick the checkbox next to Enable identity privacy.
- In the field below, enter: anonymous@rwth.edufi.de or anonymous<-currentdate>@rwth.edufi.de or anything that ends in @rwth.edufi.de
- Under Connect to these servers, enter: radius.rz.rwth-aachen.de;radius1.rz.rwth-aachen.de;radius2.rz.rwth-aachen.de;radius3.rz.rwth-aachen.de
- Under Trusted Root Certification Authorities, tick the checkbox for DFN-Verein Community Root CA 2022
- Under Client authentication, select Select an EAP method for authentication.
- From the drop-down menu below it, select Microsoft: Secured password (EAP-MSCHAP v2).

Step 27
Click OK.
Step 28
You are now back on the Security tab. Click Advanced Settings.
Step 29
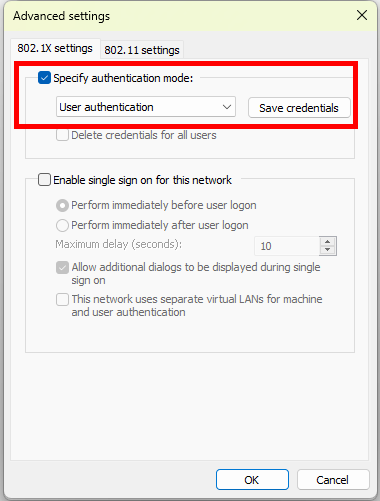
Tick the checkbox next to Specify authentication mode.
Step 30
Select User Authentication from the drop-down menu underneath.
Step 31
Click Save credentials.
Step 32
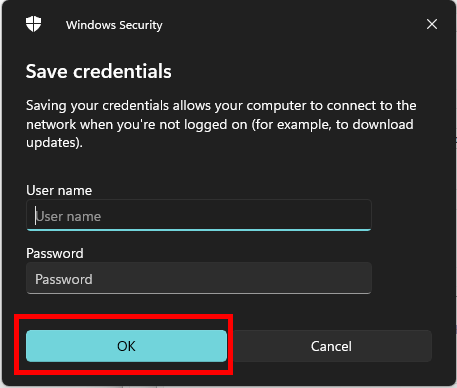
Enter your eduroam login credentials again.
Step 33
Click OK.
Step 34
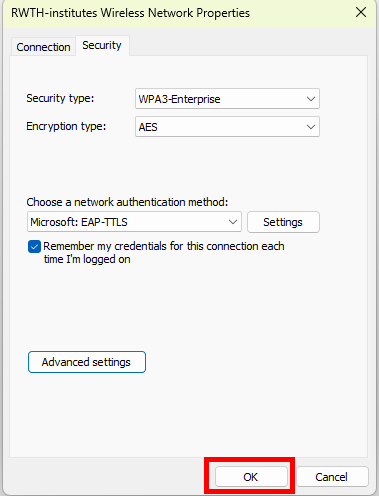
You are now back to the Security tab. Click OK.
Step 35
Connect to RWTH-institutes again. Your device is now configured and should be connected to the Wi-Fi.
