


Viral tenants

On this page, you will learn what viral tenants are and how they are migrated.
- What is a viral tenant?
- Tenant Takeover
- Check tenant usage and disable user registration
- Prepare the tenant for migration
- Final steps
1. What is a viral tenant?
A viral tenant is a tenant that is created automatically when employees register for the cloud service using their work email address. A tenant created in this way cannot be managed or viewed by the RWTH IT Center.
You can check whether a viral tenant exists for your domain on the Tenant Lookup (opens in new tab) page:
- Enter the domain (for example itc.rwth-aachen.de) in the search field.
- Click Lookup Tenant.
- If the search result displays a TenantID that differs from e3ad3c00-0c12-4d7d-9c87-8c837df23b10, action is required. In this case, continue with section 2. Tenant Takeover. If exactly this TenantID is displayed, no action is required.
The use of M365 for work purposes is only permitted via the central employee tenant provided by the IT Center. The following sections explain how viral tenants are handled.
2. Tenant Takeover
First, the affected tenant should be taken over using the internal admin takeover (opens in new tab). To do this, create an account using your work email address and complete the admin takeover process to obtain administrative permissions for the tenant. You need permission to create DNS records for the affected domain.
3. Check tenant usage and disable user registration
3.1 Check tenant usage
An overview of the accounts can be viewed in the Azure Portal (opens in new tab). To do this, sign in using the account created in section 2. Tenant Takeover. If tenant usage appears to be high and new users are currently registering, we recommend disabling user registration. If usage is low, this is not necessary. In this case, you can skip step 3.2 and continue with section 4.
3.2 Disable user registration
If usage is correspondingly high, user registration should be disabled. This ensures that no additional users can create their own Microsoft accounts using the institution's email address.
User registration can only be disabled using Microsoft Graph. Instructions for setting up Microsoft Graph can be found in the next section.
3.2.1 Register GraphAPI app using app context
Complete the following steps to register the app:
First, create the GraphAPI app
Step 1
Sign in to Microsoft Azure (opens in new tab) using the account created in section 2. Tenant Takeover.
Step 2
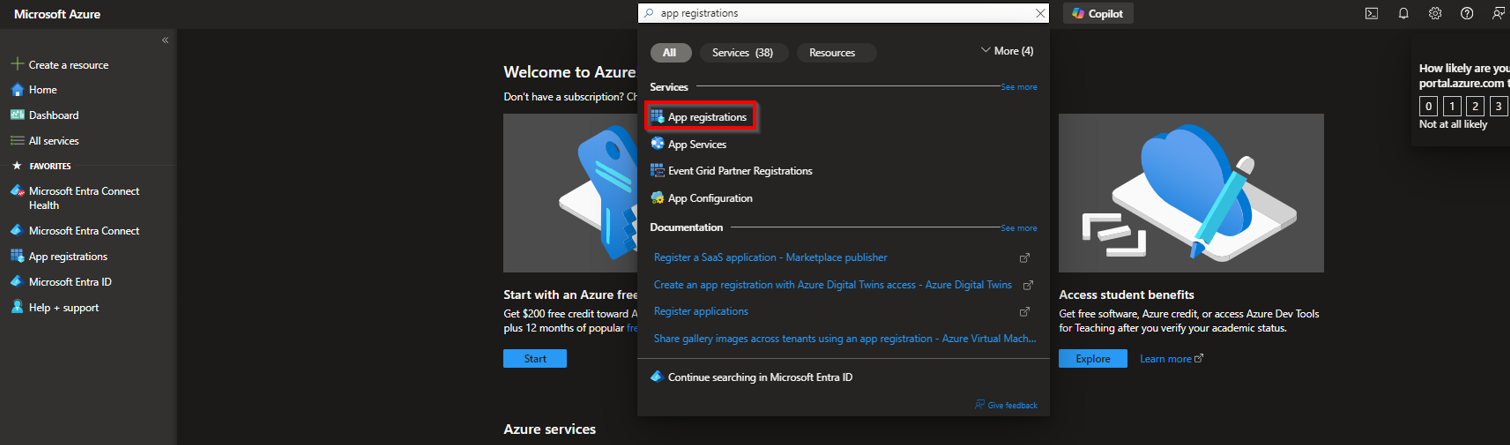
Enter App registrations in the search bar and select App registrations:
Step 3
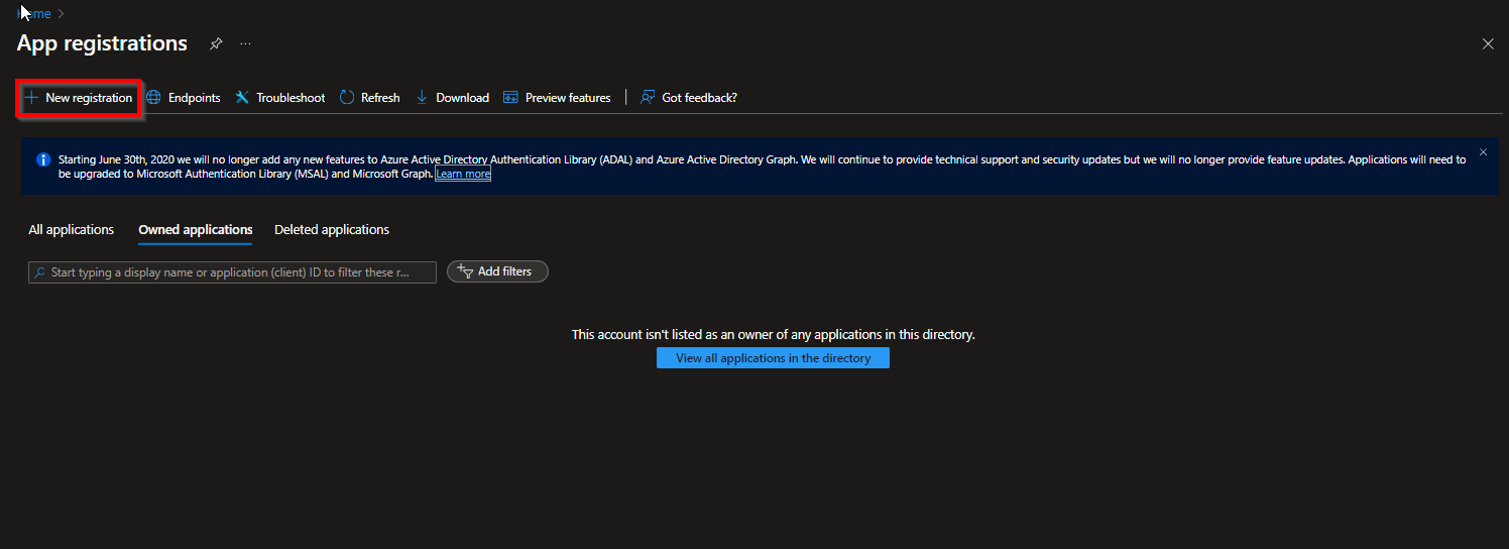
In the App registrations window, click + New registration:
Step 4
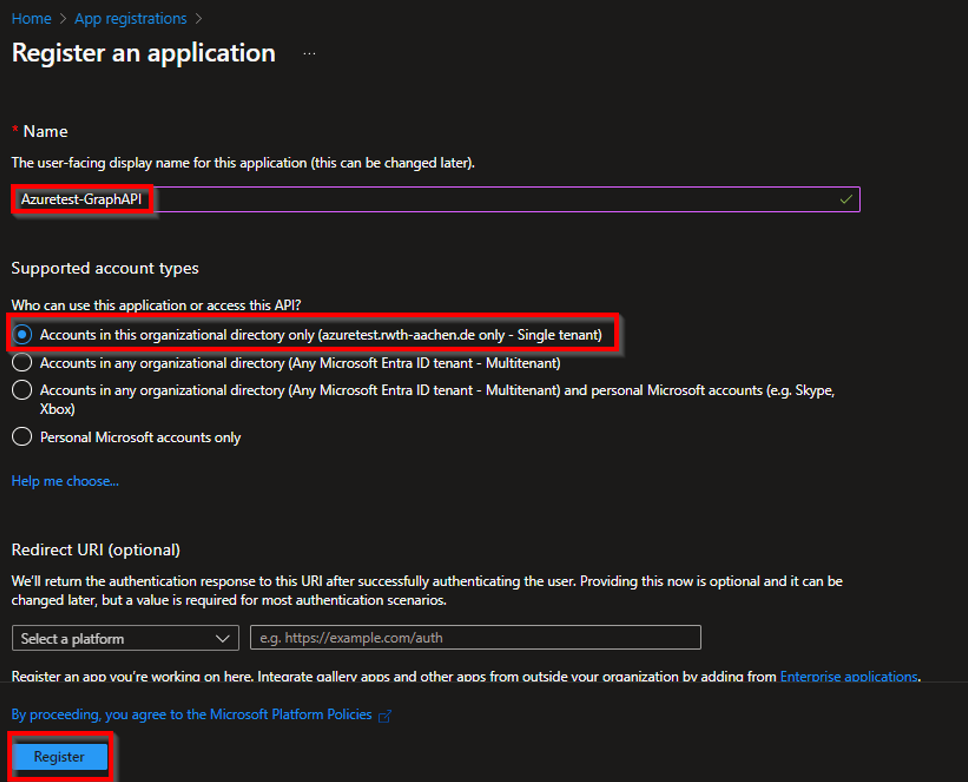
Enter the required information in the Register an application window as needed.
- Name: Name of your choice
- Supported account types
- Who can use this application or access this API: Accounts in this organizational directory only (Selected organization - Single tenant)
- Redirect URL (optional): URL of your choice
Under Who can use this application or access this API, select the first option.
Finally, click Register at the bottom of the screen.
Step 5
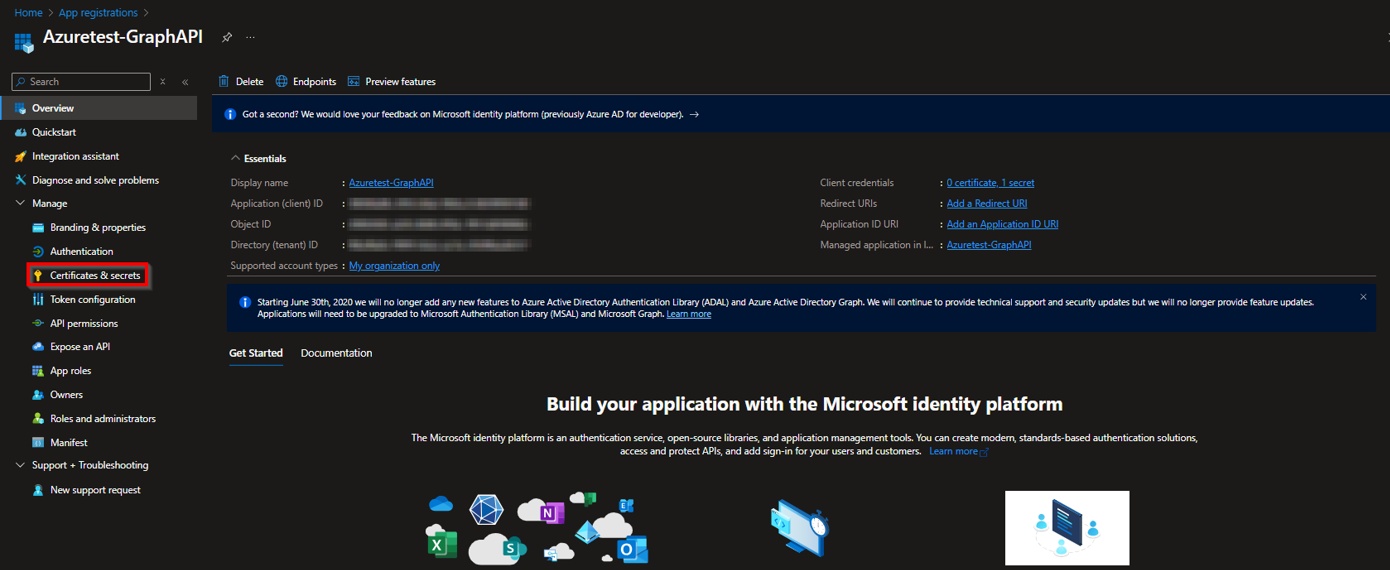
After creating a new app, also create a client secret
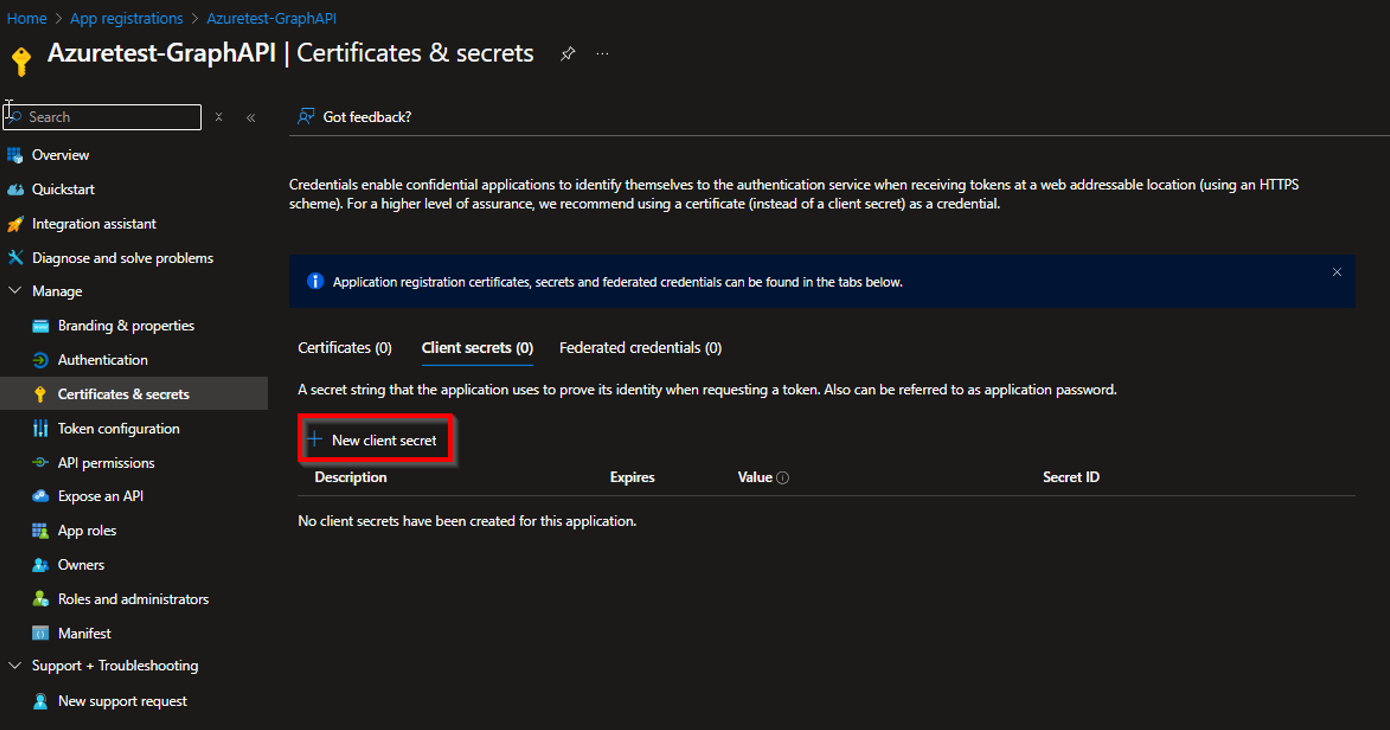
To do this, select the newly created app (Azuretest-GraphAPI in this example) and click Certificates & secrets in the navigation bar on the left.
Step 6
In the Certificates & secrets window, click + New client secret.
Step 7
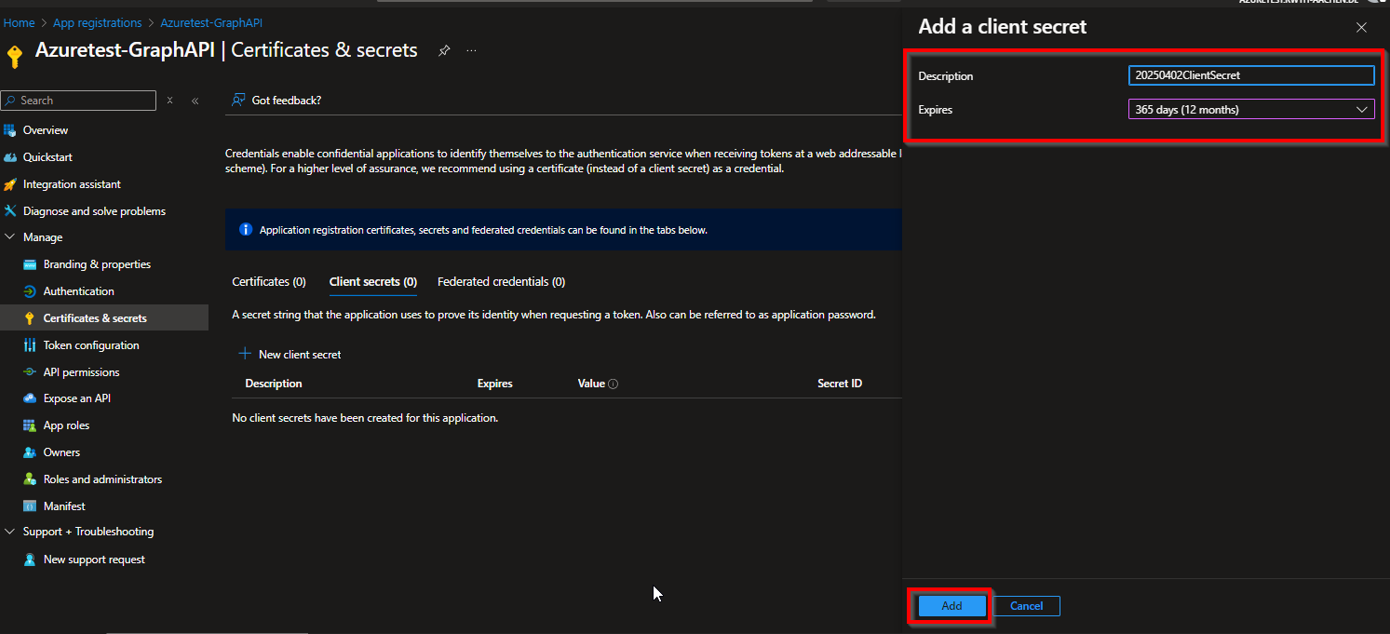
In the Add a client secret window, you can specify a name and an expiration date.
Once you have entered the information, click Add at the bottom right.
Step 8
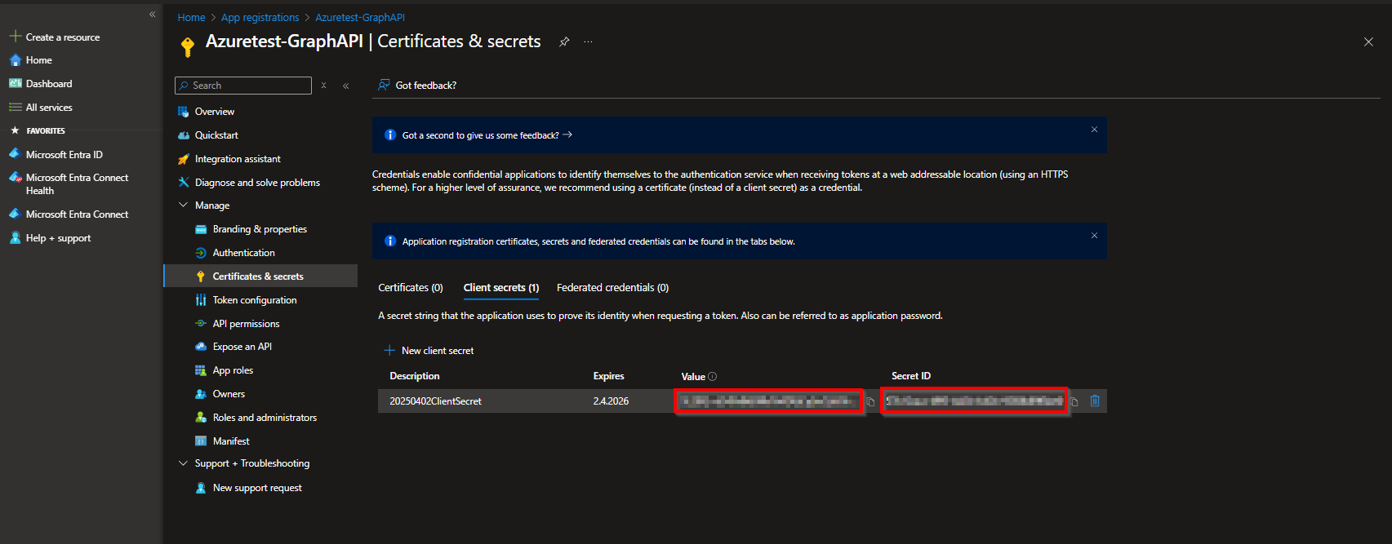
The client secret is now displayed. Please save both the Value and the Secret ID separately immediately.
Step 9
Finally, the required permissions must be assigned to the application.
In particular, Policy.ReadWrite.Authorization, which is the permission required to read and modify policies.
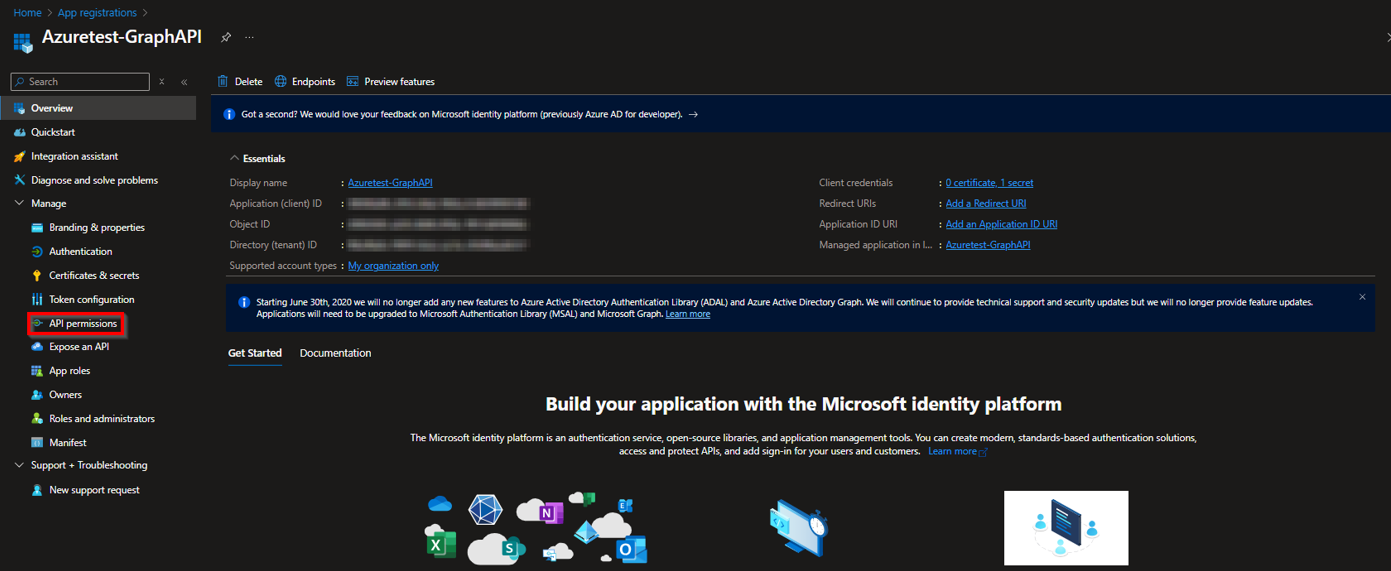
To do this, click API permissions in the navigation bar on the left.
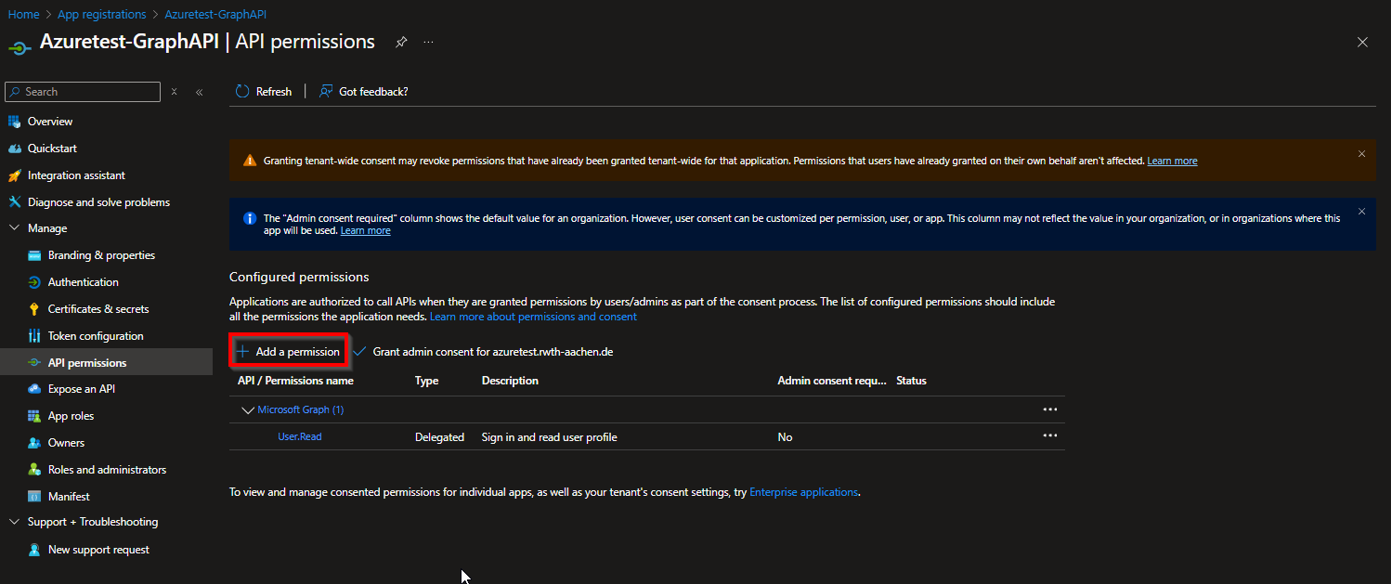
Step 10
In the API permissions window, click + Add a permission.
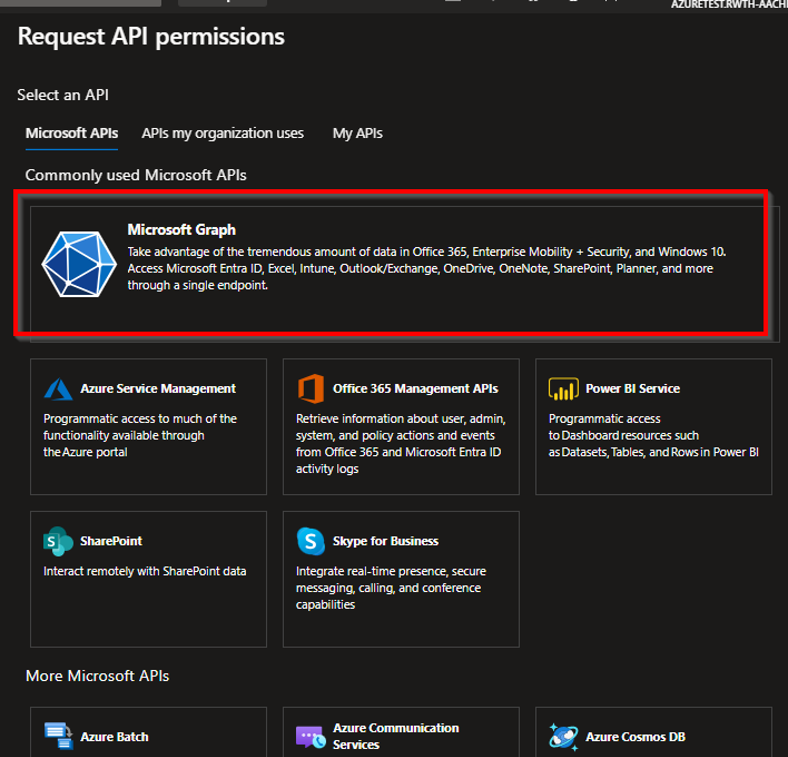
Step 11
In the Request API permissions window, select Microsoft Graph.
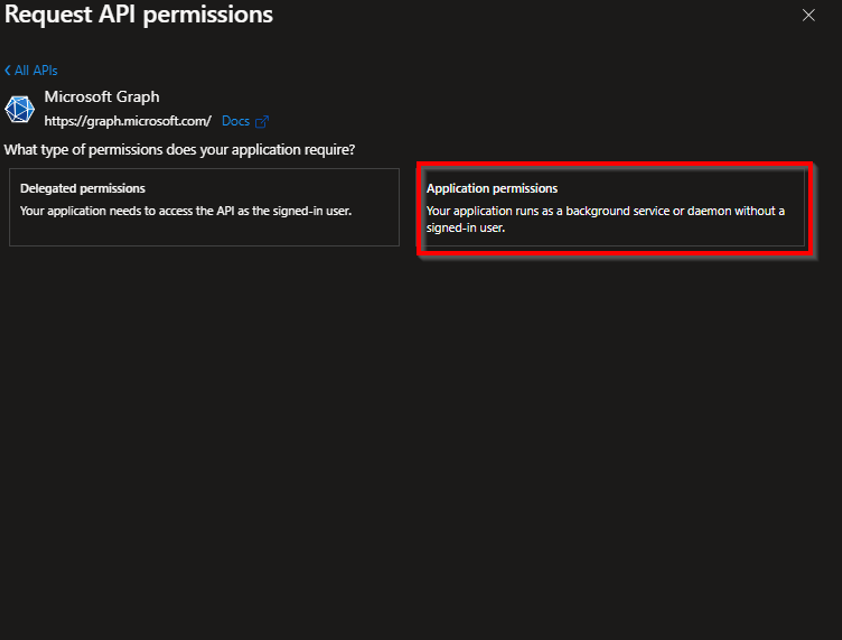
Step 12
Then select Application permissions.
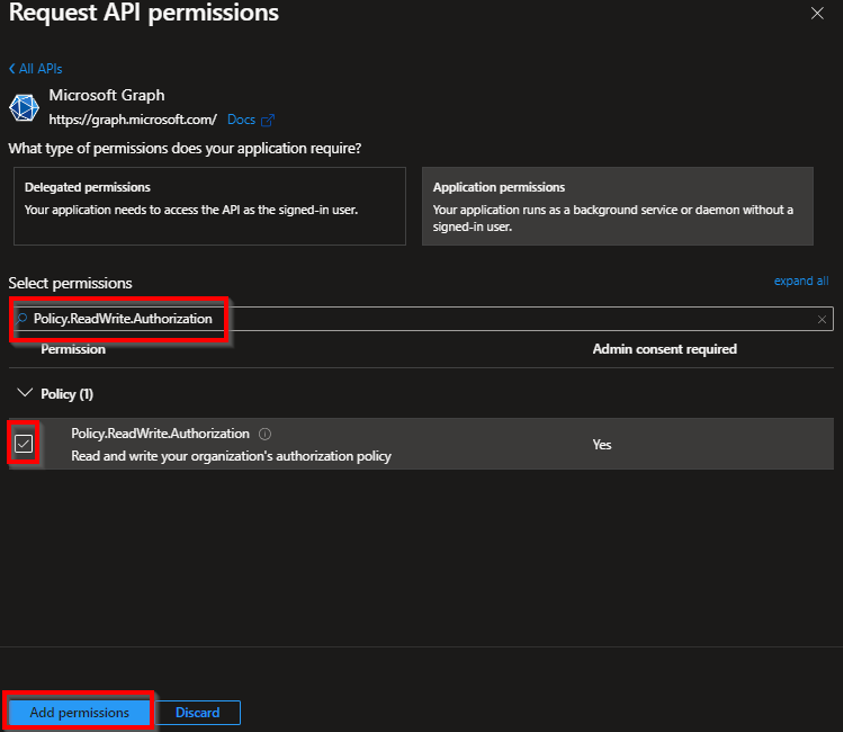
Step 13
You can now specify the type of permission and select Policy.ReadWrite.Authorization.
If it is not already selected, check the box next to the permission.
Finally, click Add permissions.
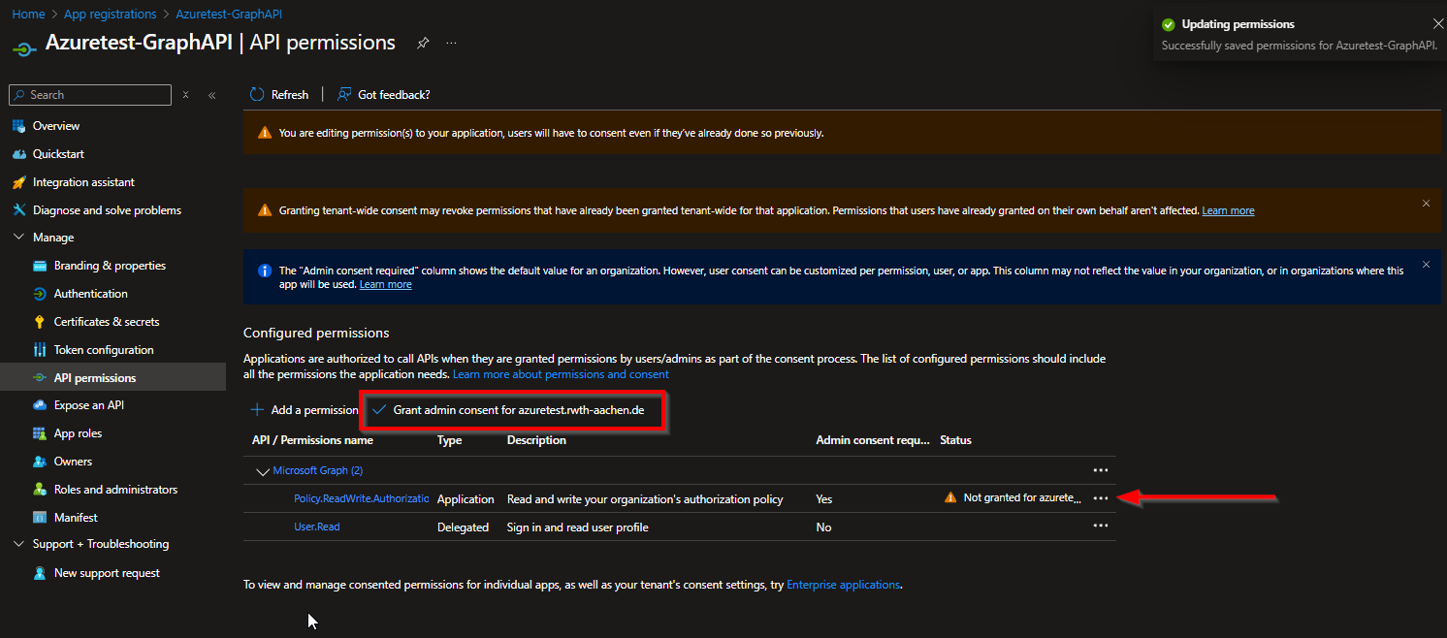
3.2.2 Disable user registration
Once Microsoft Graph has been set up in the Azure Portal, you can run the script provided by the IT Center.
- Script as a text file (.txt)
- Script as a PowerShell script (.ps1)
Save the script and store it together with the config file (.json) under C:\Temp\Viral\[…]
Then open the config.json file, enter the relevant information from the MS Graph app, and save the file.
- TenantID: Tenant ID (Can be viewed in the app overview in MS Graph)
- ClientID: App ID (Can be viewed in the app overview in MS Graph)
- ClientPassword: Secret password (Please enter the previously generated value of the client secret here)
Then run the script. You may need to confirm that the script is allowed to run. The output after the script has finished should look as follows:
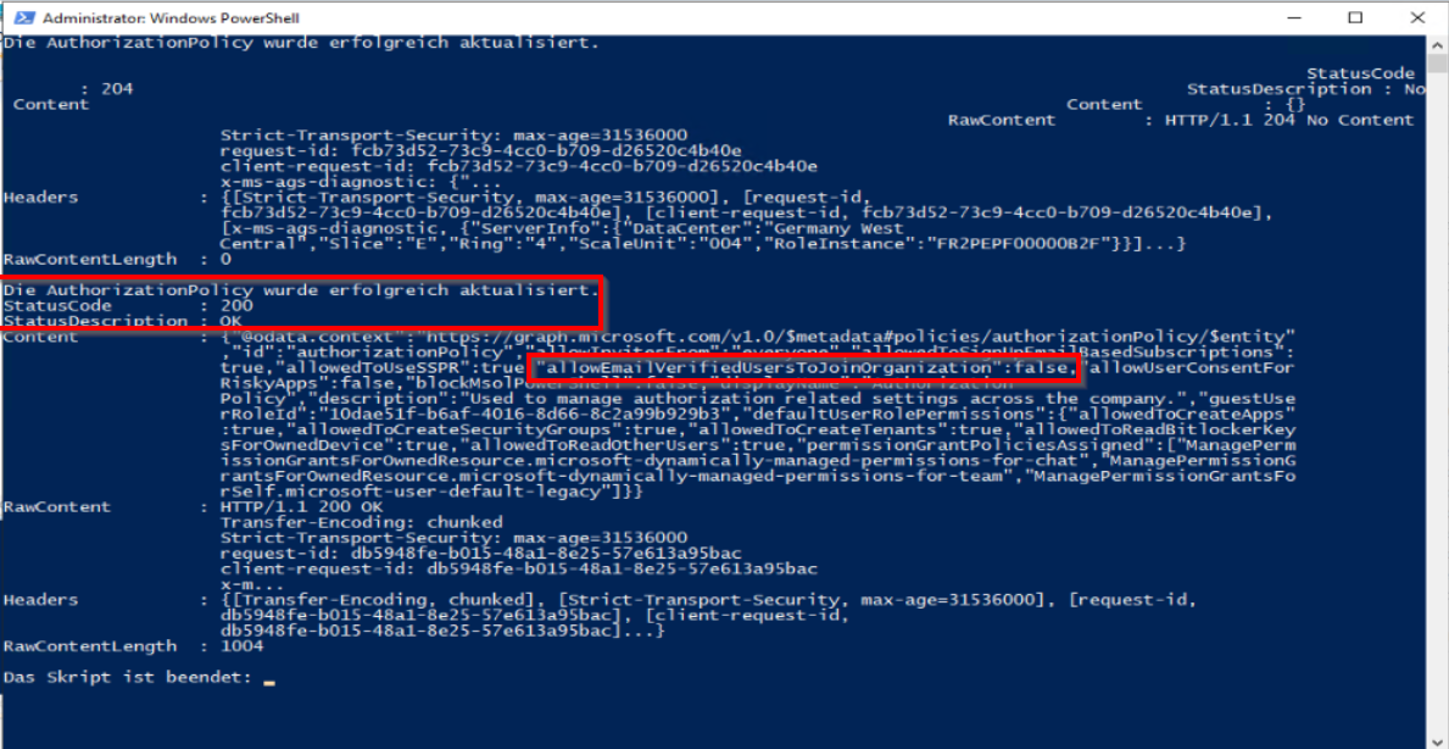
You can then close PowerShell. If you no longer plan to use MS Graph, we recommend removing the application from the Azure Portal afterward.
4. Prepare the tenant for migration
Once the tenant takeover and the deactivation of user registration have been completed successfully, the tenant should be prepared for migration.
We recommend reducing the number of accounts in the tenant to a minimum, while also communicating this and giving users the opportunity to back up their data beforehand.
The IT Center recommends the following procedure in the order shown:
4.1 Remove inactive accounts and groups
Check storage usage
Sign in using the account you created at the Microsoft Admin Loginpage (opens in new tab).
The OneDrive (opens in new tab) and SharePoint (opens in new tab) tabs show the overall storage usage in OneDrive and SharePoint as well as the specific usage per user and per site.
These lists provide a useful reference for OneDrive and SharePoint usage within the tenant. They provide an overview of how much data is stored in the tenant and which accounts or groups are storing the data.
Check users and assigned licenses
Under Users (opens in new tab), you can review the existing users in the tenant. We recommend reducing the number of users as much as possible to provide a better overview.
To do so, follow the next steps:
Step 1
Delete all guest accounts in the tenant via the Guest users (opens in new tab) tab.
Step 2
Delete all accounts belonging to former employees via the Users (opens in new tab) tab.
These accounts can be deleted because the employment relationship with the institution has ended and any stored data is (theoretically) no longer required.
Alternatively, you can check how much storage space the respective account is using under Storage Management. If in doubt, contact your employees.
Step 3
Delete all accounts belonging to users without active licenses via the Users (opens in new tab) tab.
Users without licenses probably no longer actively use the account because Microsoft services cannot be used without an appropriate license.
These accounts can probably also be deleted (if necessary, after a brief check in Storage Management). If in doubt, contact your employees.
Removing the user groups mentioned above generally reduces the number of accounts in the tenant to a minimum.

Note
Alternatively, accounts can initially be blocked. This is a less invasive way to determine whether users notice any restrictions in their daily work.
Blocked accounts and their data are not deleted automatically and remain in the tenant. The account must then be deleted manually in a second step.
At this point, we recommend checking the group memberships and storage usage of the remaining accounts, as these accounts may still be actively used and it may be necessary to contact the employees concerned.
To check group membership, navigate to the Groups (opens in new tab) tab.
Check groups
The Groups (opens in new tab) tab allows you to view group memberships and draw possible conclusions about usage within the tenant.
If a user does not belong to any groups, it is very likely that they have not used SharePoint or worked in Teams groups within the tenant.
In general, as with the accounts, we recommend reducing the number of groups as a first step.
To do so, follow the next steps:
Step 1
Delete all groups for which no members or owners (Member/Owner) are specified.
Click each group individually and check the memberships under Membership.
Because accounts were previously deleted, there may now be empty groups that can be removed.
Alternatively, the groups and their properties can also be queried and analyzed using Microsoft Graph.
Step 2
Delete active groups if they are no longer required.
If a group is a Teams group or contains a SharePoint site, a Teams icon or SharePoint icon is displayed next to the group.
A direct link to the Teams group or SharePoint site is available via the properties.
The amount of storage used by a group can be found in the storage overview (see above).
Note
Check SharePoint sites
SharePoint sites are created indirectly through a Microsoft group. Site activity can potentially be used to draw conclusions about usage or the relevance of the stored data.
The Sites tab provides an overview of the SharePoint sites, which you can then review:
- https://[insert tenant here]-admin.sharepoint.com/_layouts/15/online/AdminHome.aspx?modern=true#/siteManagement/view/ALL%20SITES
- The tenant must be adjusted in the URL because the link is tenant-specific: e.g. itcrwth-aachende-admin.sharepoint.com/... for the IT Center tenant
If the page cannot be accessed (The website cannot be reached), SharePoint has not been used via the tenant.
If you can access the page, please follow the next steps:
Step 1
Check the site activity using the adjusted link mentioned above.
Step 2
Delete all sites without activity after checking their relevance.
In this case, it makes sense to delete the group first, as this will also delete the SharePoint site in the long term.
Note
4.2 Communication within the institution about deactivating active accounts and groups
Communication within the institution is handled independently by the institution's internal IT department.
Depending on the number or complexity of the accounts, it may be useful to send an (internal) circular email to users informing them about the tenant migration.
In more complex situations, such as high storage usage by individual accounts or groups, we recommend contacting the affected users directly.
4.3 Data backup by users
You can forward the following IT Center Help page and the articles listed there to users as general guidance on backing up data from Microsoft cloud services.
There, you will find the most important points and locations where these services are typically used, as well as instructions on how affected users can check whether services have been used or data has been stored.
It also explains how to migrate or save data from the account.
4.4 Deactivate all remaining accounts and groups
Once all steps up to this point have been completed, the users have backed up their data, and no further usage can be identified in the tenant, the remaining accounts and groups in the tenant can be removed.
5. Final steps
Since no accounts or groups are migrated when the domain is migrated to the tenants managed by the IT Center and existing accounts receive an alternative sign-in domain, access to the old accounts may be lost.
The data in the accounts is not migrated because only the domain is being migrated. For this reason, although the data theoretically remains available in the tenants, continued use is not recommended.
Once everything has been prepared for the domain migration, please contact the (Send an email to:) IT-ServiceDesk by email using the subject keywords Migration of the viral tenant [insert your tenant here] or reply to the email you received from the IT-ServiceDesk regarding this matter.
The responsible department at the IT Center will then contact you regarding the next steps for the migration.
