


Cisco Secure Client (AnyConnect) for macOS


Be aware
In order to establish a VPN connection to an RWTH VPN via Cisco Secure Client on a macOS system, the following conditions must be met:
- Supported operating systems:
- Windows 11 (64-bit)
- Microsoft supported versions of Windows 10 x86 (32-bit) and x64 (64-bit)
- Microsoft-supported versions of Windows 11 for ARM64-based PCs
- Fully configured VPN account in SelfService
- Ready installation file Cisco Secure Client for macOS (cisco-secure-client-macos-5.1.8.122-core-vpn-webdeploy-k9.dmg).
- Connection data for central RWTH VPN:
- Server: vpn.rwth-aachen.de
- Tunnel: Full tunnel (all traffic via RWTH network) or split tunnel (only RWTH internal addresses are accessed via VPN)
- VPN-Username: Form ab123456
- VPN Kennwort (see step 1)
To connect to the RWTH VPN, the following steps are necessary:
Install Cisco Secure Client
To install Cisco Secure Client, proceed as follows:
Step 1
Run the installation file.

Step 2
Select the package "cisco-secure-client...".

Step 3
Once the installer starts, select Continue.

Step 4
Accept the licence agreement by selecting Continue and Agree.


Step 5
Select the “VPN” package.
All other packages are not required to connect to the RWTH VPN.
Confirm your selection by clicking Continue.

Step 6
Confirm that you wish to install the app with Install.

Step 7
You may be prompted to enter your device's username and password to authorize the installation Install Software.

Activate Cisco Secure Client
When installing Cisco AnyConnect Socket Filter for the first time, it must be enabled in the settings. The steps for macOS 15 differ slightly from those for other versions.
macOS 15
Step 1
Open the system settings from the pop-up.

Step 2
Click the slider next to the socket filter.
You may need to select Details next to the notification that software needs attention before it can be used, so that you can see the Cisco Socket Filter extension.

Step 3
Allow the socket filter.
Step 4
Close the dialogue with Done.

macOS 14 and older
Your device will block the Cisco Secure Client by default. Multiple windows will open, informing you that the Cisco Secure Client System Extension needs to be enabled in your device settings.
Step 1
Use the Open Preferences button to open the settings directly.

Step 2
Choose the menu point "Privacy and Security" and then scroll down to the message that the AnyConnect Socket Filter was blocked.
Select Allow next to the message.

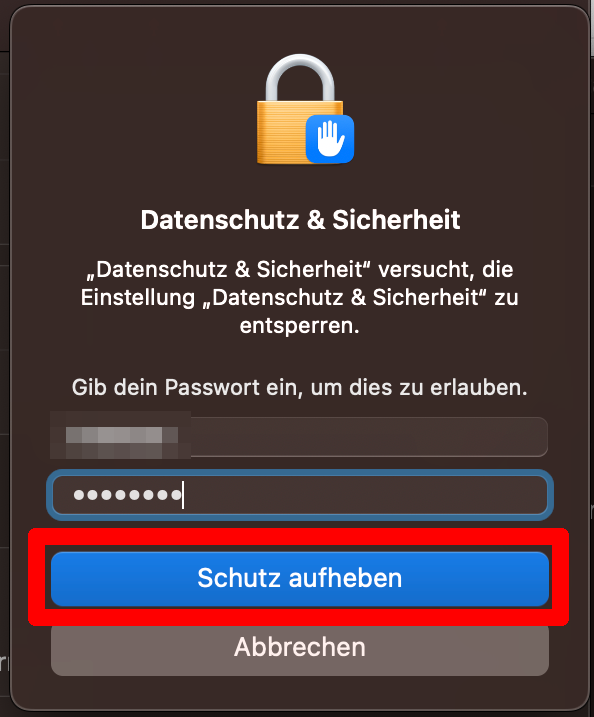
Step 3
Enter your device username and password, then select Unprotect (Schutz aufheben) to confirm the unlock.
Step 4
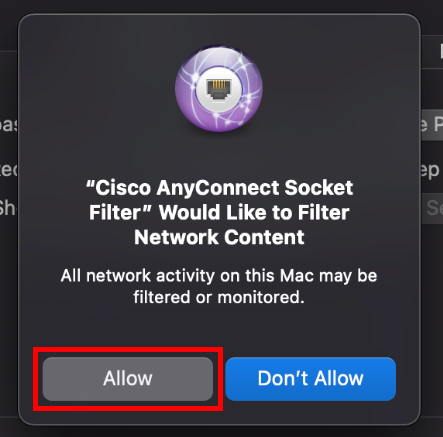
You will be shown a window asking whether the socket filter is allowed to filter network content. Choose to allow the filter ("Erlauben").

Step 5
Click Dismiss to confirm the activation.

Step 6
You can now close the installation summary by selecting Close.

Connect to the RWTH VPN
To connect to the RWTH VPN, proceed as follows:
Step 1
Start the app, which you will usually find in your files under “ Applications.”

A Cisco Secure Client connection window opens.
Step 2
Enter the address “vpn.rwth-aachen.de” or a valid address for an organizational VPN, then click Connect.

Step 3
Choose the group "RWTH-VPN (Full Tunnel*)" or"RWTH-VPN (Split Tunnel*)" and enter your username (format ab123456) and your VPN password as the password.
- *Full tunnel: All data traffic runs via the RWTH network.
- *Split tunnel: Only data traffic directed to RWTH systems runs via the RWTH network. Local home network devices remain accessible.
Then select OK to continue.

Step 4
Enter the code for multi-factor authentication.
You can generate a code using a token, such as an authenticator app.
Then select OK to continue.

The connection has been successfully established.
Disconnect
The connection should now have been established successfully. You can stop your connection at any time by selecting "Disconnect".


