


Edit associated people

On this page you will learn how to edit people belonging to your organization in the People Directory or add new people to it.
Entry requirements for the people directory
You can only add people who already have an identity in the Identity Management of RWTH and a status in your organization. The Status column can contain the following statuses, for example (corresponding to the person's status in IdM Selfservice):
- Employee RWTH
- Scholarship Holder RWTH
- Member UKA
- External Employee RWTH
If the person you want to add does not yet have an identity, they must first redeem an appropriate coupon.
If the person you want to add does not yet have a status in your organization, your role administrator can assign the role Beitritt Personenverzeichnis (Access to People Directory) to the person.
In this case, the “Status” column contains the following designation:
- Role holder
Please note that newly added people may not be displayed until the following day.
To add a person to your organization's people directory, please follow these steps:
Step 1
Open the RWTH People Directory and log in.
Step 2
Select the Persons tab on the start page and then Add Persons (1).

Step 3
A list of all people who are assigned to your organization by the system and do not yet have an entry in your organization's people directory will now open.
If you cannot find a person who belongs to your organization here, please have the person's status and affiliation checked.
The respective person can do this themselves in the RWTH Selfservice. If there are any problems, please contact the IT ServiceDesk.
For external people who nevertheless belong to your organization, please assign the role Beitritt Personenverzeichnis (Access to People Directory).
If you have found the person you want to add, check the box next to the entry and select Add selected persons.

To edit a person's business address or contact details, please follow these steps:
Step 1
Open the RWTH People Directory and log in.
Step 2
Select the Persons tab on the start page and search for the entry of the person you wish to edit.
Then click on the person's blue-highlighted name under (2).
Step 3
Fill in all the required fields.
Please note:
Using the slider Show in Public Directories, you can either hide the entire personal entry or individual contact information (for example email address or phone number) on public pages such as RWTHcontacts and RWTH websites. This does not affect connected systems, such as SAP or role management.
- The “Display name” field is used by the Alcatel telephone system of RWTH and by the telephone system of the University Hospital for the name display on the telephone display.
- If the telephone number is entered for several people and the display name in the personal entrie differs, a message will be displayed:

- The email address field is queried by several IT Center services (for example Webex).
- The workplace address may be relevant when sending mail via internal mail.
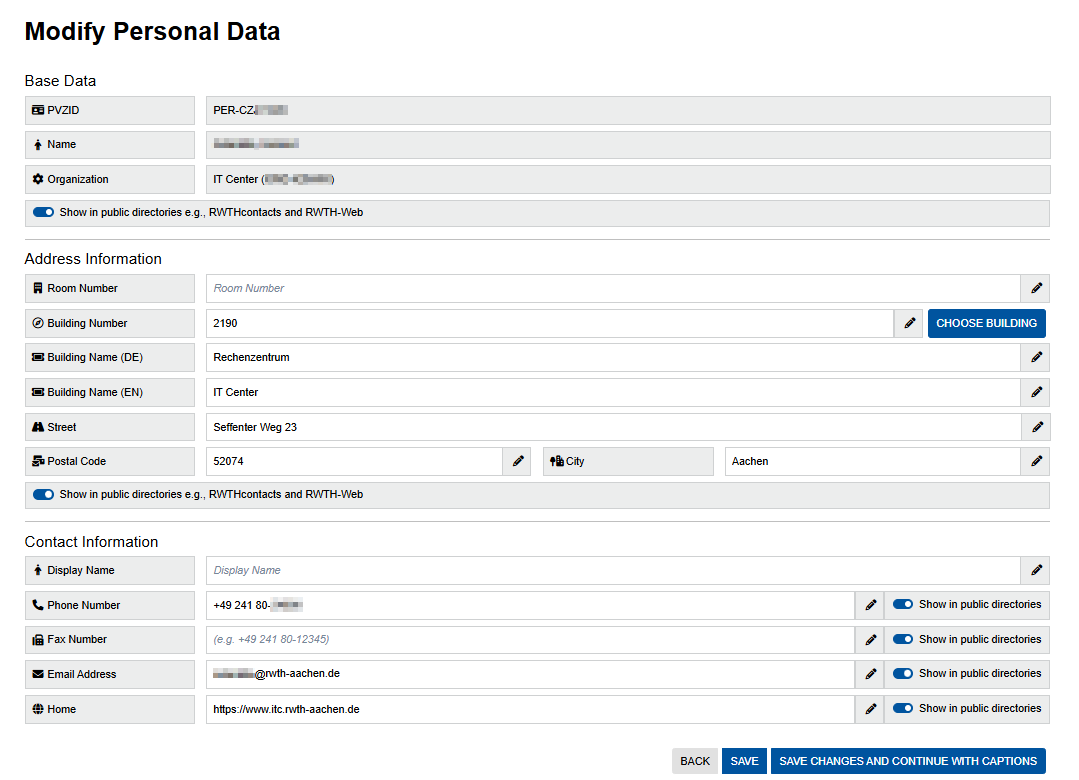
Step 4
As soon as you have made all the desired changes, you can finalize them by clicking on Save.
People are not automatically removed from organizations. Instead, organization administrators must remove people who have left.
To remove a person from your organization, please follow these steps:
Step 1
Open the RWTH People Directory and log in.
Step 2
Select the Persons tab on the start page and search for the entry of the person you wish to delete.
Step 3
Then click on the trash icon (3) in the person's row and confirm the deletion.
If required, an export can be created as a CSV file containing the complete overview of all persons in an organization and the associated data.
To do this, click on the button Download All Data (4).
