


Biometric data as Hardware token for RWTH Single Sign-On (WebAuthn/FIDO2)

The RWTH Single Sign-On hardware token (WebAuthn/FIDO2) can also be used with end devices that offer biometric fingerprint or facial recognition. Please ensure that your end device supports these features.
This token requires initialisation in the Token Manager and verification outside of it.
- Requirements for using a hardware token
- Device configuration
- Initialisation in the Token Manager
- Verification outside the Token Manager
1. Requirements for using a hardware token
- Your end device supports biometric fingerprint or facial recognition.
- This token can only be set up if the WebAuthn/FIDO2 protocol is supported. Biometric fingerprint or facial recognition fulfils these requirements on most end devices.
2. Device configuration
If you have not set up biometric fingerprint or facial recognition yet, please follow one of the guides below:
If your device is already set up, skip to the Initialisation in the Token Manager.
Setup for Apple devices
By using Apple Touch ID or Face ID as a hardware token for RWTH Single Sign-On, secure login to RWTH services can be enabled without a separate hardware security key.
Please check first whether your device supports these functions.
- Apple smartphones are best suited for this.
- Apple computers that have fingerprint scanners (Mac computers with Magic Keyboard, Apple Chip and MacOS Big Sur 11.4 or newer) can also be used for Touch ID.
If you already use the Apple Keychain (Passwords) function, you can integrate Touch ID or Face ID as a hardware token for RWTH Single Sign-On (WebAuthn/FIDO2) as follows:
Step 1
Activate the Touch ID or Face ID function in the system settings.
- For MacOS devices: Select the Apple menu (apple icon) > System Preferences > Touch ID & Password
- For iOS devices:
- For Touch ID: Select Settings (gear icon) > Touch ID & Code > Configure Touch ID
- For Face ID: Select Settings (gear icon) > Face ID & Code > Configure Face ID
Step 2
Follow the respective instructions on the screen of your end device. The required biometric data (fingerprints or facial images) must be added.
Step 3
Once this is complete, open the Token Manager on the respective end device and follow the steps under Initialisation in the Token Manager.
Setup for Android devices
By using the biometric fingerprint or facial recognition of Android as a hardware token for the RWTH Single Sign-On, a secure login to RWTH services can be enabled without a separate hardware security key.
Please check first whether your device supports these functions.
You can integrate biometric fingerprint or facial recognition as a hardware token for RWTH Single Sign-On (WebAuthn/FIDO2) as follows:
Step 1
Select an end device on which a biometric fingerprint or facial recognition is already set up or with which this can be done.
Step 2
If this has not yet been done, the biometric fingerprint or facial recognition function must be activated in the system settings.
Select Settings (gear icon) > Security and privacy > and then select Biometric data under the Additional security settings tab.
- Either select Fingerprints
- Or select Facial recognition
Step 3
Follow the instructions on the screen of your device. The required biometric data (fingerprints or facial images) must be added.
Step 4
Once this is complete, open the Token Manager on the respective end device and follow the steps under Initialisation in the Token Manager.
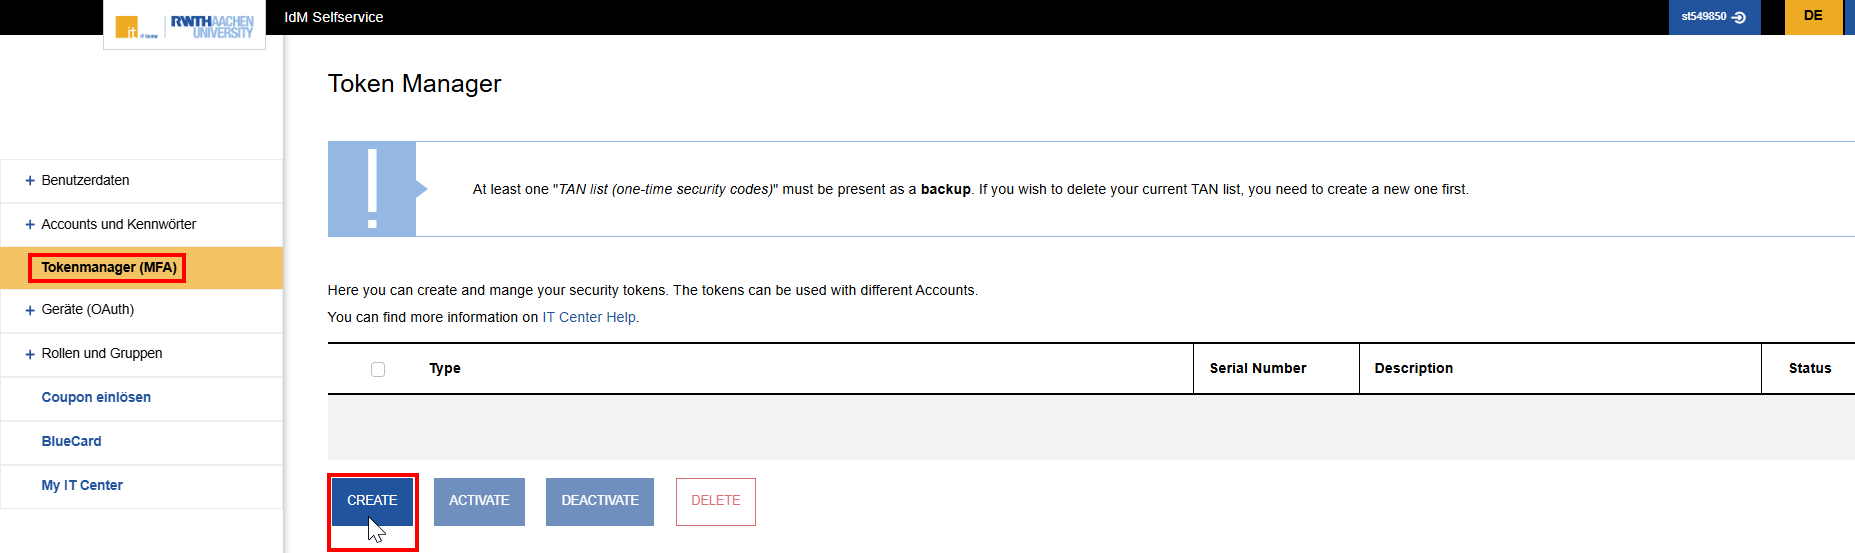
3. Initialisation in the Token Manager
Step 1
Open the Token Manager.
Step 2
Log in with RWTH Single Sign-On.
Step 3
Click on the blue Create button at the bottom left of the Token Manager.
Step 4
Choose Hardware Token for RWTH Single Sign-On (WebAuthn/FIDO2).
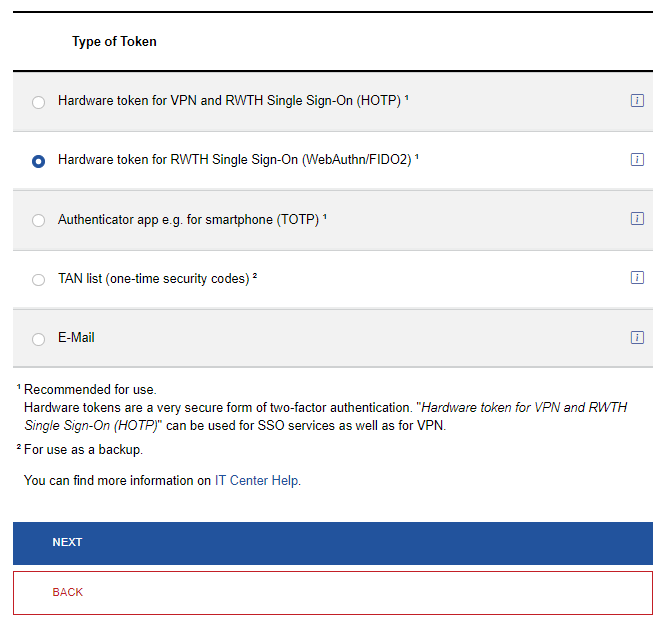
Step 5
Click on Next.
Step 6
Enter a unique description for the security key (e.g. Smartphone Touch/Face ID). This helps you to differentiate between tokens, especially if you have created several tokens.

Step 7
Click on Create.
Step 8
Start the verification process for the hardware token in the credential manager or browser by clicking on Register.

4. Verification outside the Token Manager
After you have clicked on Registration, a new window will open where you can select a device for your passkey.
The following guides describe how to conduct the verification on your device.
Verification for Apple devices
Step 1
Select Apple Keychain, or if this is not possible, select This device.
![]()
Step 2
Follow the instructions given on the screen.
You might need to place your finger on the Touch ID sensor or face the camera.
After confirmation, the overview in the Token Manager is displayed again and the token is now set up.
The next time you log in to a RWTH service, you must select the Hardware token for RWTH Single Sign-On (WebAuthn/FIDO2) option.
Authentication is then carried out using the previously set up fingerprint or facial image.
Verification for Android devices
Step 1
Select This device.

Step 2
Follow the instructions given on the screen.
You might need to place your finger on the fingerprint sensor / screen or face the camera.
After confirmation, the overview in the Token Manager is displayed again and the token is now set up.
The next time you log in to an RWTH service, you must select the Hardware token for RWTH Single Sign-On (WebAuthn/FIDO2) option.
Authentication is then carried out using the previously set up fingerprint or facial image.
Please contact the IT-ServiceDesk if you experience any further problems.
