


Hardware Token for VPN and RWTH Single Sign-On (HOTP)

The hardware token for VPN and RWTH Single Sign-On (HOTP) is used with a physical security key (e.g. YubiKey).
- Requirements for the use of the hardware token
- Configuration
- Login with a security key
- Resync (optional)
1. Requirements for the use of hardware token:
- You have a hardware security key (hardware token).
- Yubikey 5 Series, Nitrokey 3 and selected Feitian keys are compatible with both "Hardware token for VPN and RWTH Single Sign-On (HOTP)" and "Hardware token for RWTH Single Sign-On (WebAuthn/FIDO2)".
- To set up this token, the security key must at least support the OTP (one time password) protocol.
- You have installed a corresponding manager app (e.g. Yubico Authenticator).
2. Configuration
Video tutorial on token setup for VPN using the Yubikey Manager:
Step 1
Insert your security key into a USB slot of your PC.
Step 2
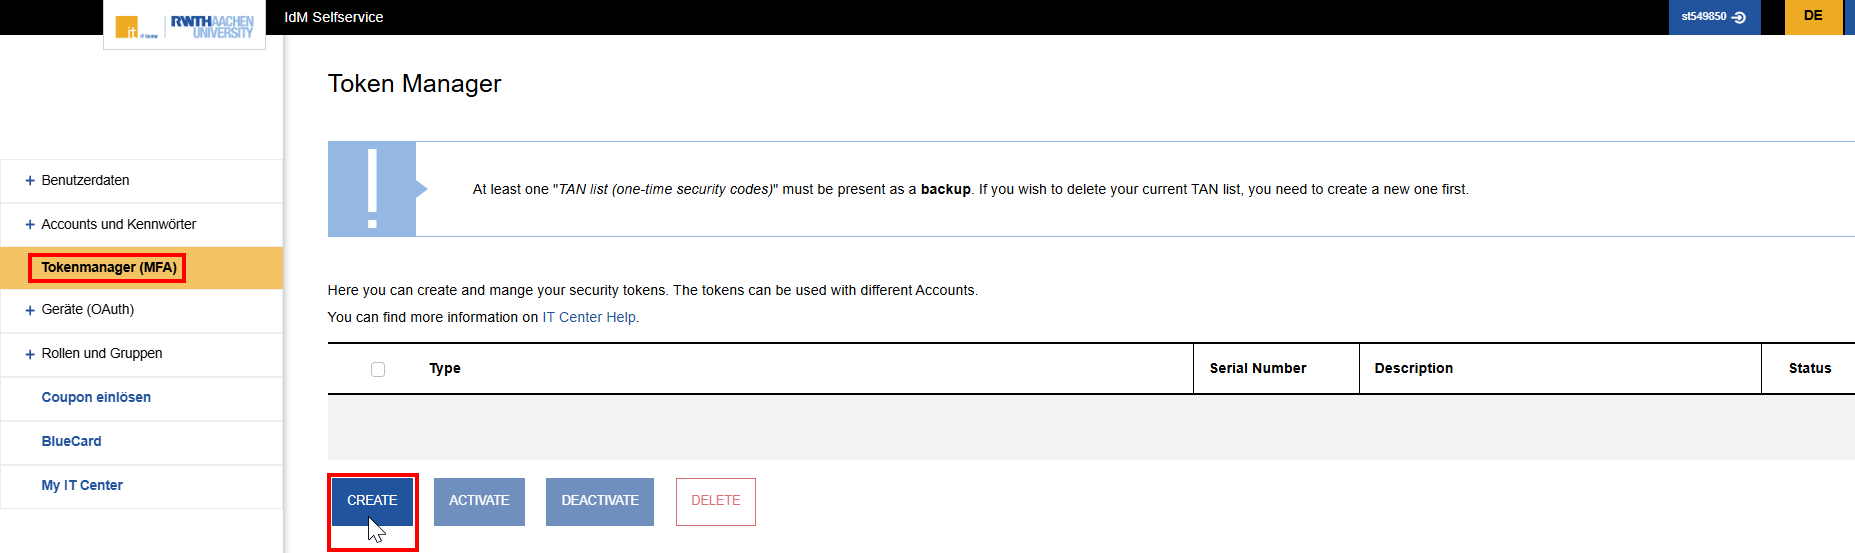
Open the Token Manager.
Step 3
Log in with RWTH Single Sign-On.
Step 4
Click on the blue Create button at the bottom left of the Token Manager.
Step 5
Choose Hardware token for VPN and RWTH Single Sign-On (HOTP).
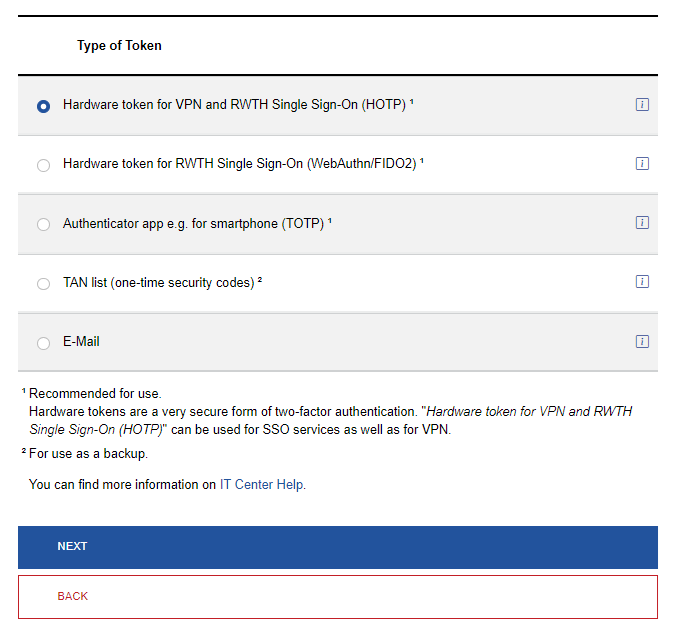
Step 6
Click on Next.
Step 7
Enter a unique description for the security key (e.g. My HOTP key for VPN). This helps you to differentiate between tokens, especially if you have created several tokens.
Optional
You can adjust the length of the security code under Advanced options. The default setting is 6 characters, which does not need to be changed.
You must make sure that the length of the one-time security codes in the Token Manager and in the Manager app are set to the same length. If you cannot change the length of the codes, leave them at the default setting of 6 characters.
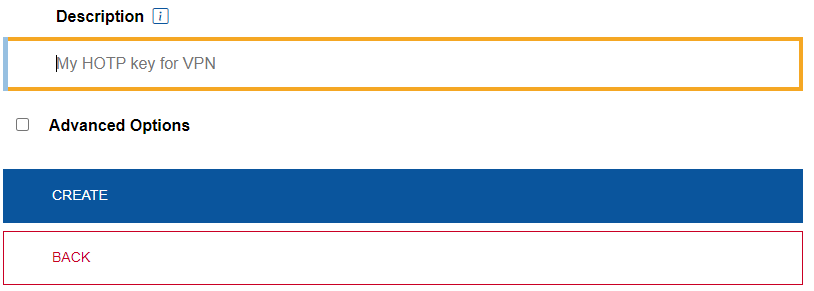
Step 8
Click on Create.
Step 9
Copy the code under Token secret. You will need it in Step 14. Do not share the token secret with anyone else.
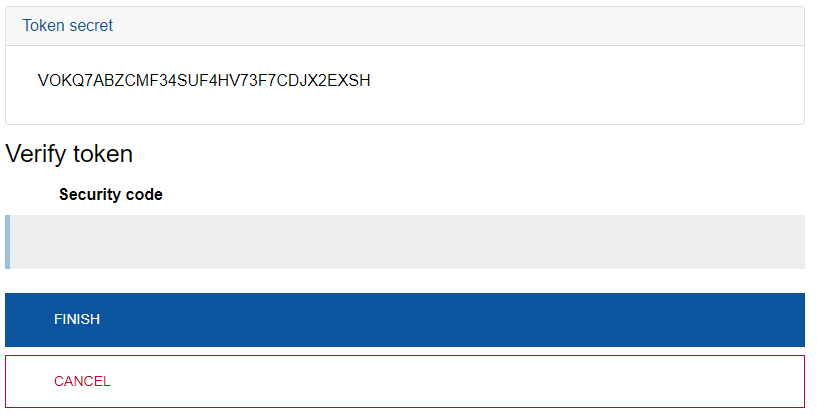
Step 10
Keep the RWTH Token Manager open in the background. Navigate to the OTP configuration of your security key in the Manager app.
In the Yubico Authenticator via Slots.
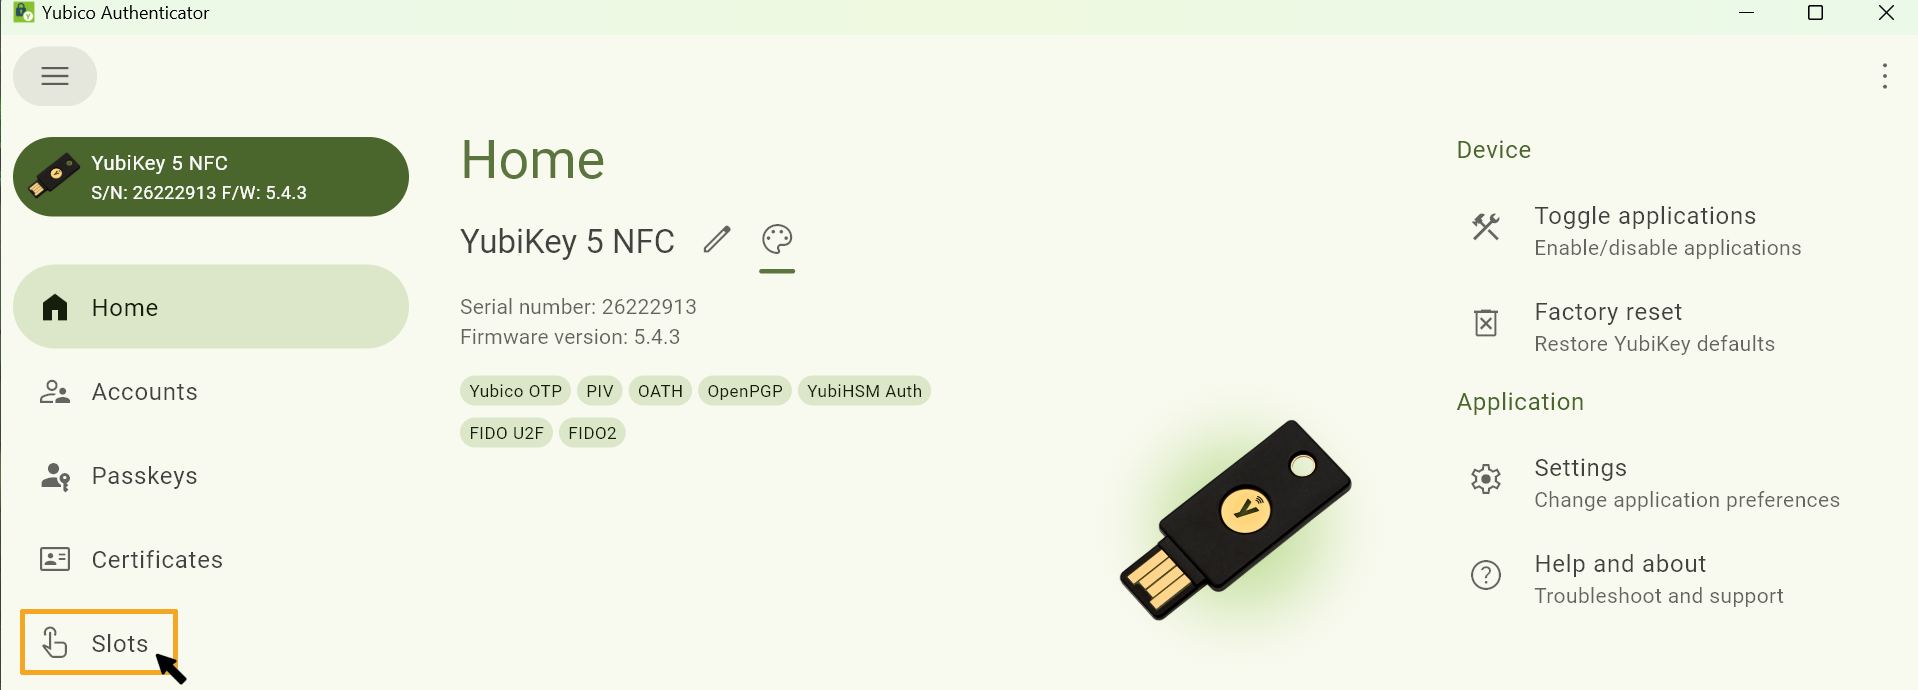
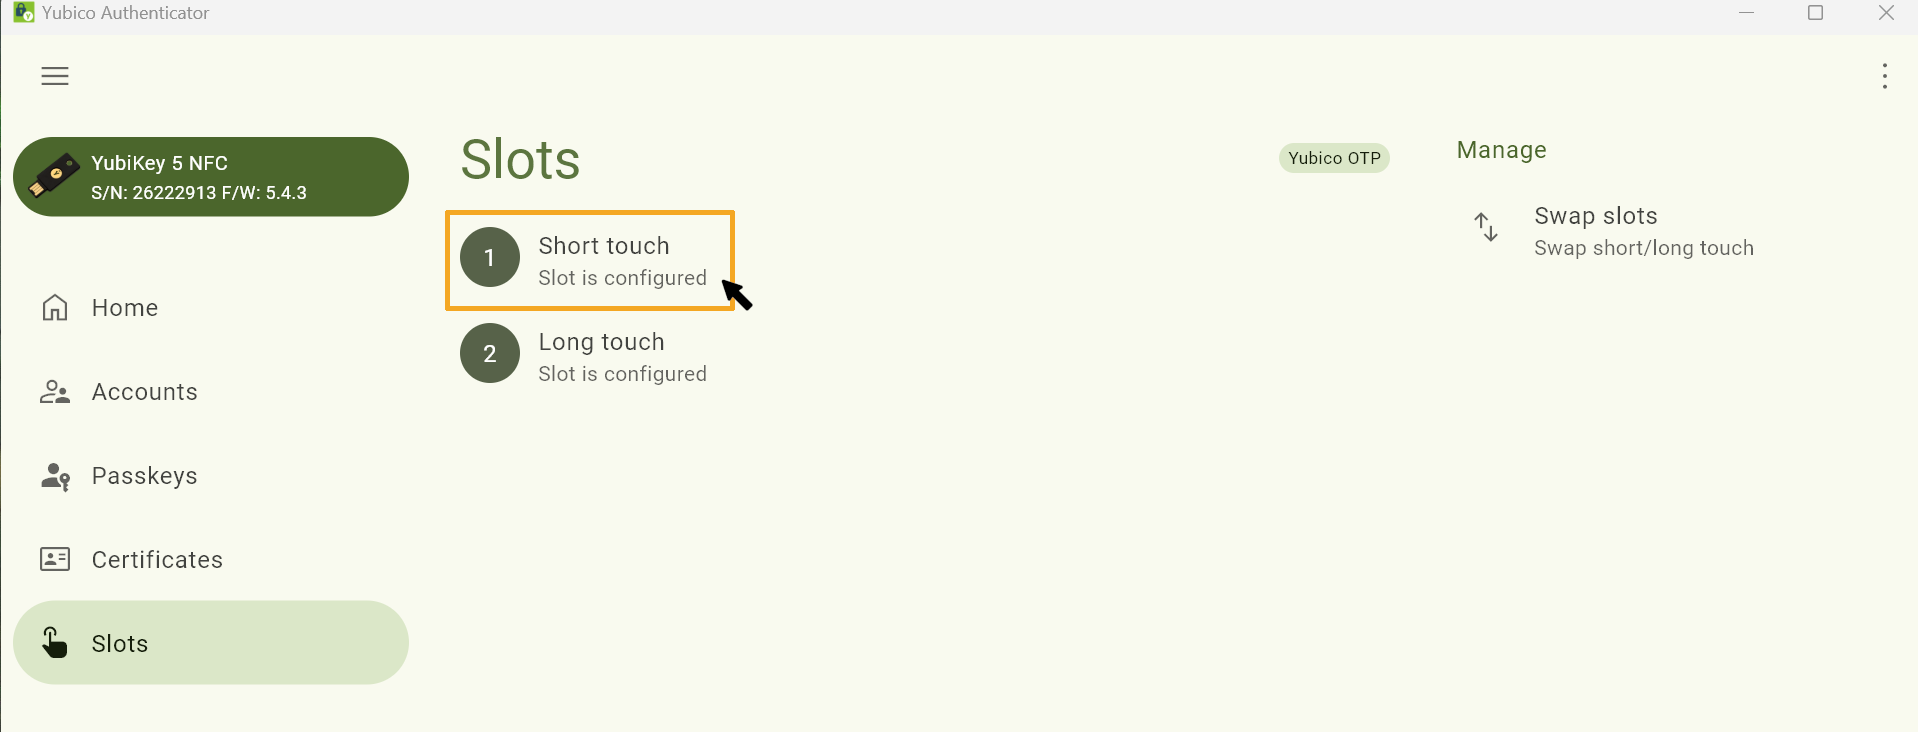
Step 11
Select one of the slots to configure it. A Yubikey has two configurable slots, one for a short tap and one for a long hold.
Please note:
If one slot is already being used for another application (e.g. Bitwarden or similar), you can select the other slot so that the configuration is not deleted. New Yubikeys have their first slot occupied by a Yubico-OTP-Token - this slot can be overwritten.
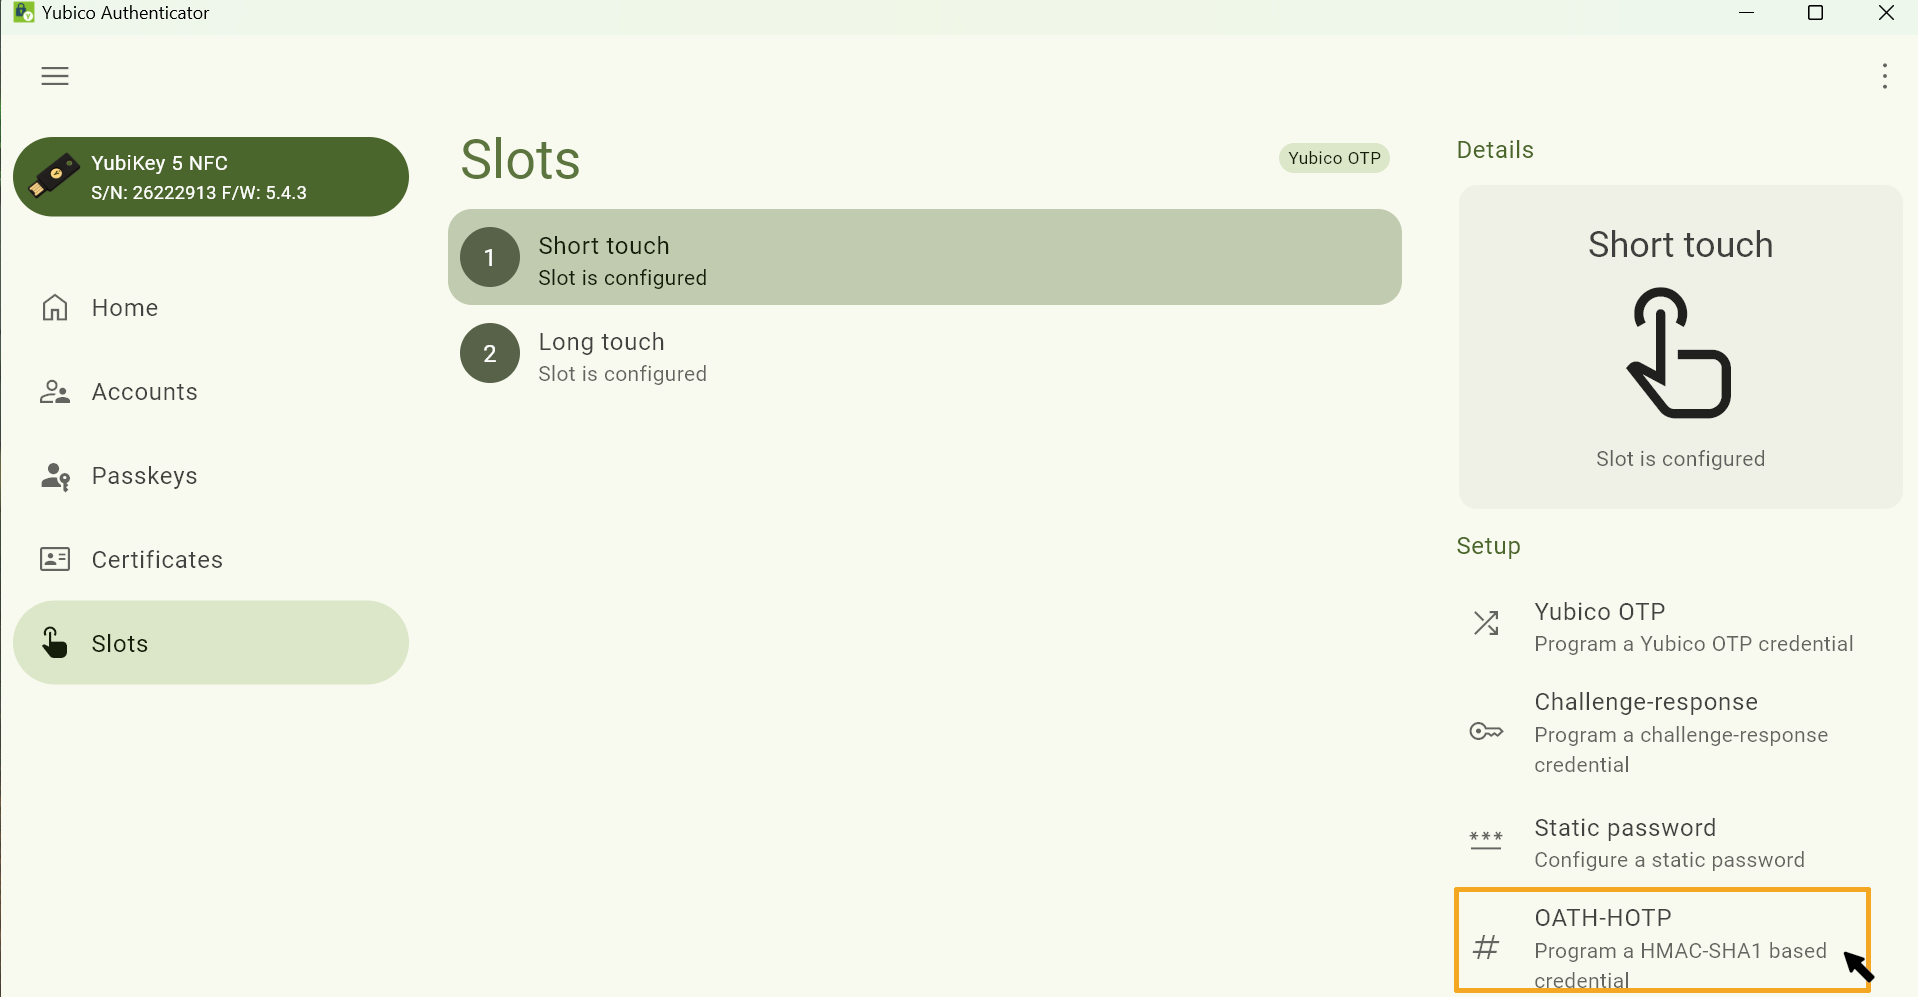
Step 12
In the next window, select OATH-HOTP.
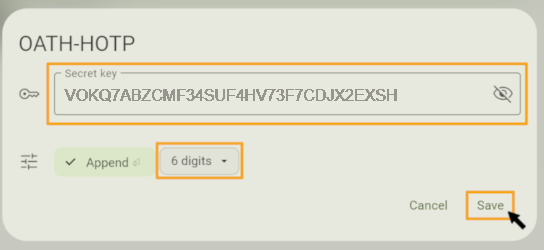
Step 13
Paste the copied token secret into the corresponding Secret Key field in the Manager app.
Please note:
Make sure that the length of the one-time security codes in the Token Manager and in the Manager app are set to the same length. The default setting is 6 digits, which does not need to be changed.
Step 14
Click Save.
Step 15
Return to the Token Manager and click in the gray area under "Security code".
Step 16
Tap on your security key with your finger.
For the Yubikey, tap on the circular recess with the Y on it.
If slot 1 has been selected in Step 11, tap once briefly; if slot 2 has been selected, press and hold the security key.
A code will be entered automatically in the field "Security Code".
Step 17
By entering the security code, the process should be completed automatically and the overview of the tokens created should be displayed.
If this is not the case, click on Complete manually in the Token Manager.
Please note:
If you now receive an error message, an error has occurred somewhere in the process.
- Please check again whether you have correctly tapped short (slot 1) or held long (slot 2).
- If the error message persists, click Cancel and delete all tokens in the Token Manager overview that do not have a green plug symbol on the far right.
- Then restart the process. Make sure that the length of the security code is the same in the Manager app and in the Token Manager.
- In case of further problems please contact the IT-ServiceDesk.

Note
3. Login with a security key
To use a security key for login with MFA, please proceed as follow:
Step 1
Insert the security key into a USB port of your device.
Step 2
When you are promted to enter a one-time security code, tap the security key with your finger.
On the Yubikey, tap the circular recess with the Y on it.
- If slot 1 has been set up, tap once briefly.
- If slot 2 has been set up, press and hold the security key.
Step 3
A code is generated in the input field and the process is completed automatically.
4. Resync (optional)
A HOTP token generates a new code every time you activate it - regardless of whether you actually use the codes.
If several codes are generated in this way without being used for authentication, authentication with this token may no longer work.
If you enter the Token Manager with another token, such as the backup tan list, you can usually restore the HOTP token by synchronizing it.
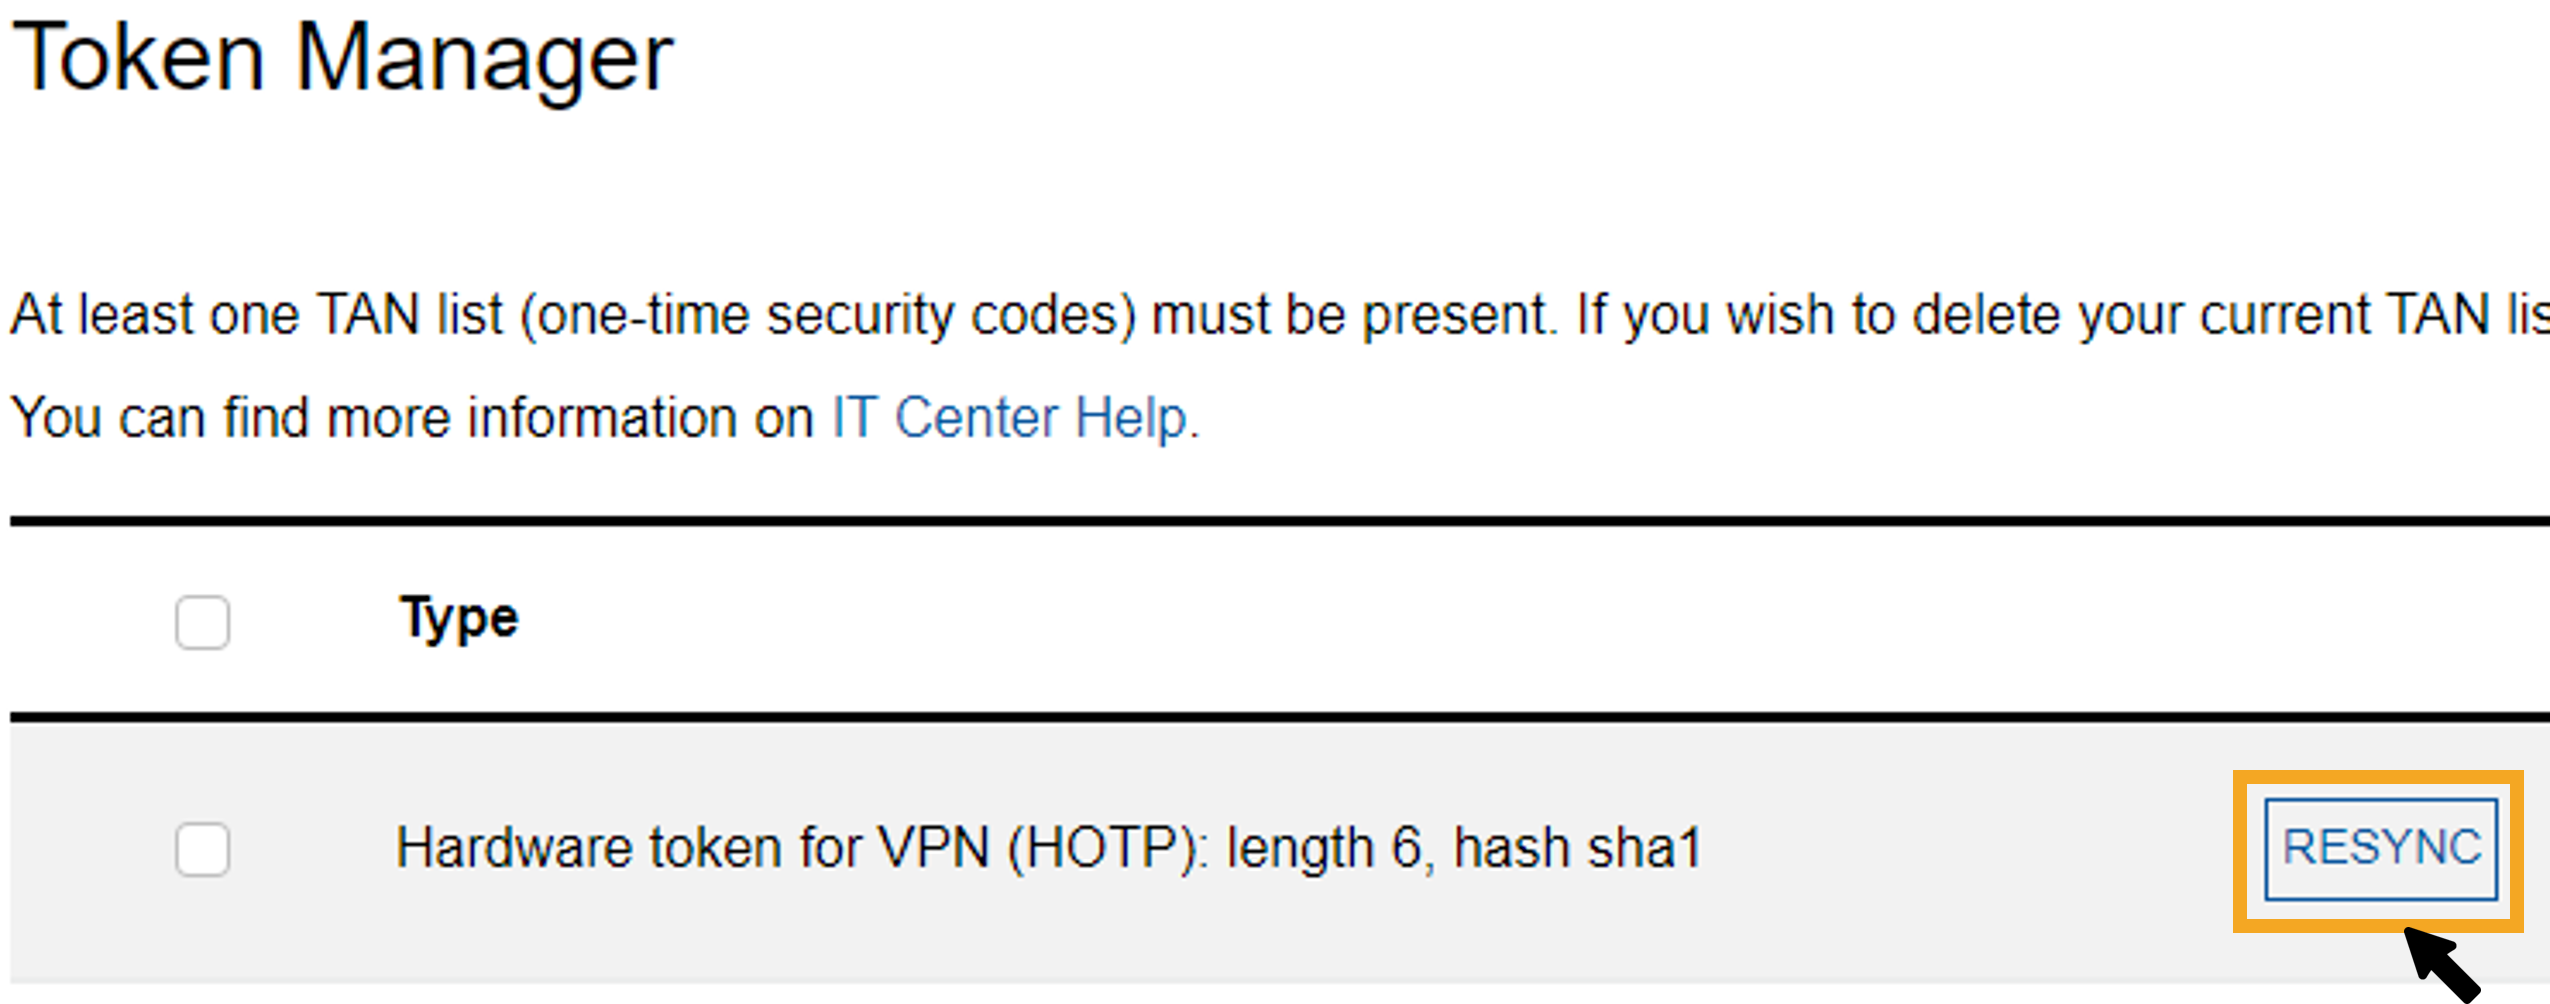
Step 1
Click on the button to the right of the token type on the overview page in the Token Manager.
Step 2
Enter two one-time security codes generated directly one after the other in the fields (1) and (2) by clicking in the fields and tapping or holding your security key (depending on the configuration in step 11).
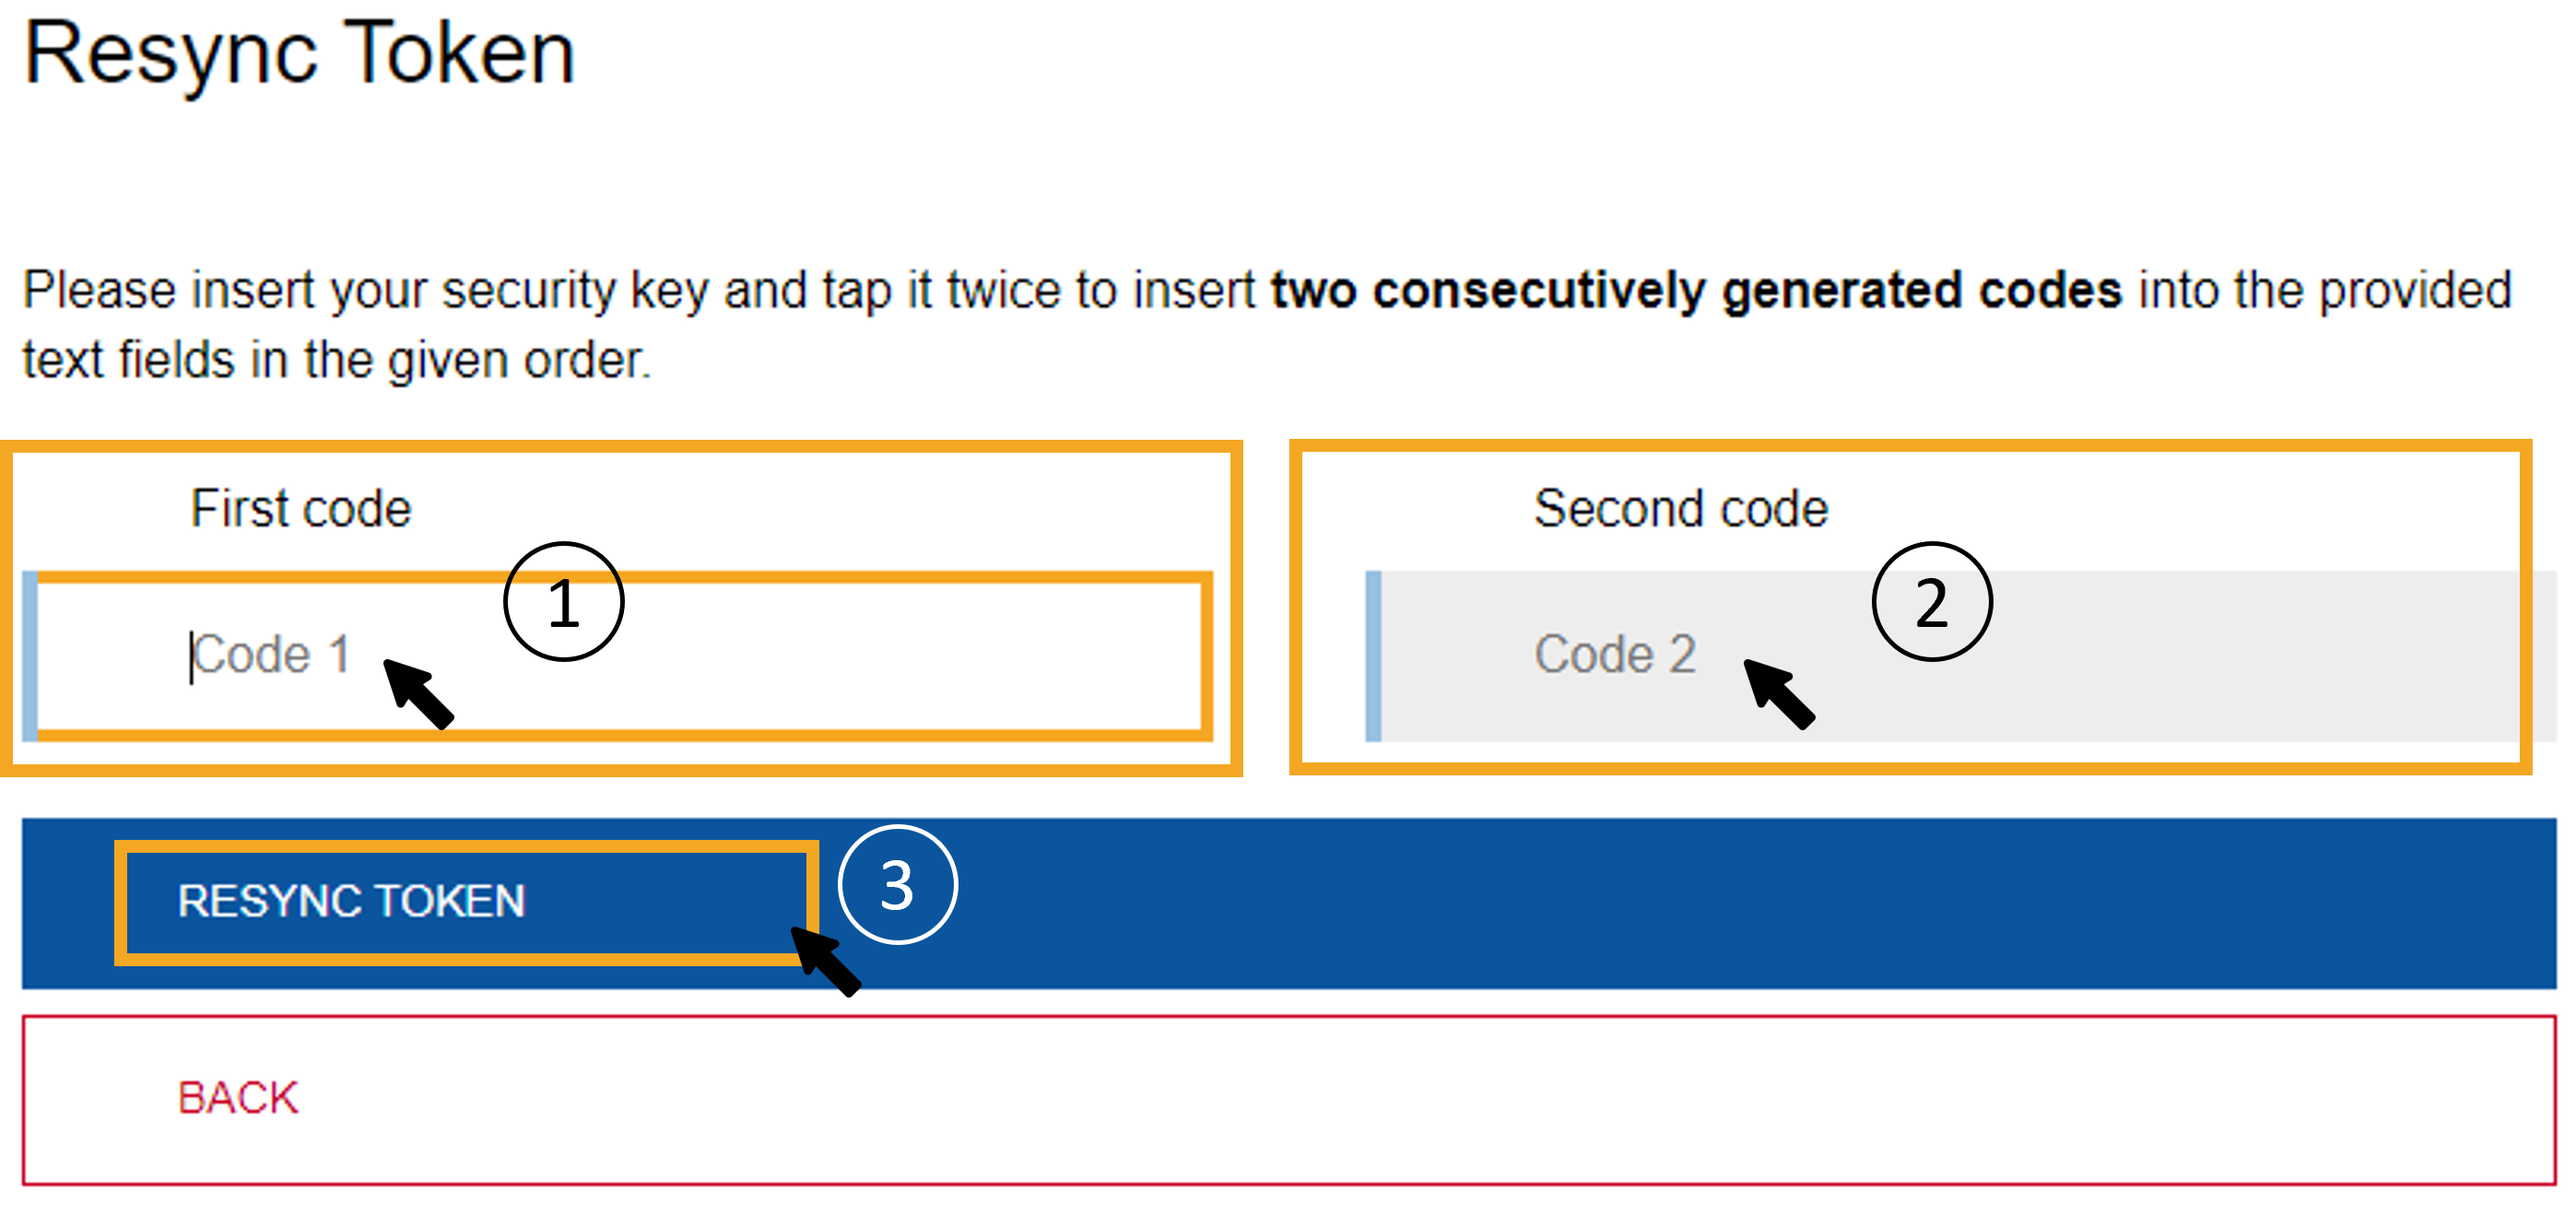
Step 3
Synchronization takes place automatically. If this is not the case, please click Resync token.
If the security key is still not accepted, you can delete it in the overview. This allows you to configure it again.
Please contact the IT-ServiceDesk if you experience any further problems.
