


s3 connection using s3cmd (Linux)

On this page you will learn how to connect to an s3-Client from the DigitalArchiv.
Required connection data
- For IPv4-only systems:
- Server name: https://digitalarchiv.hcp-carl-s3.dasi.rwth-aachen.de
- Port: 8483
- For IPv6-only systems:
- Server name: https://digitalarchiv.hcp-carl-s3.dasi.rwth-aachen.de
- Port: 443
- For IP DualStack:
- Server name: https://digitalarchiv.hcp-carl-s3.dasi.rwth-aachen.de
- Port: 443
- Access Key
- Secret Key
- Bucket Name
Configuration and connection with s3cmd
Step 1
Install s3cmd using pip:
pip install s3cmd
Step 2
Open the configuration settings for s3cmd:
s3cmd --configure
Step 3
Enter your access key:

Step 4
Enter your secret key:

Step 5
Choose the default region [US]: us-east-1:

Step 6
Enter the correct s3 endpoint and port for your bucket:
- IPv4:
- digitalarchiv.hcp-carl-s3.dasi.rwth-aachen.de:8483
- IP Dualstack and IPv6:
- digitalarchiv.hcp-carl-s3.dasi.rwth-aachen.de:443

When prompted to give the DNS-style bucket+hostname:port template for accessing a bucket: enter the address in the Form [BUCKETNAME].digitalarchiv.hcp-carl-s3.dasi.rwth-aachen.de:[IP PORT].

Step 7
Do not set an encryption key by pressing enter while leaving the field empty.

Step 8
Press enter to confirm that you want to use HTTPS protocol.
![The prompt asking whether to use the HTTPS protocol [Yes] is confirmed by pressing Enter.](https://api.app.rwth-aachen.de/v3/sabio/Manual/File/documents%2f0962a984657bb2e901657bc9e2810004%2f1jifm42ljvvhw%2f74f1bf55a2844360b7dc005169a27d9e%2f2026-07-07_HTTPS_Select.png)
Step 9:
Leave the HTTP Proxy server name empty and press enter, provided that no proxy has been specified in your instructions.
Step 10:
Leave the HTTP Proxy server port empty and press enter, provided that no proxy has been specified in your instructions.
Step 11:
Test the configuration. After the prompt Test access with supplied credentials? [Y/n] type Y and press Enter. s3cmd will try to connect to the endpoint with the configured credentials.

- If the test is completed successfully, the configuration is correct.
- An error message such as ERROR: Test failed: [Errno -3] Temporary failure in name resolution indicates that there is a DNS, VPN or network problem. It does not indicate a problem with the configuration.
If there is a problem, you will be prompted Retry configuration? [Y/n]. In this case you can abort the test with n in order to continue and save your configuration.
Step 12:
Save your configuration with y when prompted Save Settings? [y/N]:
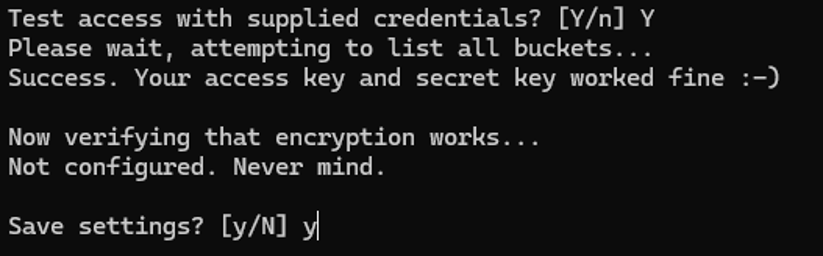
A confirmation that the configuration was saved is displayed:

Step 13:
The completed configuration should look as follows:

Next steps:
You can use the following commands after connecting to the bucket:
- List the objects in the bucket:
s3cmd ls s3://[bucket name]
- Download an object from the bucket:
s3cmd get s3://[bucket name]/[filename]
- Further information about the available commands in the bucket:
man s3cmd
