


Hardware Token for RWTH Single Sign-On (WebAuthn/FIDO)
![]()
On this page you will learn how to set up a hardware token that supports the WebAuthn/FIDO2 procedure. You can currently only use this token for RWTH Single Sign-On.
The Hardware token for RWTH Single Sign-On (WebAuthn/FIDO) is used with an external hardware component, a security key (e.g. Yubikey). Just like the "Hardware token for VPN and RWTH Single Sign-On (HOTP)", it is detached from the end device used and is therefore currently the most secure type of token at RWTH Aachen University.
The security key generates and transmits a one-time password so that you are forwarded to the desired service. The form of the one-time password depends on the hardware key used.
Important: When selecting the hardware key, make sure that it is compatible with the WebAuthn protocol used.
This token type can be used for authentication of the following services:
- RWTH Single Sign-On
Instruction for set up
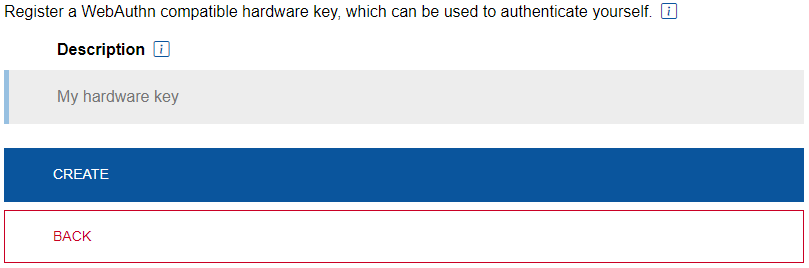
To configure this type of token, please choose "Hardware token for RWTH Single Sign-On (WebAuthn/FIDO2)" in the Token Manager in IdM Selfservice.
Step 1: Assign a self-selected, unique description for the token and click on "Create".
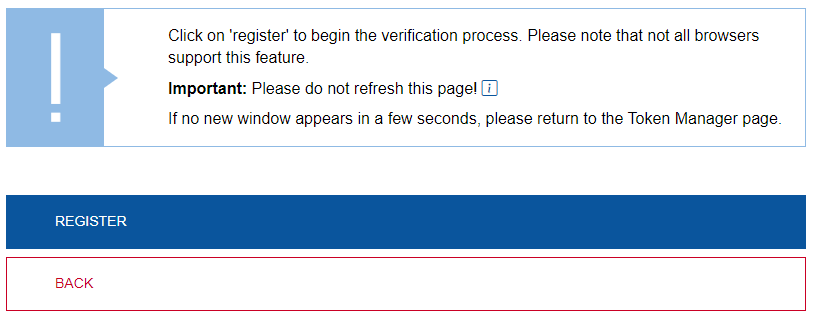
Step 2: Start the setup of the hardware token by clicking on "Register". Please note that not all browsers support this feature and if in doubt, use another browser (e.g. Chrome, Edge, Firefox).
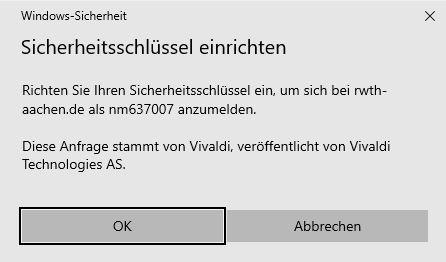
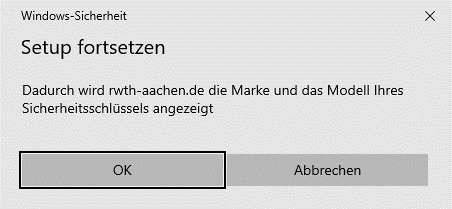
Step 3: To set up your hardware token, please follow the on-screen instructions.
Step 4: Whether a PIN is required depends on whether and how the hardware key was previously set up. When you are prompted to enter your PIN, enter a secure PIN of your choice.
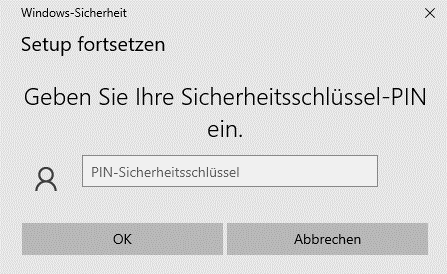
Important: When assigning the security key PIN, make sure that it cannot be seen by unauthorized third parties.
If your operating system does not have its own credential manager, such as that of Windows, the tokens are set up by your web browser:
Firefox
Do not anonymize your data in the first step, otherwise the token setup will fail:

Now the hardware key can be connected to the system. You may be asked for the PIN of the key:

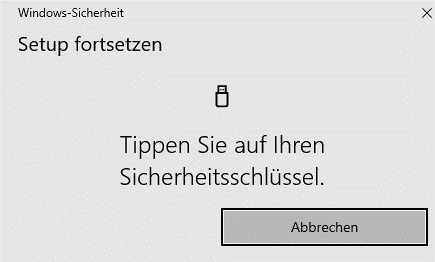
Complete the process by tapping the key:

Chrome
If there is no key connected to the system yet, you will be asked for the type of device to be used. Please select "USB security key":

Then follow the instructions on your screen.
